
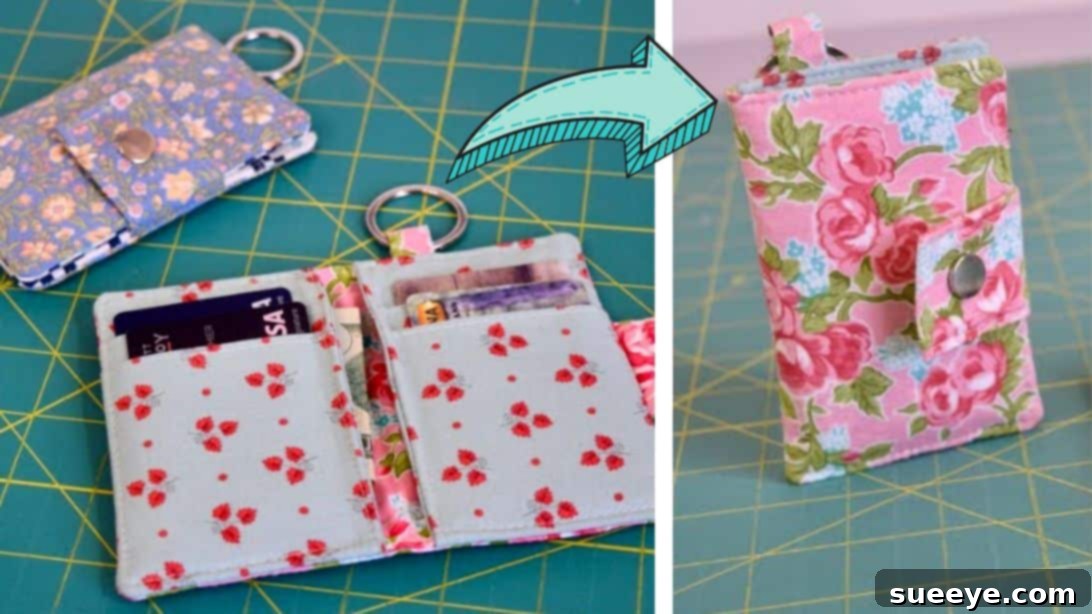
Sew Your Own Dainty Keychain Wallet: A Comprehensive DIY Tutorial
In our fast-paced lives, convenience is key. We often find ourselves juggling essentials, and a bulky bag isn’t always the most practical solution, especially for quick errands or minimalist outings. Like many, I prefer to carry just my absolute necessities: cards and cash. However, even a standard wallet can feel cumbersome when pockets are scarce or when you want to travel light. This is precisely where the charm of a dainty keychain wallet shines.
Imagine a compact, stylish accessory that keeps your vital cards and money secure, yet remains small enough to attach to your keys or slip into the tiniest of spaces. This isn’t just a fantasy; it’s a delightful reality you can create yourself! Inspired by the brilliant design from Yoan Sewing Studio, this DIY keychain wallet project offers both elegance and practicality. It’s incredibly cute, surprisingly spacious for its size, and perfectly suited for your everyday needs. Best of all, it’s a rewarding sewing project that even beginners can master with a little patience and precision.
This comprehensive tutorial will guide you through every step of crafting your very own personalized fabric card holder. Forget the hassle of carrying a larger bag; with this handy accessory, your essentials will always be within reach, neatly organized, and secured with a stylish flair. Let’s dive into creating a functional piece that reflects your personal style and makes carrying your essentials a breeze!
Why Choose a DIY Keychain Wallet?
Opting to sew your own keychain wallet isn’t just about saving money; it’s about creating a truly personalized and functional accessory that perfectly suits your lifestyle. Here are just a few compelling reasons why this project is worth your time and creative energy:
- Unleash Your Creativity: From selecting unique fabric patterns to choosing the perfect button snap, every element of this wallet can be customized to reflect your personal style. Imagine a wallet made from your favorite floral print, a sleek geometric design, or even upcycled denim for an eco-friendly touch!
- Perfectly Practical: Designed to hold essential cards and a bit of cash, this compact wallet eliminates the need for bulky purses or overflowing pockets. Attach it to your keys, toss it in a small clutch, or even use it as an emergency cash holder in your car. Its small footprint makes it incredibly versatile for any occasion.
- A Rewarding Project for All Skill Levels: While the finished product looks professionally made, the steps involved are straightforward and clearly outlined. With clear instructions and a little practice, even those new to sewing can achieve fantastic results, building confidence with each successful stitch and seam.
- Unique Gift Idea: Handmade gifts always hold a special place in the recipient’s heart. A custom-sewn keychain wallet makes a thoughtful and practical present for friends, family, or teachers, showing you put effort and care into their gift. It’s a gift that’s both personal and incredibly useful.
- Durability and Quality You Control: By choosing your own materials, you have complete control over the quality of your wallet. Select sturdy fabrics and appropriate interfacing to ensure your wallet stands up to daily wear and tear, lasting much longer than many mass-produced alternatives.
- Sustainable Crafting: Repurpose fabric scraps or remnants from other projects, reducing waste and giving new life to beautiful materials. This aligns with a more sustainable approach to fashion and accessories.
Essential Materials You’ll Need
Gathering your materials before you begin will ensure a smooth and enjoyable crafting experience. For this stylish keychain wallet, you’ll need the following items. Pay attention to the fabric types and interfacing as they contribute significantly to the wallet’s structure and durability, ensuring a professional and long-lasting finish.
- Fabric A: Approximately 1/6 yard or one fat eighth. This will be your main exterior fabric and for certain internal components like the button flap and ring tab. Choose a durable woven fabric such as quilting cotton, linen blend, or even a lightweight canvas for the best results. Consider a pattern or solid color that truly expresses your personal style!
- Fabric B: Approximately 1/8 yard. This fabric will be used for the pocket linings and other interior details. It can complement Fabric A beautifully or provide a fun, contrasting pop of color or pattern to add visual interest to the inside of your wallet.
- Firm Stabilizer: One piece measuring 6″ x 4 1/2″. This crucial component provides the necessary structure and rigidity to the exterior of your wallet, helping it maintain its shape, prevent sagging, and protect its contents. Look for heavyweight interfacing products like Pellon Peltex 70 or similar craft fuse stabilizers.
- Fusible Woven Interfacing: Approximately 1/3 yard. This interfacing is applied to various fabric pieces to add body, prevent stretching, and give a professional, crisp finish. It’s lighter than the firm stabilizer but equally important for the overall feel and longevity of your wallet, providing subtle support without bulk.
- Button Snap Closure: One complete set. This will secure your wallet’s flap, keeping your cards and cash safely inside. You have several options here: plastic KAM snaps (which require a special plier tool), metal hammer-on snaps, or even a magnetic snap for a different aesthetic. Choose one that matches your fabric and preference.
- Keychain Ring: One sturdy ring, ideally 1″ to 1 1/4″ in diameter. This allows you to easily attach your finished wallet to your keys, a larger bag, a lanyard, or even a belt loop, making it an incredibly versatile and accessible accessory. Ensure it’s strong enough for daily use.
(Note: The original video tutorial from Yoan Sewing Studio might offer visual guidance on selecting these materials, so refer back if you have any doubts about specific types or brands!)
Step-by-Step Guide to Sewing Your Keychain Wallet
Follow these detailed instructions to transform your chosen fabrics and materials into a stylish and functional dainty keychain wallet. Take your time with each step, and don’t hesitate to refer to the video tutorial for visual clarity.
Step 1: Precise Fabric Cutting for All Components
Accuracy in cutting is paramount for any sewing project, especially for small items like this wallet where every millimeter counts towards a neat finish. Take your time with this initial step to ensure all your pieces are perfectly sized, which will make the subsequent assembly much smoother. For best results, use a rotary cutter, a self-healing mat, and a quilting ruler, as these tools provide the highest precision.
For Panels 1 and 2 (Main Pocket Pieces):
- From Fabric B, cut two rectangles measuring 18″ x 3 1/2″ each. These longer pieces will form the main structure of your card pockets, providing the necessary depth and flexibility for expansion.
- From the Fusible Woven Interfacing, cut two rectangles measuring 17″ x 2 1/2″ each. These interfacing pieces will be applied to Panels 1 and 2 to give them additional body, prevent stretching, and help them maintain their shape.
For Pocket Linings:
- From Fabric B, cut two rectangles measuring 3 1/2″ x 5 1/2″ each. These pieces will serve as the inner lining for your card pockets, creating a clean, finished appearance.
For Panel 3 (Interior Body of the Wallet):
- From Fabric A, cut one rectangle measuring 7″ x 5 1/2″. This is the main interior piece where your card pockets will be securely attached.
- From the Fusible Woven Interfacing, cut one rectangle measuring 6″ x 4 1/2″. This interfacing will add stability and a smooth, professional finish to the interior of your wallet, providing a nice hand-feel.
For Panel 4 (Exterior Body of the Wallet):
- From Fabric A, cut one rectangle measuring 7″ x 5 1/2″. This is the visible outer shell of your keychain wallet. Choose your most appealing fabric for this piece, as it will be the first thing people see!
- From the Firm Stabilizer, cut one rectangle measuring 6″ x 4 1/2″. This heavy-duty stabilizer is essential for giving the wallet its firm structure and shape, ensuring it protects your contents and holds its form beautifully.
For the Ring Tab:
- From Fabric A, cut one small rectangle measuring 2″ x 1″. This small but mighty piece will securely hold your keychain ring, allowing you to attach the wallet.
For the Button Flap:
- From Fabric A, cut one rectangle measuring 5″ x 2″. This piece will form the flap that secures the wallet with the button snap.
- From the Fusible Woven Interfacing, cut a piece measuring 4″ x 1″. This interfacing will add crispness and structure to your button flap, ensuring it lays flat and closes securely.
Tip for Cutting: Always cut on a flat, stable surface. When cutting interfacing, it’s generally good practice to cut it slightly smaller than the fabric piece it’s being applied to. This prevents the interfacing adhesive from potentially gumming up your sewing machine needle when stitching close to the edge, and reduces bulk in the seam allowances.
Step 2: Reinforcing with Interfacing and Stabilizer
This step is crucial for giving your keychain wallet a professional feel, enhanced durability, and a well-defined structure. Fusible interfacing adds body and prevents stretching, while the firm stabilizer provides rigid support for the wallet’s exterior, ensuring it holds its shape beautifully.
- Apply Fusible Woven Interfacing: Take the fusible woven interfacing pieces you cut for Panel 1, Panel 2, Panel 3, and the Button Flap. Following the manufacturer’s instructions for your specific interfacing (which usually involves heat and steam), place the shiny, adhesive side of the interfacing onto the wrong side of the corresponding fabric piece. Carefully center the interfacing so that there’s an even border of fabric around its edges. Using a hot iron set to the appropriate temperature, press firmly and evenly to fuse the interfacing to the fabric. This process bonds the two layers, giving your fabric a crisp, stable foundation.
- Apply Firm Stabilizer: Now, take the firm stabilizer piece designated for Panel 4 (the exterior of the wallet). Position this stabilizer precisely in the center of the wrong side of Panel 4. Unlike fusible interfacing, this firm stabilizer is typically not ironed on; it will be secured in place during the stitching process of the final assembly. Ensure it is perfectly centered to maintain the wallet’s symmetry and structure.
- Mark Pleat Lines: On the wrong side of both Panel 1 and Panel 2 (the pieces with the fusible woven interfacing now securely attached), you will need to mark the pleat lines. These lines are essential guides for creating the expandable pockets. Refer to the video tutorial from Yoan Sewing Studio for precise measurements and placement of these lines. Typically, these marks indicate where you will fold and stitch to create the characteristic pleats that give your card pockets their capacity. Use a fabric marker or tailor’s chalk that will easily erase or disappear without leaving permanent marks.
Tip for Fusing: Always use a pressing cloth when fusing interfacing, especially if your fabric is delicate or heat-sensitive. This protects both your precious fabric and your iron from adhesive residue. Allow fused pieces to cool completely before handling them extensively, as this helps the adhesive bond properly and prevents shifting.
Step 3: Folding, Pressing, and Topstitching Pleats
The pleats you create in this step are what give your card pockets their expandable nature, allowing them to comfortably hold multiple cards without adding unnecessary bulk to the wallet when empty. This step requires careful folding and precise stitching for a neat and professional-looking finish.
- Fold and Press Pleats: Referencing the pleat lines you marked in Step 2 on Panels 1 and 2, carefully fold the fabric along these lines. Ensure your folds are crisp and even. Once folded, use a hot iron to firmly press the pleats into place. Sharp, precise folds are key here, as they will define the structure and neatness of your pockets. Repeat this exact process for both Panel 1 and Panel 2, ensuring they are mirror images or identical as needed.
- Topstitch the Pleat Lines: With the pleats neatly pressed and held in place, take your panels to your sewing machine. Using a coordinating or contrasting thread, topstitch along the folded edges of each pleat. This stitching not only secures the pleats permanently in their desired position but also adds a decorative, professional touch to the pocket panels. Ensure your topstitching is straight, even, and consistent in its distance from the fold.
- Trim the Bottom Edge: After all pleats are stitched and secured, align the bottom raw edge of Panel 1 and Panel 2. You may find that the pleating process has slightly altered the length or created unevenness. Carefully trim the bottom of both panels so they are perfectly straight and even. The exact final measurement here is less critical than ensuring a clean, straight raw edge for the next step, where they will be attached to the pocket lining.
Sewing Tip: When topstitching, lengthen your stitch length slightly (e.g., from a standard 2.5 to 3.0 or 3.5 on most machines). This creates a more aesthetically pleasing stitch line that is characteristic of topstitching and gives a more professional, tailored appearance.
Step 4: Constructing Pocket Panel 1 with its Lining
Now, we begin to assemble the individual pocket components, starting with Panel 1. This step involves attaching the main pocket piece to its lining, creating a clean and finished top edge for your first card slot. Precision here will lead to neat and functional pockets.
- Prepare for Stitching: Take Pocket Panel 1 (the larger piece with pleats from Fabric B) and one of the Pocket Lining pieces (the smaller 3 1/2″ x 5 1/2″ piece from Fabric B). Place these two pieces together with their right sides facing each other. Align them carefully along one of the longer sides (this will typically become the top opening of your first pocket). Ensure all raw edges are flush.
- Stitch the Side: Using your sewing machine, stitch along the aligned long edge with a precise 1/4″ seam allowance. It’s always helpful to backstitch at the beginning and end of your seam to secure the stitches and prevent them from unraveling, especially on areas that will see frequent use.
- Press the Seam Open: Once stitched, carefully open up the two fabric pieces and press the seam allowance open with a warm iron. This creates a flat, neat seam that significantly reduces bulk, ensuring a smooth and professional finish when the pocket is folded and turned.
- Topstitch for a Professional Finish: Fold the pocket lining to the wrong side of Pocket Panel 1, so the right side of Panel 1 is now fully visible, and the lining is neatly hidden behind it. Press this fold very well to create a crisp and defined top edge. Then, on the right side of the fabric, topstitch along the seam line you just created with a very narrow 1/8″ seam allowance. This topstitching will secure the lining in place, prevent it from rolling to the front, and add a clean, decorative edge to what will be the top of your first card pocket.
Precision Tip: A 1/4″ seam allowance is quite small, so using a sewing machine foot with a quarter-inch guide or marking your seam line with a fabric pen can be incredibly helpful for maintaining accuracy throughout your stitching. Consistent seam allowances are key to a well-proportioned wallet.
Step 5: Constructing Pocket Panel 2 with its Lining
This step closely mirrors Step 4, as you’ll be creating your second card pocket. It’s important to pay attention to which side you are stitching to ensure the pockets are correctly oriented and layered for installation in the subsequent steps.
- Prepare for Stitching: Take Pocket Panel 2 (the second pleated piece from Fabric B) and the remaining Pocket Lining piece (the other 3 1/2″ x 5 1/2″ piece from Fabric B). Place these two pieces together with their right sides facing each other. Align them along the corresponding long edge. Double-check your alignment to ensure proper pocket orientation, especially if your fabric has a directional print.
- Stitch the Side: Stitch along this aligned long edge using a precise 1/4″ seam allowance. Remember to backstitch at the beginning and end of the seam for added durability, as these areas will be stressed when cards are inserted and removed.
- Press the Seam Open: Just as before, open up the stitched pieces and press the seam allowance flat. This ensures a clean, bulk-free finish and helps the fabric lay smoothly.
- Topstitch for a Professional Finish: Fold the pocket lining to the wrong side of Pocket Panel 2, so the right side of Panel 2 is visible. Press this fold firmly to create a crisp top edge for your pocket. Then, topstitch along this newly formed edge with a narrow 1/8″ seam allowance. This completes the top edge of your second card pocket, making it ready for installation.
Once you’ve completed Steps 4 and 5, you should have two distinct pocket units, each with a neat top-stitched edge, ready to be integrated into the main wallet structure. The precision in these steps directly contributes to the functionality and aesthetic appeal of your finished dainty keychain wallet.
Step 6: Securing Pocket Panels to the Interior Wallet Body (Panel 3)
Now that your individual pocket units are complete, it’s time to attach them to the main interior panel of your wallet. This step brings the functional aspect of the card holder to life, creating the layered slots that make this wallet so practical.
- Orient Panel 3: Lay Panel 3 (the 7″ x 5 1/2″ piece of Fabric A with fusible interfacing already applied) right side up on your work surface. This will be the interior base of your wallet, so ensure it is clean and flat.
- Position Pocket Panel 1: Take Pocket Panel 1. Align its raw side edges and bottom edge with the corresponding raw edges of Panel 3. The topstitched edge of Pocket Panel 1 will be facing upwards, creating the opening for your cards. Pin or clip it securely in place, ensuring it is perfectly centered and straight on Panel 3.
- Stitch Pocket Panel 1: Stitch Pocket Panel 1 to Panel 3 along the two side raw edges and the bottom raw edge, using a small seam allowance (e.g., 1/8″ or 1/4″, as indicated in the video tutorial). This will create three stitched lines, effectively forming the first pocket. Remember to backstitch at the beginning and end of each seam to reinforce it.
- Position Pocket Panel 2: Next, take Pocket Panel 2. Position it on top of the already attached Pocket Panel 1, aligning its raw side edges and bottom edge with Panel 3 (and thus with Pocket Panel 1). This layering creates the distinct card slots. Again, pin or clip it securely, ensuring precise alignment to maintain the wallet’s symmetry and functionality.
- Stitch Pocket Panel 2: Stitch Pocket Panel 2 to Panel 3 along its two side raw edges and bottom raw edge, just as you did with Panel 1. This secures the second pocket in place. Double-check that all edges are neatly aligned and your stitching is straight, as this will be visible inside the finished wallet.
At this point, you should have Panel 3 with two functional card pockets stacked neatly on its right side. This layered design is what makes the wallet so efficient in organizing your cards and allows for compact storage.
Step 7: Crafting and Attaching the Ring Tab and Button Flap
These two small but significant components add both functionality (the convenient keychain attachment) and security (the button closure) to your wallet. Precision in creating and attaching them ensures they are sturdy, durable, and aesthetically pleasing.
- Prepare the Ring Tab: Take your small 2″ x 1″ Fabric A piece. Fold it lengthwise, wrong sides together, and press firmly to create a crisp fold down the center. Then, open it up and fold both long raw edges inward to meet the center fold line, pressing again. This encloses all raw edges and creates a neat, finished look. Finally, fold it in half again lengthwise, creating a narrow strip approximately 1/4″ wide. Topstitch along both long edges of this strip to secure the folds and give it a polished finish.
- Attach the Keychain Ring: Thread your chosen keychain ring through the prepared fabric tab. Fold the tab in half around the ring, aligning the raw ends.
- Position and Attach the Ring Tab: Refer to the Yoan Sewing Studio tutorial for the exact placement, but generally, the ring tab is attached to the top edge of Panel 4 (the exterior piece with firm stabilizer). Position the raw edges of the folded tab flush with the raw edge of Panel 4, ensuring the keychain ring extends outwards from the fabric edge. Baste or pin it securely in place, sewing it within the seam allowance to hold it there temporarily for the next step.
- Prepare the Button Flap: Take your 5″ x 2″ Fabric A piece and the 4″ x 1″ fusible woven interfacing. Fuse the interfacing to the wrong side of one half of the fabric flap piece, centering it carefully. Fold the fabric flap in half lengthwise, right sides together, and stitch along the long raw edge and one short raw edge, leaving the other short edge open for turning. Trim the seam allowances to reduce bulk and clip the corner close to the stitching line (without cutting through it) to ensure a crisp point when turned.
- Turn and Press the Flap: Turn the flap right side out through the open end. Use a point turner or a blunt tool to gently push out the corner to get a crisp, defined point. Press the flap flat with an iron, ensuring the stitched edges are smooth and the raw opening is neatly tucked inside. Topstitch around the three finished edges (the two long sides and the pointed/rounded end) for a professional look and to secure the raw edge of the opening.
- Install the Button Snap Closure: Following the manufacturer’s instructions for your chosen button snap type (e.g., plastic KAM snaps, metal snaps), install one half of the snap onto the prepared flap. Position it carefully in the center, near the finished end of the flap, ensuring it’s centered both horizontally and vertically.
- Position and Attach the Button Flap: Again, refer to the video for precise placement, but the button flap is typically centered along one of the short edges of Panel 4 (the exterior piece), usually the one that will become the top when the wallet is closed. Place the raw edge of the flap flush with the raw edge of Panel 4. Baste or pin it securely in place, ensuring it is neatly centered and sewn within the seam allowance.
Taking careful attention to detail in creating and attaching these smaller elements will greatly enhance the overall functionality, durability, and polished appearance of your finished dainty keychain wallet.
Step 8: Assembling the Main Wallet Body
This is where your wallet truly starts to take shape! You’ll be joining the interior (Panel 3 with pockets) and the exterior (Panel 4 with stabilizer, ring tab, and flap) together. Pay close attention to the seam allowance and remember to leave an opening that will allow you to turn the wallet right side out later.
- Align Panels 3 and 4: Place Panel 3 (the interior piece with pockets) and Panel 4 (the exterior piece with the firm stabilizer, ring tab, and button flap already basted in place) with their right sides facing each other. Align all the raw edges precisely. It’s crucial that the ring tab and button flap are tucked inwards, between the two main panels, so they don’t get accidentally caught in your main seam and are free once the wallet is turned. Pin or clip generously all around the perimeter to hold all the layers securely in place.
- Stitch Around the Perimeter: Using your sewing machine, stitch all around the perimeter of the wallet with a consistent 1/2″ seam allowance. Begin stitching from one side of the designated opening on the bottom edge, sew along the short end, up the long side, across the top short end, and down the other long side, stopping at the other side of your opening. Maintain a steady hand and a consistent seam allowance throughout.
- Leave a Turning Opening: Crucially, leave an unstitched opening of approximately 4″ along the bottom edge of the wallet. This opening is absolutely essential for turning the wallet right side out in the next step. Remember to backstitch securely at the beginning and end of your stitching on either side of this opening to reinforce the stitches and prevent them from unraveling when you turn the wallet.
- Clip the Corners: Carefully clip the corners of the wallet, very close to your stitch line but without cutting through it. This step reduces bulk in the corners, allowing them to turn out neatly and form crisp points, giving your wallet a much more professional finish.
- Trim Seam Allowances: Trim the seam allowances on the sides and the top of the wallet to about 1/4″ or 3/8″. You can leave the seam allowance around the opening a little wider (at 1/2″) to make it easier to fold under and press neatly later. Trimming reduces bulk, which is especially important for a small item, and helps the wallet lay flat and smooth once turned.
Important Note: Double-check that all your basted tabs (ring tab and button flap) are securely tucked inside and not accidentally caught in the main seam allowance where they shouldn’t be. Their raw edges should be aligned with the raw edges of the main panels, but the main body of the tab/flap should be safely within the interior space, away from the seam.
Step 9: Turning, Closing, and Final Topstitching
This final step brings your dainty keychain wallet to completion, transforming it from a collection of fabric pieces into a polished, functional accessory. Take your time with these finishing touches to ensure a neat, durable, and professional-looking end product.
- Turn Right Side Out: Carefully reach into the 4″ opening you left at the bottom of the wallet. Gently pull the entire wallet right side out through this opening. Take your time with this process, working the fabric slowly and easing out all the seams, especially around the corners. Use a point turner, a chopstick, or a similar blunt tool to gently push out all four corners from the inside, creating sharp, crisp points. Be careful not to push too hard, which could damage your stitching or poke through the fabric.
- Press and Prepare the Opening: Once the wallet is turned right side out, smooth out all the seams with your fingers, ensuring they are lying flat. Then, go to your ironing board. Take the raw edges of the 4″ opening and carefully fold them inward to the wrong side of the fabric, aligning them precisely with the existing seam line. Press this folded edge firmly with a warm iron to create a clean, closed seam. Use wonder clips or pins to hold this opening securely in place, preparing it for the final topstitch.
- Final Topstitching: With the opening neatly folded and pressed, take your wallet back to the sewing machine. Beginning a few inches before the opening (to make the start and end of the stitch less noticeable), topstitch all the way around the entire perimeter of the wallet, approximately 1/8″ to 1/4″ from the edge (matching the topstitching width you used on the pockets and flap for consistency). This final topstitch will securely close the turning opening permanently and add a beautiful, professional finish to the entire wallet, reinforcing all the edges and giving it a crisp outline. Remember to backstitch neatly at the beginning and end of your topstitching to secure it.
Congratulations! You have successfully sewn your own dainty keychain wallet. Take a moment to admire your handiwork and appreciate the beautiful, functional accessory you’ve created. Now you can easily organize your cards and cash in a compact, stylish way, always ready for your next adventure!
Tips for a Perfect Dainty Keychain Wallet
Even seasoned sewers can benefit from a few tips, and for those new to the craft, these pointers can make all the difference in achieving a professional-looking finish and a truly satisfying crafting experience:
- Choose Your Fabrics Wisely: Opt for high-quality woven fabrics like quilting cotton, linen, or lightweight canvas. These are durable, easy to work with, and hold their shape well when interfaced. Consider complementing patterns or contrasting colors for a unique and personalized look that stands out.
- Press, Press, Press!: Ironing is your best friend in sewing. Pressing seams open, folding, and edges after each step makes a huge difference in the neatness, flatness, and overall professionalism of your finished project. It helps fabric lie flat, seams align perfectly, and gives a crisp finish.
- Use the Right Tools: A rotary cutter, a self-healing mat, and a clear ruler are invaluable for precise cutting of all your fabric pieces. Good quality sharp fabric scissors, plenty of pins or wonder clips (especially helpful for thick layers), and a fabric marker or tailor’s chalk will also make your sewing journey smoother and more accurate.
- Practice Makes Perfect: If you’re new to sewing, don’t be afraid to practice stitching straight lines and consistent seam allowances on scrap fabric before working on your actual wallet pieces. A little practice can prevent frustration later on.
- Take Your Time: Rushing through steps often leads to mistakes, crooked seams, or uneven edges. Enjoy the process, pay meticulous attention to detail, and don’t hesitate to unpick a seam if it’s not quite right. Patience will always be rewarded with a beautiful, high-quality end product.
- Refer to the Video: The original Yoan Sewing Studio video tutorial is an excellent visual aid. If any written instruction seems unclear, watching the corresponding segment of the video can provide immediate clarification and demonstrate techniques visually.
- Secure Your Stitches: Always backstitch at the beginning and end of your seams to prevent them from unraveling. This is especially important on a functional item like a wallet that will experience daily wear and tear and frequent handling.
Personalize Your Keychain Wallet: Creative Customization Ideas
One of the greatest joys of DIY projects is the ability to infuse them with your unique style, transforming a functional item into a personal statement. Here are some ideas to make your dainty keychain wallet truly one-of-a-kind, reflecting your personality and creativity:
- Fabric Play: Experiment with different fabric textures and patterns. Use a luxurious velvet or cork fabric for the exterior, a playful polka dot for the interior lining, or a sleek metallic faux leather for a touch of glam. Consider adding subtle embroidery, appliqué designs, or even fabric painting to your exterior fabric before assembly for added unique detail.
- Embellishments: Add small iron-on patches, embroidered initials, or even tiny charms securely sewn onto the exterior. Just ensure any embellishments are relatively flat and securely attached so they don’t create excessive bulk or interfere with the wallet’s functionality when in use or when closing the flap.
- Hardware Upgrade: Instead of a standard keychain ring, consider using a decorative swivel clasp, a stylish D-ring, or a sturdy carabiner. These alternatives can offer a different look and potentially easier attachment to various bags, belt loops, or lanyards.
- Contrast Stitching: Choose a thread color that sharply contrasts with your fabric for all your topstitching. This can beautifully highlight the wallet’s construction lines and add an interesting, deliberate visual element that enhances its overall design.
- Interior Organization Enhancements: While this design provides two main pockets, if you feel confident enough to modify the pattern, you could adapt it slightly to add a small zippered coin pouch, an elastic loop for a pen, or even additional card slots if your needs require more organization.
- Gift Packaging: If you’re making this as a thoughtful gift for someone special, present it beautifully! Tie a coordinating ribbon around it, tuck it into a small gift box, or pair it with a matching handmade key fob or lip balm holder for a cohesive and charming set.
Let your imagination be your guide! This pattern is a fantastic canvas for your creativity, allowing you to craft a wallet that is not only highly functional but also a true reflection of your personal aesthetic and a joy to carry.
Your New Favorite Accessory: A Dainty DIY Keychain Wallet
And there you have it – a beautifully crafted, highly functional, and utterly adorable dainty keychain wallet, all made with your own two hands! This project is a testament to the power of thoughtful design and the immense satisfaction of creating something practical and pretty from scratch. Whether you’re tired of bulky bags, looking for a quick and easy way to carry your essentials, or simply love the idea of a unique handmade accessory, this DIY project is perfectly suited for your needs.
The compact size of this wallet makes it ideal for everyday use, offering unparalleled convenience. It’s perfect whether you’re heading to the grocery store for a quick run, going for a refreshing walk, enjoying a night out, or simply want to keep your essential cards and cash organized without the fuss and weight of a large purse. Attach it effortlessly to your keys, clip it securely inside your backpack, tuck it neatly into your coat pocket, or even carry it as a minimalist clutch – its versatility truly is unmatched.
We hope this comprehensive tutorial, inspired by the wonderful and creative designs of Yoan Sewing Studio, has empowered you to embrace your inner crafter and discover the joy of creating functional fabric accessories. Don’t hesitate to experiment with different fabrics, explore new embellishments, and personalize your wallet to truly make it your own. Your handmade keychain wallet is more than just an accessory; it’s a reflection of your creativity and a stylish solution to your everyday carrying needs. Happy sewing, and enjoy your fantastic new creation!