
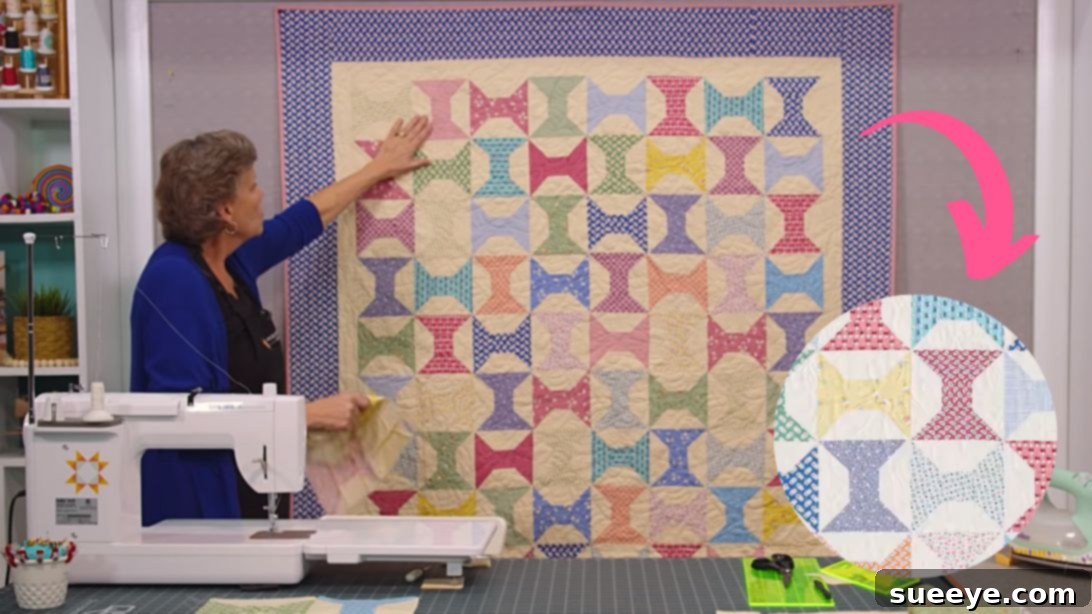
Master the ‘Spoolin’ Around’ Quilt: An Easy Tutorial for Beginners
Are you searching for a delightful quilt project that’s not only beautiful but also quick to finish? Look no further! The “Spoolin’ Around” quilt pattern is a fantastic choice, particularly for those new to the art of quilting. Its charming design and straightforward instructions make it an ideal project for beginners to build confidence and create something truly special. This tutorial will guide you through every step, ensuring a smooth and enjoyable quilting journey.
Join the renowned Jenny Doan from Missouri Star Quilt Company as she demonstrates how to bring this captivating spool quilt to life. With her clear, encouraging style, you’ll learn foundational techniques that can be applied to countless future projects. Get ready to transform simple fabric squares into a stunning visual display that resembles a collection of colorful thread spools. This is more than just a quilt; it’s a perfect blend of creativity, simplicity, and speedy satisfaction. Let’s dive into the detailed steps and start your “Spoolin’ Around” adventure today!
Why Choose the ‘Spoolin’ Around’ Quilt?
The “Spoolin’ Around” quilt stands out for several reasons, making it a favorite among quilters of all skill levels. For beginners, it offers a gentle introduction to piecing, cutting, and assembly without overwhelming complexity. The repetitive nature of the blocks allows for practice and mastery of basic techniques, leading to consistent results. Seasoned quilters will appreciate its speed; it’s the perfect pattern for a weekend project or when you need a quick gift. The use of pre-cut 10-inch squares (layer cakes) significantly reduces cutting time, allowing you to jump straight into the fun part – sewing! The finished quilt boasts a delightful, timeless appeal, reminiscent of a sewing room filled with vibrant threads, making it a cherished addition to any home.
Watch the full video tutorial by Jenny Doan from Missouri Star Quilt Company here:
Watch Jenny Doan’s Tutorial
Materials You’ll Need:
Gathering your materials beforehand ensures a seamless quilting experience. For this “Spoolin’ Around” quilt, we’re focusing on efficiency and visual appeal. Using pre-cut 10-inch print squares (often called “layer cakes”) saves a significant amount of cutting time and provides a beautiful assortment of coordinating fabrics. The background fabric is crucial for making your colorful spools truly pop, creating a cohesive and inviting look. The outer border adds a finishing frame, while the binding provides a durable and attractive edge. Don’t forget the backing fabric, which is the foundation of your quilt and often a place to add another layer of personality.
- 1 pack of 10″ print squares: Also known as a “layer cake,” this provides a wonderful variety of coordinating fabrics for your spool centers.
- 2 3/4 yards for the background fabric: Choose a solid or a subtle tone-on-tone fabric that contrasts well with your print squares, allowing them to stand out.
- 1 1/4 yards for the outer border: This fabric will frame your quilt, so select one that complements your chosen prints and background.
- 3/4 yard for binding: The binding provides a durable and attractive finish to the edges of your quilt. It can match the border, background, or be a coordinating print.
- 4 3/4 yards for backing: This is the fabric for the back of your quilt. Consider a soft, cozy flannel or a wide-back quilting cotton for comfort and ease of use.
- Basic Quilting Tools (recommended): Rotary cutter, self-healing cutting mat, quilting ruler, sewing machine, thread, fabric scissors, pins or wonder clips, iron and ironing board.
Step-by-Step ‘Spoolin’ Around’ Quilt Instructions:
Follow these detailed steps to construct your charming “Spoolin’ Around” quilt block by block. Remember to maintain a consistent 1/4-inch seam allowance throughout your sewing for the best results, and press your seams carefully after each step to ensure flatness and accuracy.
Step 1: Preparing Your Fabric for the Spool Blocks
Precision in cutting is the foundation of a beautiful quilt. Begin by selecting four pieces of 10-inch print squares. Arrange them in a way that pleases your eye – consider varying colors and patterns to create visual interest. Lay these four squares neatly aligned, ensuring they are stacked straight. With your rotary cutter and a reliable quilting ruler, make a precise 6 1/2-inch cut across all four layers. This will yield a larger section and a smaller section from each square.
Next, focus on the larger 6 1/2-inch sections. Turn these sections and cut them into 2 1/2-inch strips. You’ll be making multiple strips from each of these sections. These strips will form the outer edges of your spool blocks, so accuracy is key. Now, take the remaining smaller halves (the initial 3 1/2-inch sections). From these, cut across 5 inches. Then, from that 5-inch piece, cut it into 2 1/2-inch segments, and then again cut across 2 1/2 inches to create 2 1/2-inch squares. These smaller 2 1/2-inch squares will serve as the little center spools, providing the vibrant “thread” effect. For each individual quilt block you intend to make, you will need 6 pieces of 2 1/2-inch background squares. These will create the structure around your printed spool centers.
Step 2: Constructing Panel A – The Spool Center
This step focuses on assembling the central part of your spool block. Take two of your precisely cut 2 1/2-inch background squares. These will flank your colorful spool center. Now, select one of the printed 2 1/2-inch squares that you cut in Step 1. This square will become the visible “thread” of your spool. Carefully place this printed square in the middle, between the two background squares. Ensure all raw edges are aligned perfectly. Using a consistent 1/4-inch seam allowance, sew these three pieces together in a strip. Press your seams open or towards the darker fabric (depending on your preference and fabric choices) to reduce bulk and ensure your panel lies flat. This completed strip is known as Panel A, and it forms the core of your spool block.
Step 3: Adding the Distinctive Spool Edges
Now it’s time to create the unique shape that makes these blocks resemble thread spools. For the outside edges of your spool, retrieve two of the 2 1/2-inch strips you prepared in Step 1. These strips will be sewn to the top and bottom of your newly created Panel A. Position one strip along the top edge of Panel A and the other strip along the bottom edge, right sides together. Next, take two more 2 1/2-inch background squares. These will be added to the ends of the top strip. Place one background square at each end of the top strip, right sides together, ensuring they align with the edges of Panel A below. Before sewing, you’ll need to draw a diagonal line from one corner to the opposite corner on the wrong side of each of these two background squares. This line should descend towards the middle of the strip. Sew directly along these diagonal lines. Repeat this process for the bottom strip, attaching two more 2 1/2-inch background squares to its ends, also sewing diagonally towards the middle.
Once sewn, carefully cut off the excess fabric from the outer corners, leaving a 1/4-inch seam allowance beyond your sewn diagonal lines. Then, press the seams open towards the middle of the strips. This pressing technique is crucial for creating sharp points and a flat block. As you press, you will see the distinctive angled edges of the spool take shape, making your center panel truly stand out.
Step 4: Assembling the Complete Spool Block
With Panel A and your two new spool edge panels prepared, you are now ready to bring them together to form a complete “Spoolin’ Around” block. Lay all three panels together in their correct order: one spool edge panel, followed by Panel A in the middle, and then the second spool edge panel. Ensure that all raw edges are perfectly aligned. Pin the panels together carefully, especially where seams meet, to help them nest and create crisp intersections. Using your consistent 1/4-inch seam allowance, sew the three panels together. After sewing, gently press your seams flat. You can choose to press them open for less bulk or press them towards the outer strips, depending on what will make the block lie flattest and minimize shadowing with lighter fabrics. Take a moment to admire your first finished spool block! Repeat these steps to create as many identical blocks as needed for your desired quilt size. Consistency in your piecing will lead to a wonderfully cohesive quilt top.
Step 5: Arranging and Sewing Blocks into a Four-Patch Unit
Once you have a collection of individual spool blocks, it’s time to assemble them into larger units that will form your quilt top. A common and effective method for this pattern is to create four-patch units. Gather four of your completed spool blocks. This is where you’ll see the magic of the pattern emerge! Lay them out in a two-by-two grid, creating a larger square (a four-patch). For the first row, place the first block horizontally and the second block vertically. For the second row, place the first block vertically and then the second block horizontally. This alternating orientation is key to creating the continuous, intertwining spool design across your quilt. Carefully sew the two blocks in the first row together. Then, sew the two blocks in the second row together. After sewing each pair, press the seams open or to one side, nesting them if possible, to minimize bulk where the seams intersect. Finally, sew the two rows together, aligning the central seams for a crisp intersection. Press this final seam flat. Repeat this process to create as many four-patch units as required for your desired quilt size.
Step 6: Assembling the Quilt Top and Adding Borders
With your four-patch units (or individual blocks, depending on your chosen layout) complete, you’re ready to assemble the entire quilt top. Following the layout from the Missouri Star Quilt Company tutorial, you will typically sew 5 rows with 4 blocks (or four-patch units) in each row. Lay out all your assembled units on a design wall or on the floor to visualize the final arrangement and ensure you’re happy with the color distribution and block orientation. Sew the blocks within each row together, maintaining your consistent 1/4-inch seam allowance. Press the seams for each row in alternating directions (e.g., press seams of row 1 to the right, row 2 to the left, etc.) to allow for nesting when you join the rows. Then, sew your rows together, carefully pinning at seam intersections to ensure everything lines up perfectly. Press the final seams flat.
Finally, it’s time to add the borders that frame your beautiful quilt. First, add a 2 1/2-inch inner border. Measure the length and width of your quilt top accurately through the center, cut your border strips to these precise measurements, and sew them to the quilt top, starting with the side borders and then the top and bottom. Press seams towards the border. Next, add the larger 6-inch outer border using the same technique. This final border not only enhances the quilt’s visual appeal but also helps to square up your quilt top, preparing it for batting and backing. Congratulations, your “Spoolin’ Around” quilt top is now complete and ready for layering, quilting, and binding!
Tips for Quilting Success:
- Accurate Cutting is Key: Invest in a good rotary cutter, mat, and ruler. Measure twice, cut once! Even a slight variation can throw off your block alignment.
- Consistent Seam Allowance: A perfect 1/4-inch seam allowance is crucial. Practice on scraps to ensure your machine’s setting is spot on. Many quilters use a 1/4-inch foot.
- Pressing Matters: Pressing after each seam helps your blocks lie flat and keeps your points sharp. Experiment with pressing seams open or to the side to see what works best for your fabric and pattern.
- Chain Piecing: To speed up your process, especially with repetitive blocks, use chain piecing. Sew multiple units one after another without lifting the presser foot or cutting threads in between.
- Fabric Selection: Don’t be afraid to play with colors and patterns. The “Spoolin’ Around” quilt looks fantastic with high-contrast fabrics, but subtle variations can also create a stunning effect.
- Stay Organized: Keep your cut pieces organized by step or block to avoid confusion. A design wall or even just a clean floor space can be invaluable for laying out your blocks.
- Enjoy the Process: Quilting is a journey, not just a destination. Embrace any learning curves and celebrate your progress along the way.
About Jenny Doan and Missouri Star Quilt Company
Jenny Doan, the beloved face of Missouri Star Quilt Company (MSQC), has revolutionized the quilting world with her engaging, easy-to-follow video tutorials. Known for her warm personality and knack for simplifying complex patterns, Jenny has inspired millions to pick up a needle and thread. Missouri Star Quilt Company, based in Hamilton, Missouri, started as a family business and grew into the largest quilting tutorial channel on YouTube. They are celebrated for making quilting accessible, fun, and less intimidating for beginners, offering a vast array of patterns, fabric, and tools. This “Spoolin’ Around” quilt tutorial is a perfect example of Jenny’s approach, breaking down a beautiful design into manageable, enjoyable steps.
Your Finished ‘Spoolin’ Around’ Quilt!
Congratulations on completing your “Spoolin’ Around” quilt! Whether this is your very first quilt or one of many, the sense of accomplishment is truly rewarding. This charming design, with its playful “spools” of color, makes a wonderful lap quilt, a decorative wall hanging, or a cherished gift for a loved one. The techniques you’ve learned here, from precise cutting to careful pressing and block assembly, are fundamental skills that will serve you well in all your future quilting endeavors. We hope you enjoyed this journey with Jenny Doan and Missouri Star Quilt Company. Now that you’ve mastered the ‘Spoolin’ Around’ quilt, you have a beautiful piece to show for your efforts and a solid foundation for your next creative project!