
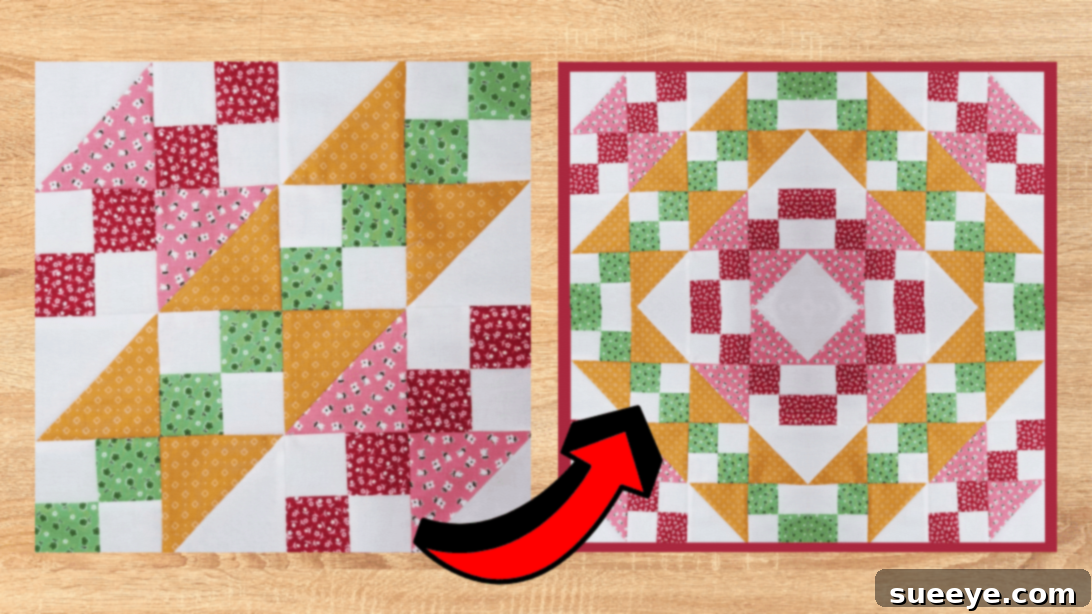
Embark on a delightful quilting journey with the captivating State House Quilt Block, an exquisite design brought to life by the talented Sunrise Quilt Studio on YouTube. This block boasts a remarkably intricate and visually appealing design that might initially seem challenging to many quilters. However, you’ll be pleasantly surprised to discover just how straightforward and enjoyable it is to piece together, making it an ideal project even for those new to the art of quilting. Its elegant structure and versatile aesthetic make it a perfect addition to any quilter’s repertoire.
The beauty of the State House Quilt Block lies in its simplicity of construction. It is primarily composed of two fundamental quilting units: half-square triangles (HSTs) and 4-patch block units. This clever combination allows for endless creative possibilities when it comes to fabric selection. You can easily personalize this block by using any combination of fabrics you desire, whether you prefer vibrant contrasts, subtle gradients, or a harmonious blend of colors and patterns. Once completed, this stunning quilt block is incredibly versatile and can elevate a wide array of projects, including elegant table toppers, charming table runners, beautiful hanging quilts, decorative throw pillows, or even as a core component in a larger, full-sized quilt. The potential applications are limited only by your imagination, making it a truly rewarding DIY quilting endeavor.
RELATED: Enhance your quilting skills further with this Super Easy Courthouse Steps Quilt Block Tutorial, another excellent project for beginners looking to expand their knowledge of foundational quilt blocks.
Essential Materials for Crafting Your State House Quilt Block
To ensure a smooth and enjoyable quilting experience, gathering all your materials beforehand is crucial. Precision in cutting and stitching is key to a beautiful finished block, so investing in good quality tools will make a significant difference. Here’s a detailed list of what you’ll need:
- Pink Fabric: A vibrant or soft pink fabric will add a lovely touch to your block, contributing to the overall color scheme.
- Gold Fabric: Introduce a warm and rich tone with a beautiful gold fabric, perfect for creating contrast and depth.
- Red Fabric: A classic red fabric can provide a bold statement or a subtle accent, depending on your design preferences.
- Green Fabric: Complement your chosen colors with a refreshing green fabric, offering a natural and balanced element.
- Background Fabric: Select a neutral background fabric, such as white, cream, or a light gray, to make your colorful pieces truly pop and define the intricate pattern.
- Marking Pen, Pencil, or Chalk: Essential for drawing precise lines on your fabric, especially for half-square triangles. Choose one that is easily visible on your chosen fabrics and disappears after use.
- Ruler: A clear, sturdy quilting ruler with accurate measurements is indispensable for precise cutting and trimming.
- Scissors or Rotary Cutter and a Cutting Mat: A sharp pair of fabric scissors is fundamental, but a rotary cutter paired with a self-healing cutting mat offers unparalleled speed and accuracy for cutting multiple fabric layers.
- Fabric Pins: High-quality, sharp pins are vital for holding fabric pieces together securely before stitching, ensuring alignment and preventing shifting.
- Needle and Thread: Opt for a good quality all-purpose sewing thread that matches your fabrics or a neutral color like white or light gray. Ensure your sewing machine needle is sharp and appropriate for quilting cotton.
- Iron, for Pressing: A reliable iron and ironing board are critical for achieving flat, crisp seams, which contribute significantly to the overall accuracy and professional finish of your quilt block.
- Sewing Machine: A well-maintained sewing machine is your primary tool for stitching. Ensure it’s threaded correctly and that you are comfortable with its basic operations.
- Pattern (Click here to download the pattern): Don’t forget to download and print the official pattern. This will provide all the necessary cutting dimensions and assembly diagrams specific to the State House Quilt Block.
Step-by-Step Guide: How to Craft Your State House Quilt Block
Creating the State House Quilt Block is a rewarding experience that combines foundational quilting techniques with a beautiful design. Follow these detailed steps carefully, paying attention to precision and pressing, to ensure your block comes together flawlessly.
Step 1: Preparing Your Fabrics and Initial Half-Square Triangle (HST) Construction
Begin by downloading and accurately printing the State House Quilt Block pattern. Ensure your printer settings are correct so that the pattern prints at 100% scale, preventing any distortion in your block’s final size. Once you have the pattern, carefully cut all your chosen fabrics to the specified dimensions. Precision in this initial cutting stage is absolutely critical for a perfect block. Use a sharp rotary cutter and a reliable quilting ruler for the most accurate results. Next, we’ll start creating the half-square triangles, which are a cornerstone of this design. Take one square of fabric designated as ‘A’ and one square of fabric designated as ‘E’. Stack these two squares together with their ‘right sides facing’ each other, ensuring all edges are perfectly aligned. Using your marking pen, pencil, or chalk, draw a clear diagonal line from one corner to the opposite corner on the ‘wrong side’ of the lighter fabric. This line will serve as your guide for stitching.
Step 2: Stitching, Cutting, and Trimming Your Half-Square Triangles
With your fabrics aligned and the diagonal line drawn, it’s time to stitch. Carefully sew a scant ¼ inch seam allowance along both sides of the drawn diagonal line. This precise seam allowance is fundamental for ensuring your finished half-square triangles will be the correct size after trimming. Once stitched, use your scissors or rotary cutter to cut the unit apart directly along the drawn diagonal line. You will now have two raw half-square triangle units. Take these units to your ironing board and press the seams towards the ‘E’ triangle (typically the darker fabric). Pressing seams towards the darker fabric helps to prevent seam allowance show-through on the lighter fabric. After pressing, it’s essential to trim and square up your new HST units. Using a square quilting ruler, carefully trim each unit to a perfect 4½-inch square. Squaring up is a vital step that removes any slight distortions from stitching and ensures all your blocks are uniform in size, making final assembly much easier. For the ‘A’ and ‘E’ fabric combination, you will need to create two of these perfectly squared HST units. Repeat the entire process for the ‘B’ and ‘E’ squares, making four of this particular set. Finally, create two sets of HSTs using the ‘A’ and ‘B’ squares. Consistency in these steps will ensure a beautifully balanced quilt block.
Step 3: Assembling 4-Patch Units and Final Block Construction
Now that your half-square triangles are complete, it’s time to construct the 4-patch units. Begin by stitching together one ‘F’ square and one ‘C’ square side-by-side, using a consistent ¼ inch seam allowance. You will need to make eight of these two-piece units in total. Once you have these, refer to your pattern to arrange them into 4-patch units. Typically, this involves pairing two of these two-piece units and stitching them together, carefully nesting your seams at the intersection to create a flat center point. Create four of these precise 4-patch units using the ‘F’ and ‘C’ squares. Repeat this same process for the ‘D’ and ‘F’ squares, again creating four 4-patch units from this combination. As you go, press all seams meticulously according to the pattern’s instructions or by alternating pressing directions to reduce bulk. With all your individual units prepared (HSTs and 4-patch blocks), you can now begin to assemble the main State House Quilt Block. Lay out all your units according to the arrangement shown in the pattern. This visual guide is invaluable for ensuring correct placement. First, stitch the units together into horizontal rows, carefully matching all seam intersections and pinning them securely before sewing to prevent shifting. Then, stitch these completed rows to each other, again taking care to align all vertical seams perfectly. After each seam, take your block to the ironing board and press the seams. This final pressing step will flatten the block, setting the stitches and preparing it for integration into a larger quilt project. Take your time, enjoy the process, and admire your beautifully crafted State House Quilt Block!
*All these amazing images and the inspiring tutorial are thanks to Sunrise Quilt Studio via YouTube. We highly encourage you to visit her channel to explore more fantastic quilting projects, gain valuable tips, and discover a community passionate about fabric artistry!
Mastering the State House Quilt Block: Your Next Quilting Adventure
Congratulations on completing your State House Quilt Block! This project is a testament to the fact that even seemingly complex designs can be broken down into simple, manageable steps, making them accessible to quilters of all skill levels. By mastering the half-square triangle and 4-patch units, you’ve not only created a beautiful block but also enhanced your fundamental quilting skills. The State House Quilt Block offers endless possibilities for creativity. Whether you choose to incorporate it into a larger quilt, create a series of blocks for a unique wall hanging, or design a decorative item for your home, its striking pattern is sure to impress. Don’t hesitate to experiment with different fabric choices and color palettes to truly make this design your own. Share your finished projects with the quilting community and inspire others to embark on their own creative journeys. Happy quilting!