
Mastering “Tomatoes in the Snow”: A Delicious & Easy Home Canning Guide
Every year, the fertile soil of the Texas Hill Country blesses us with an abundant harvest of plump, sun-ripened tomatoes. These homegrown treasures are truly a delight, bursting with flavor unmatched by anything you’d find in a store. However, with such a generous yield comes a familiar challenge: how to enjoy every single one before they pass their prime. The desire to preserve this peak-season goodness has always been strong, and the art of home canning presented itself as the perfect solution. That’s why, upon discovering the enchanting “Tomatoes in the Snow” video recipe tutorial by My Kitchen Tanja on YouTube, I was instantly captivated. This method, featuring whole canned tomatoes with garlic, promised not only ease but also a unique aesthetic that truly lives up to its name. It was the ideal way to transform my next batch of fresh Hill Country tomatoes into a year-round pantry staple.
Embarking on this canning journey was far simpler than I anticipated. The instructions were exceptionally clear, guiding me through each step with confidence. For those new to canning, the initial investment in a few essential supplies is minimal. I quickly sourced a basic canning bath kit, complete with a convenient basket insert, a wide-mouth funnel for spill-free filling, and trusty jar tongs for safe handling of hot jars—all readily available at local retailers like Walmart. As for the iconic Mason jars, these versatile containers can be found at great value at Dollar Tree, Michael’s craft store, Hobby Lobby, or any major supermarket. With just these few tools and a passion for preserving, you’re well on your way to enjoying homemade canned tomatoes that taste like summer, no matter the season.
Why Embrace Home Canning? The Joys of Preserving Your Harvest
Beyond simply preventing waste, home canning offers a multitude of benefits that extend far beyond the kitchen. It’s an empowering practice that connects you more deeply with your food and the cycle of the seasons. Here’s why canning tomatoes, especially a delightful recipe like “Tomatoes in the Snow,” is an endeavor worth undertaking:
- Unmatched Freshness and Flavor: When you can tomatoes at their peak ripeness, you lock in their vibrant flavor and nutritional value. Store-bought canned tomatoes often lack the depth and sweetness of homegrown varieties.
- Control Over Ingredients: You decide what goes into your jars. No artificial preservatives, excessive sodium, or unwanted additives. This is especially important for those with dietary restrictions or a desire for clean eating.
- Cost-Effective: If you grow your own tomatoes, canning them is a highly economical way to stock your pantry. Even buying fresh tomatoes in bulk during peak season and canning them can be cheaper than purchasing commercially processed alternatives throughout the year.
- Sustainable Living: Reducing food waste and relying less on industrially produced goods contributes to a more sustainable lifestyle.
- Year-Round Enjoyment: Imagine the delight of opening a jar of your “Tomatoes in the Snow” in the dead of winter, instantly bringing the taste of summer to your meals. They are perfect for sauces, stews, soups, or even as a simple side dish.
- A Sense of Accomplishment: There’s immense satisfaction in seeing your pantry shelves lined with jars of your own beautifully preserved food. It’s a skill that builds confidence and provides a tangible reward for your efforts.
“Tomatoes in the Snow”: A Culinary Delight and Visual Feast
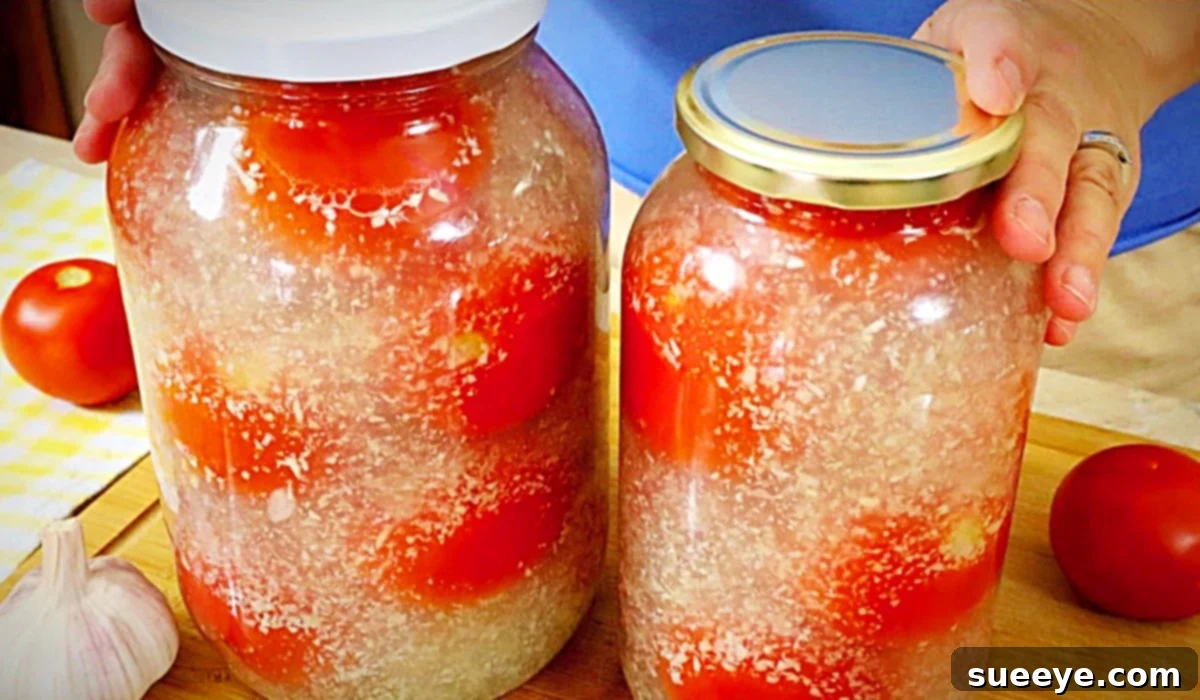
The intriguing name “Tomatoes in the Snow” becomes clear once you see the finished product. The whole cloves of garlic, suspended in the clear preserving liquid alongside the vibrant red tomatoes, create a beautiful, almost whimsical effect reminiscent of a snowy landscape. But this recipe is more than just pretty; it’s incredibly flavorful. The garlic infuses the tomatoes with a gentle aromatic depth, complemented by a perfectly balanced brine that highlights the natural sweetness and acidity of the tomatoes. This particular recipe from My Kitchen Tanja stands out for its simplicity, making it an excellent choice for first-time canners while still impressing seasoned enthusiasts.
Essential Ingredients for Your “Tomatoes in the Snow”
Gathering your ingredients is the first exciting step in any culinary adventure, and this recipe calls for simple, wholesome components that come together to create something truly special. The quality of your produce will significantly impact the final flavor, so always opt for the freshest available.
Ingredients List:
- 2.5 kg. of Ripe Tomatoes: Choose firm, blemish-free tomatoes. While many varieties work, Roma or other paste tomatoes are often preferred for canning due to their lower water content and firmer flesh, which helps them hold their shape. However, this recipe works beautifully with round slicing tomatoes as well.
- 20 cloves of Fresh Garlic: This is where the “snow” comes from! Use fresh garlic for the best flavor. Peel them carefully, keeping them whole.
- 100 ml. of White Vinegar (5% acidity): Vinegar is crucial for safety in water bath canning as it helps ensure the brine reaches a safe pH level. It also adds a pleasant tang that brightens the tomato flavor. Always use vinegar with at least 5% acidity.
- 100 grams of Granulated Sugar: Sugar balances the acidity of the tomatoes and vinegar, enhancing the overall flavor profile without making the tomatoes overly sweet.
- 2 tablespoons of Canning Salt (or pickling salt): It’s important to use canning or pickling salt, which is free of anti-caking agents and iodine. These additives can cause cloudiness or discoloration in your canned goods. Regular table salt is not recommended.
- 2 liters of Water: This will form the base of your brine. Ensure it’s clean, filtered water if your tap water has a strong mineral content.

Detailed Directions for Canning “Tomatoes in the Snow”
This comprehensive guide, inspired by the excellent “My Kitchen Tanja” video tutorial, will walk you through each step of creating these delectable canned tomatoes. Precision and cleanliness are paramount in canning to ensure both safety and quality.
Step-by-Step Canning Process:
-
Prepare Your Canning Equipment:
Before you even touch your tomatoes, ensure all your canning equipment is clean and ready. Wash your Mason jars, lids, and bands in hot, soapy water and rinse thoroughly. While modern canning guidelines often state that pre-sterilization of jars isn’t strictly necessary if processing time is 10 minutes or more, it’s good practice to heat your jars to prevent breakage when hot liquid is added. Place your empty jars in your water bath canner, fill the canner with water to cover the jars by at least an inch, and bring it to a simmer (around 180°F or 82°C). Keep the jars hot until you are ready to fill them. Set new flat lids aside; they do not need to be boiled but can be warmed in hot (not boiling) water just before use to soften the sealing compound. Bands do not need to be heated.
-
Prepare Your Tomatoes:
Wash your 2.5 kg of tomatoes thoroughly under cool running water. Gently scrub away any dirt. For this recipe, the tomatoes are canned whole. If they are very large, you might want to halve or quarter them to fit better into the jars. Remove any stems or blemishes. For smaller tomatoes, a quick prick with a clean needle or toothpick can help prevent them from bursting during processing.
-
Prepare the Garlic:
Peel the 20 cloves of garlic. Ensure they are whole and clean. These will be added directly to the jars with the tomatoes, creating that signature “snow” effect and infusing the tomatoes with their pungent aroma.
-
Fill the Jars:
Carefully remove your hot jars from the canner using jar tongs, pouring any hot water back into the canner. Place them on a clean, heat-safe surface. Into each hot jar, place several whole garlic cloves. Then, gently pack your prepared whole (or halved/quartered) tomatoes into the jars. Pack them as snugly as possible without crushing them, leaving about 1/2 inch of headspace from the rim of the jar. This headspace is crucial for proper sealing.
-
Prepare the Brine:
In a large saucepan, combine the 2 liters of water, 100 ml of white vinegar, 100 grams of sugar, and 2 tablespoons of canning salt. Bring this mixture to a rolling boil, stirring occasionally to ensure the sugar and salt are fully dissolved. Allow it to boil for at least 1-2 minutes to ensure all ingredients are well incorporated and the brine is thoroughly heated.
-
Pour the Brine:
Using a wide-mouth funnel, carefully ladle the hot brine over the tomatoes in each jar. Pour until the brine covers the tomatoes and reaches the 1/2-inch headspace mark. Use a non-metallic utensil (like a plastic chopstick or rubber spatula) to gently release any air bubbles trapped between the tomatoes. Press the tomatoes down gently if needed, and add more brine to maintain the 1/2-inch headspace.
-
Seal the Jars:
Wipe the rims of each jar thoroughly with a clean, damp cloth to remove any food particles or brine residue. This ensures a proper seal. Place a warm, new flat lid onto each jar, centering it carefully. Screw on the metal bands fingertip tight – meaning tighten until you feel resistance, then give it just a tiny extra turn. Do not overtighten, as this can prevent air from escaping and compromise the seal.
-
Process in a Water Bath Canner:
Carefully place the filled and sealed jars back into the hot water bath canner using your jar tongs. Ensure the jars are completely submerged under at least 1-2 inches of water. If necessary, add more hot water to achieve this level. Bring the water in the canner back to a rolling boil. Once it reaches a full boil, start your timer. Process the jars for the time specified by your recipe or local extension office, accounting for altitude if you live at a high elevation. For typical pint or quart jars of whole tomatoes, a common processing time is around 40-45 minutes. *Always consult reliable canning charts for exact times based on jar size and altitude.*
-
Cool and Check Seals:
Once the processing time is complete, turn off the heat and remove the canner lid. Let the jars sit in the hot water for 5 minutes before carefully removing them with the jar tongs. Place the hot jars upright on a clean towel or cooling rack, ensuring there is space between them for air circulation. Do not disturb them for 12-24 hours. As they cool, you should hear a “ping” sound as the lids seal. After 12-24 hours, check for proper seals by pressing down on the center of each lid. If it doesn’t flex, it’s sealed. Remove the bands, wipe the jars clean, label them with the date and contents, and store them in a cool, dark place.

Tips for Canning Success & Safety
- Follow Tested Recipes: Always use recipes from reliable sources (like university extension offices, reputable canning books, or established food bloggers with tested recipes). This ensures the correct balance of acidity for safe preservation.
- Use Fresh, High-Quality Produce: Canning won’t improve the quality of poor ingredients. Start with the best and freshest tomatoes.
- Inspect Jars: Before filling, check jars for chips, cracks, or imperfections around the rim, which can prevent a proper seal.
- New Lids Every Time: Always use new flat lids for canning. The sealing compound can only be used effectively once. Bands can be reused if they are in good condition.
- Proper Headspace: Maintaining the correct headspace is vital. Too little can cause siphoning (liquid loss) and lead to unsealed jars. Too much can result in an incomplete vacuum seal.
- Altitude Adjustments: If you live at an altitude above 1,000 feet, you will need to increase your processing time. Consult a local extension office or a trusted canning guide for precise adjustments.
- Cleanliness is Key: Sanitize all equipment that comes into contact with your food. Cleanliness prevents spoilage and ensures a safe product.
- Don’t Rush the Cooling: Allow jars to cool naturally for 12-24 hours. Do not overtighten bands during cooling, and avoid retightening them after they have cooled, as this can break the seal.
- Storage: Store sealed jars in a cool, dark, dry place. Remove the bands before storage to prevent rust and to make it easier to detect if a seal has failed.
Creative Ways to Enjoy Your Canned “Tomatoes in the Snow”
Once you’ve mastered the art of canning these exquisite “Tomatoes in the Snow,” you’ll discover endless possibilities for incorporating them into your culinary repertoire. Their distinct garlic-infused flavor makes them versatile and exciting.
- Elevated Pasta Sauces: Crush or blend the tomatoes directly from the jar for an instant, intensely flavorful pasta sauce base. The garlic is already included!
- Robust Soups and Stews: Add them whole or roughly chopped to winter stews, chili, or hearty vegetable soups for a burst of garden-fresh flavor.
- Quick Bruschetta Topping: Roughly chop the tomatoes and garlic, mix with fresh basil, a drizzle of olive oil, and a sprinkle of salt and pepper. Serve on toasted baguette slices.
- Savory Side Dish: Simply warm them gently in a saucepan and serve as a rustic, flavorful side dish alongside roasted meats or grilled chicken.
- Flavorful Pizza Base: Puree them to create a unique and aromatic pizza sauce that stands out from the ordinary.
- Egg Dishes: Incorporate into omelets, frittatas, or shakshuka for a vibrant and savory addition.
Embrace the Harvest: Your Canning Adventure Awaits!
There’s an undeniable magic in transforming a bountiful harvest into jars of preserved goodness, ready to be enjoyed months down the line. The “Tomatoes in the Snow” recipe is more than just a method of preservation; it’s an invitation to savor the fruits of your labor, to extend the flavors of summer, and to add a truly special touch to your everyday cooking. With the clear instructions from My Kitchen Tanja, readily available supplies, and a little patience, you’ll soon be proudly showcasing your own beautiful jars of garlic-infused canned tomatoes. Dive into the rewarding world of home canning and discover the immense satisfaction of a pantry stocked with homemade treasures. Happy canning!