
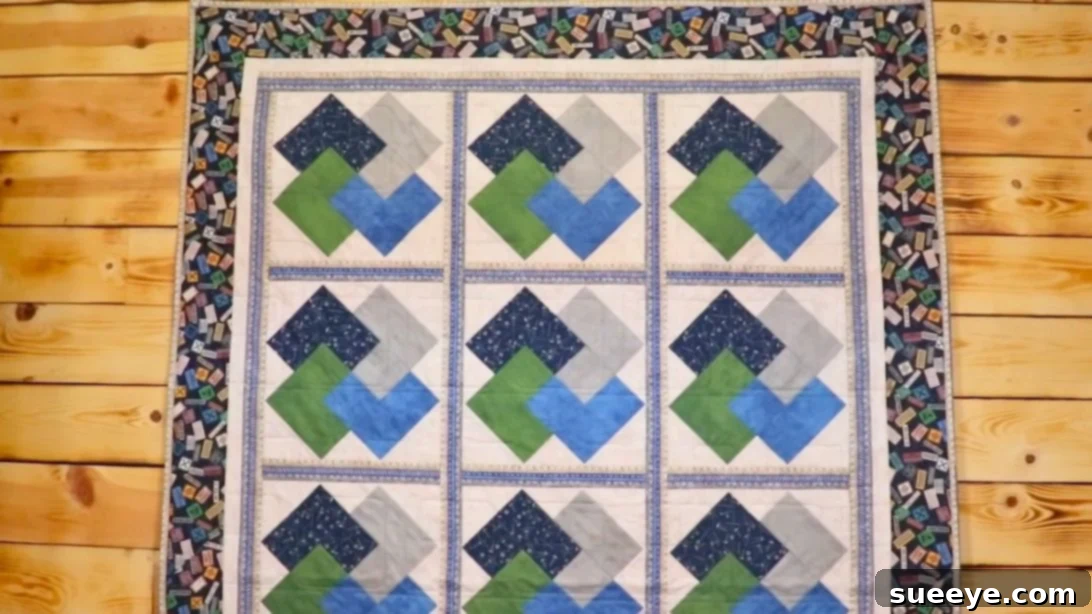
Have you ever encountered a quilt pattern that seems to defy logic, appearing intricate and complex, yet captivating you with its stunning design? The Card Trick Quilt pattern is precisely one of those masterpieces. At first glance, its overlapping squares and dynamic ‘X’ motif might suggest a challenge reserved for seasoned quilters. However, we’re here to reveal a delightful secret: this pattern is surprisingly easy to master, making it an ideal project for quilters of all skill levels, especially beginners looking to expand their repertoire.
When I first laid eyes on the mesmerizing Card Trick Quilt, I, too, found myself staring in wonder, pondering the ingenious construction behind its optical illusion. The desire to recreate its magic was immediate. My online search began, and while initially challenging due to not knowing its official name, a little persistence led me to an incredibly clear and comprehensive tutorial by the talented team at Sew Yeah. This guide draws inspiration from their expert instruction, simplifying the process into manageable steps.
Don’t be intimidated by its sophisticated appearance. While the initial steps of piecing your first block might require a moment of focused attention, once you successfully complete one, the entire process will feel incredibly intuitive and enjoyable. There’s immense satisfaction in watching the seemingly complex design emerge from simple fabric strips and squares. The beauty of the Card Trick pattern lies in its clever use of color and precise piecing to create the illusion of depth and movement, where squares appear to gracefully overlap each other, forming that signature ‘X’ pattern.
One of the most exciting aspects of the Card Trick Quilt is its incredible versatility. By playing with different color combinations and fabric choices, you can transform the entire look and feel of your quilt. Imagine vibrant, contrasting hues creating a bold statement, or subtle, harmonious tones for a more serene aesthetic. The possibilities are truly endless, allowing each quilter to infuse their unique personality into this classic design. For a detailed visual guide, the Quick Card Trick Quilt Tutorial video by Sew Yeah (linked above) is an invaluable resource that complements these written instructions perfectly.
Looking for more beginner-friendly quilting adventures? Explore these fantastic resources to continue your quilting journey: Easy Cathedral Window Quilt Tutorial, Diamond Point Quilt Block Tutorial, Easy Split 4-Patch Quilt Block Tutorial, and Beginner’s Star Quilt With Jenny Doan.
Why the Card Trick Quilt Pattern is a Must-Try
Beyond its stunning visual appeal, the Card Trick Quilt offers numerous reasons why it’s a fantastic project for any quilter:
- Captivating Optical Illusion: The unique design creates an impressive three-dimensional effect, making it a conversation starter. It looks far more complicated than it actually is, giving you well-deserved bragging rights!
- Beginner-Friendly Challenge: While it introduces you to slightly more complex piecing than a simple square-block quilt, the step-by-step process is highly achievable for those new to quilting. It builds confidence and refines foundational skills.
- Versatile Design: The pattern truly shines with strategic fabric placement. Experiment with high-contrast fabrics to emphasize the illusion, or choose a monochromatic palette for a subtle, sophisticated look. It adapts beautifully to various styles, from modern to traditional.
- Skill Development: This pattern is excellent for practicing crucial quilting techniques such as accurate 1/4-inch seam allowances, precise cutting, efficient chain piecing, and careful pressing – all essential skills that will benefit future projects.
- Endless Creativity: With four main fabric colors (A, B, C, D) plus a background, you have a vast canvas for creative expression. Think about using solids, prints, or even fussy-cutting specific motifs within your fabrics.
Essential Materials for Your Card Trick Quilt
Gathering your materials is the exciting first step! For a typical throw-sized Card Trick Quilt, here’s what you’ll need. Remember, “WOF” stands for “Width of Fabric,” which is typically 42-44 inches.
- Fabric A: 1/3 yard – Choose a distinct color or pattern that will stand out.
- Fabric B: 1/3 yard – Another unique fabric, providing good contrast with Fabric A.
- Fabric C: 1/3 yard – A third distinct fabric, chosen to complement A and B.
- Fabric D: 1/3 yard – The fourth key fabric, completing your color palette.
- Background Fabric: 1 1/3 yards – This fabric will frame your blocks and make the other colors pop. A solid or subtle blender often works best.
- Sashing/1st Border Fabric: 1 1/8 yard – For connecting your blocks and adding the first framing layer.
- 2nd Border Fabric: 1 yard – A complementary fabric to create depth and visual interest around the quilt.
- 3rd Border Fabric: 1 1/3 yards – The outermost border, providing a strong frame for your finished quilt.
- Batting: Approximately 60″ x 72″ (or size appropriate for your finished quilt top)
- Backing Fabric: Approximately 3 3/4 yards (or size appropriate for your finished quilt top, accounting for a 4-inch overhang on all sides)
- Basic Quilting Tools: Rotary cutter, self-healing cutting mat, quilting ruler (at least 6″x24″), sewing machine, thread (matching or neutral), iron and ironing board, pins or wonder clips, fabric markers, seam ripper (just in case!).
Fabric Selection Tips:
- Contrast is Key: For the illusion to truly pop, ensure good contrast between your four main fabrics (A, B, C, D) and also between these and your background fabric.
- Value Differences: Think about light, medium, and dark values. Mixing these will enhance the dimensionality of the blocks.
- Theme and Palette: Choose fabrics that share a common theme or color palette to create a cohesive look.
- Pre-wash? Decide whether to pre-wash your fabrics. While not always necessary, it can prevent potential shrinkage or dye bleeding later on.
Precise Cutting Instructions for Your Card Trick Quilt
Accuracy in cutting is paramount in quilting, as it directly impacts how well your pieces fit together. Take your time with these steps, using a sharp rotary blade and a reliable ruler.
For Fabrics A and C (each):
- Cut 2 strips of 3 1/2 inches x WOF (Width of Fabric)
- Cut 2 strips of 6 inches x WOF
For Fabrics B and D (each):
- Cut 2 strips of 3 1/2 inches x WOF
- Cut 3 strips of 3 1/4 inches x WOF
Background Fabric:
- Cut 6 strips of 3 1/4 inches x WOF
- Cut 5 strips of 6 inches x WOF – from these, sub-cut 15 pieces of 6 inch x 6 inch squares (you’ll need 3 squares per WOF strip if cutting carefully).
Sashing/1st Border Fabric:
- Cut 14 strips of 2 1/2 inches x WOF – from these, sub-cut 12 pieces of 2.5 inch x 12.5 inch strips (these will be for sashing between blocks).
2nd Border Fabric:
- Cut 24 strips of 1.5 inches x WOF
3rd Border Fabric:
- Cut 8 strips of 4.5 inches x WOF
Step-by-Step Guide: How to Make the Card Trick Quilt Block
Let’s dive into creating the individual Card Trick blocks. Remember to always maintain a precise 1/4-inch seam allowance throughout these steps. Pressing correctly after each seam is crucial for flat, accurate blocks.
Step 1: Constructing Initial Strip Sets
Take one 3.5-inch strip of Fabric A and one 3.5-inch strip of Fabric B. Place them right sides together, aligning the edges perfectly. Sew them together along one long side using a consistent 1/4-inch seam allowance. Press the seam open or towards the darker fabric (depending on your preference and fabric choice) to reduce bulk. Repeat this exact process with one 3.5-inch strip of Fabric C and one 3.5-inch strip of Fabric D, creating a second pair of sewn strips.
Step 2: Creating the Four-Patch Units
Lay the A/B strip set on your cutting mat. Now, take the C/D strip set and place it on top of the A/B set, ensuring Fabric A is directly above Fabric D. Carefully align the edges. From these combined strip sets, cut them into 3.5-inch wide segments. You will then sew these segments together, alternating them to form 15 individual “four-patch” units. Each four-patch unit should consist of one square from Fabric A, one from Fabric B, one from Fabric C, and one from Fabric D. Once sewn, square up each four-patch unit to a precise 6-inch x 6-inch square. This squaring up is vital for accuracy.
Step 3: Adding Fabric D to Your Four-Patch
Take one of your 6-inch x 6-inch four-patch units. Position it on your cutting board. Now, take a 3 1/4-inch strip of Fabric D. Align this strip along the edge of the four-patch unit such that the corner of Fabric D is positioned at what will become the upper-left corner of your finished block’s Fabric D section. Sew the length of the block. To make this process incredibly efficient, utilize chain piecing: sew one block, then feed the next block right after it without lifting your presser foot, continuing until all 15 four-patch units have Fabric D strips attached.
Step 4: Trimming and Pressing Fabric D Units
With your chain-pieced blocks still connected, place the unopened strip (the one with the attached Fabric D strip) on your cutting mat. Carefully cut apart each four-patch unit with its newly attached Fabric D strip. Trim each unit to ensure it measures exactly 6 inches across. Once trimmed, press the newly sewn seam open, ensuring the block lies perfectly flat. This meticulous trimming and pressing are crucial for maintaining the block’s final dimensions.
Step 5: Attaching Fabric B to Your Four-Patch
You will now repeat the process from Steps 3 and 4, but this time using a 3 1/4-inch strip of Fabric B. Take another four-patch unit and place the Fabric B strip such that its corner aligns with what will be the upper-left corner of the Fabric B section in your final block. Sew it along the length of the block, chain piecing for efficiency. After sewing, separate the blocks, trim each to 6 inches, and press the seams open, just as you did with Fabric D. This ensures symmetry and consistency in your blocks.
Step 6: Preparing Fabric A and C Border Strips with Background
Take a 6-inch strip of Fabric A and a 3 1/4-inch strip of background fabric. Place one background strip on each side of the Fabric A strip, right sides together. Sew both background strips along the entire Width of Fabric (WOF) using your 1/4-inch seam allowance. Press the seams open. Repeat this exact process with a 6-inch strip of Fabric C and two 3 1/4-inch background strips. You are essentially creating two new strip sets, one for Fabric A and one for Fabric C, each flanked by background fabric.
Step 7: Segmenting Fabric A and C Units
From the strip sets you created in Step 6 (the Fabric A/Background/Fabric A and Fabric C/Background/Fabric C combinations), cut them into 3 1/4-inch wide segments. For each of Fabric A and Fabric C, you should aim to create 15 pieces. These smaller units will form the crucial side panels of your Card Trick block, contributing to the distinctive ‘X’ pattern.
Step 8: Assembling the Central Block Unit
Now, let’s bring several components together. Take one of your four-patch units that already has Fabric B attached (from Step 5). This will be the center of your new unit. Take one of the 3 1/4-inch wide A-piece segments (from Step 7) and place it on the left side of the four-patch, right sides together. Take one of the 3 1/4-inch wide C-piece segments (from Step 7) and place it on the right side of the four-patch, right sides together. Sew both the A and C pieces to the sides of the four-patch unit. Once sewn, open the unit and press the seams flat. You should now see the beginnings of the central Card Trick design taking shape.
Step 9: Adding the Corner Triangles and Final Trimming
This final step brings the entire block together. Take your 6-inch x 6-inch background squares (from the “Background Fabric” cutting list). Cut each of these squares diagonally from corner to corner, yielding two 6-inch triangles per square. You will need four triangles for each Card Trick block. Place these background triangles on each of the four sides of your assembled unit from Step 8. Crucially, align the point of each triangle with the center point of the adjacent four-patch corner. Sew each side carefully, then press the seams flat. Once all four triangles are attached, your block will look much larger and slightly irregular. Now, carefully trim the entire block to a precise 12-inch x 12-inch square. This final squaring-up ensures all your blocks will fit together perfectly when assembling the quilt top.
Assembling Your Card Trick Quilt Top
Once you’ve crafted all your beautiful 12-inch Card Trick blocks (for a typical throw quilt, you might aim for 12 to 15 blocks), it’s time to bring them together to form the quilt top.
Arranging Your Blocks
Lay out your finished blocks on the floor or a design wall. Experiment with different orientations and arrangements until you achieve a layout that you love. Pay attention to how the ‘X’ patterns align and interact across the quilt. A common layout might be 3 blocks by 4 blocks, or 4 blocks by 4 blocks for a slightly larger quilt.
Adding Sashing (1st Border)
Sashing strips are used to separate blocks, providing visual breaks and helping the individual blocks stand out. Using your 2.5-inch x 12.5-inch sashing strips, sew them between your blocks, both horizontally and vertically, to create rows and then join the rows. Ensure your seams are consistent 1/4-inch, and press thoroughly after each join.
Attaching the Borders
Borders frame your quilt, add size, and can enhance the overall design. You have three borders planned for this quilt:
- First Border (Sashing continued): Once your sashed block grid is complete, you will use remaining sashing fabric strips to create a continuous border around the entire sashed center. Measure the length and width of your quilt center and cut your border strips accordingly, adding a few inches for trimming.
- Second Border: Attach the 1.5-inch strips from your 2nd border fabric around the first border. Always measure your quilt top’s length and width through the center to get the most accurate border strip length. Pin generously and sew carefully.
- Third Border: Finally, attach the 4.5-inch strips from your 3rd border fabric. This wider border provides a strong finish and can be a great opportunity to use a fabric that ties all your other choices together.
Remember to press all your seams neatly as you go. For borders, it’s often best to press seams towards the border fabric to avoid shadowing on lighter inner fabrics.
Finishing Your Card Trick Quilt
Once your quilt top is complete, the next steps transform it into a cozy, finished blanket:
- The Quilt Sandwich: You’ll need batting (the fluffy middle layer) and backing fabric. Lay your backing fabric wrong side up, then your batting, and finally your quilt top right side up. Ensure all layers are smooth and free of wrinkles.
- Basting: Secure these three layers together using basting pins, spray basting, or long hand stitches. This prevents shifting during quilting.
- Quilting: This is where you stitch through all three layers to hold them together and add texture. You can quilt by hand, use your home sewing machine, or send it to a professional long-arm quilter. Simple straight lines, a grid pattern, or “stitch in the ditch” (quilting along existing seams) are great options for beginners.
- Binding: The final step is to bind the edges of your quilt. This involves attaching strips of fabric around the perimeter to create a clean, durable finish. There are many tutorials available for machine binding or hand binding – choose the method you prefer!
Tips for Success with Your Card Trick Quilt
To ensure your Card Trick Quilt project is as enjoyable and successful as possible, keep these tips in mind:
- Precision is Paramount: In quilting, a 1/4-inch seam allowance truly means 1/4-inch. Use a dedicated 1/4-inch presser foot if your machine has one. Slight variations can compound over many pieces, leading to skewed blocks.
- Pressing Matters: Pressing after each seam isn’t just about making your fabric flat; it sets the stitches and helps your pieces join accurately. Decide whether to press seams open or to one side (usually the darker fabric) and be consistent.
- Square Up Regularly: After creating multi-piece units (like the four-patch or the completed block), take the time to square them up to the specified dimensions. This ensures all your components are the correct size before joining them.
- Chain Piecing for Efficiency: As mentioned, chain piecing saves time and thread by sewing units one after another without breaking the thread between them.
- Choose Your Fabrics Wisely: The Card Trick pattern relies heavily on contrast to create its illusion. Select fabrics with clear differences in value (light, medium, dark) to make your design pop.
- Don’t Rush: Quilting is a journey, not a race. Take your time with each step, enjoy the process, and don’t be afraid to put your project aside if you feel frustrated.
- Utilize Resources: The Sew Yeah tutorial is an excellent visual aid. Refer back to it whenever you need clarification on a step.
- Practice Makes Perfect: If you’re new to quilting, consider making a practice block or two with scrap fabric before cutting into your main project fabrics.
Conclusion: Your Masterpiece Awaits!
The Card Trick Quilt pattern is a true gem in the world of quilting – a design that marries intricate visual appeal with surprisingly straightforward construction. By following this detailed guide and the excellent visual instructions from Sew Yeah, you’re well-equipped to create a stunning quilt that will undoubtedly impress. From carefully selecting your fabrics to meticulously piecing each block and finally assembling your masterpiece, every step is a rewarding part of the creative process.
Don’t let the initial illusion of complexity deter you. Embrace the journey, enjoy the rhythm of stitching, and revel in the satisfaction of transforming simple fabric into a work of art. Your Card Trick Quilt will not only be a beautiful addition to your home but also a testament to your growing quilting skills. So, gather your materials, fire up your sewing machine, and prepare to be amazed by the magic of the Card Trick Quilt!
Quick Card Trick Quilt Tutorial (Video)
For a dynamic visual walkthrough, don’t forget to watch the full tutorial by Sew Yeah:
Watch the Card Trick Quilt Tutorial by Sew Yeah on YouTube