
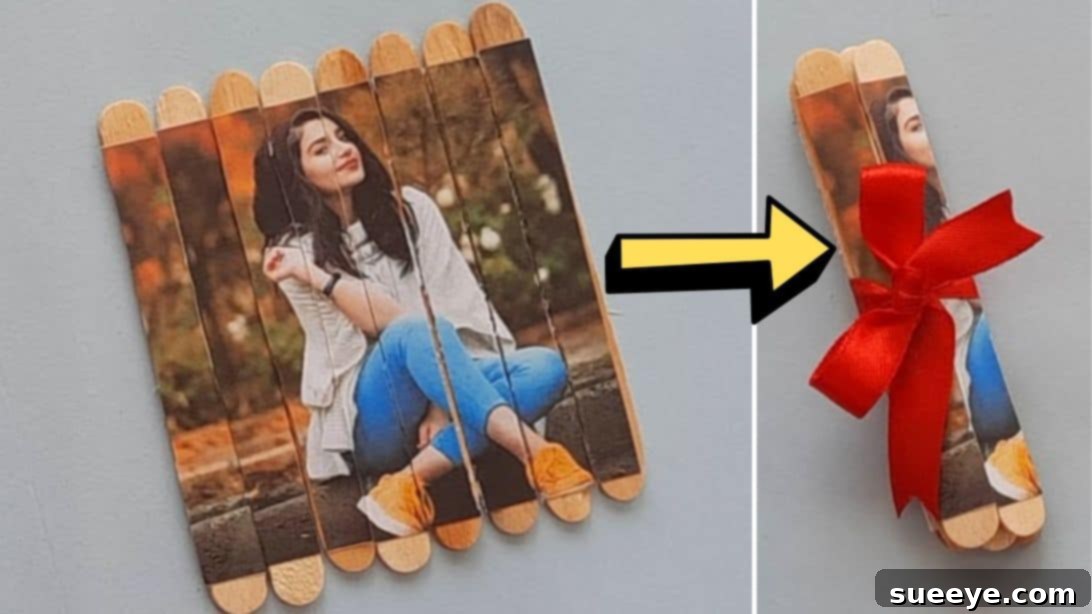
Craft a Heartfelt Memory: DIY Popsicle Stick Photo Puzzle Gift
In a world often dominated by mass-produced items, the true value of a gift lies not in its price tag, but in the thought, effort, and love poured into it. Handmade gifts possess an unparalleled charm, speaking volumes about your appreciation and affection for the recipient. There’s a unique joy in knowing someone dedicated their time and creativity to craft something specifically for you, making every moment of that gift truly special and memorable.
If you’re searching for a way to express your feelings and create a lasting keepsake, look no further than this incredibly simple yet profoundly meaningful craft idea. We’re talking about transforming ordinary popsicle sticks and a cherished photograph into a delightful personalized puzzle. This project is not only easy to make and incredibly budget-friendly, but it also results in a unique item that captures a precious memory in an interactive and fun way. Perfect for birthdays, anniversaries, holidays, or just because, this DIY popsicle stick photo puzzle is sure to bring a smile to anyone’s face. Let’s dive into creating this wonderful token of affection, inspired by the fantastic tutorial from CRAFTASTIC ARTS & GIFTS on YouTube.
The Enduring Charm of Handmade Gifts
Why do handmade gifts resonate so deeply? It’s simple: they carry an emotional weight that store-bought items often lack. When you craft something by hand, you infuse it with your personality, your time, and your genuine care. This personal touch transforms a simple object into a cherished memento, a tangible representation of your relationship with the recipient. Unlike commercial products, a handmade gift is inherently unique, carrying with it the story of its creation and the thoughtfulness behind every detail. It’s a testament to the idea that some things are too special to be mass-produced, and the act of giving becomes a more intimate and profound experience.
More Than Just a Gift: A Memory Capsule
This particular DIY popsicle stick photo puzzle is a brilliant example of a handmade gift that goes beyond mere aesthetics. It takes a beloved photograph—a captured moment in time—and turns it into an engaging activity. The recipient not only receives a beautiful image but also gets to physically reassemble that memory, piece by piece. This interactive element adds another layer of appreciation, making the gift both sentimental and entertaining. It’s a perfect blend of nostalgia and creativity, ensuring that your gesture will be remembered and treasured for years to come.
Why a Personalized Photo Puzzle Makes the Perfect Present
Choosing the right gift can often be challenging, but a personalized photo puzzle ticks all the boxes for a truly unforgettable present. Its unique combination of sentimentality, creativity, and affordability makes it an outstanding choice for almost any occasion and recipient.
- Uniquely Personal: At its core, this gift is about customization. By using a photo that holds special meaning—whether it’s a family portrait, a scenic vacation shot, or a candid moment with friends—you’re creating something that is truly one-of-a-kind and speaks directly to the recipient’s heart.
- Deeply Sentimental: Photographs are powerful vessels of memory. Transforming a cherished image into a puzzle allows the recipient to revisit that moment in a tactile way, evoking emotions and fond recollections. It’s a gift that celebrates shared history and strengthens bonds.
- Thoughtful & Effort-Filled: The act of making this puzzle yourself demonstrates a level of thoughtfulness that far exceeds simply buying something off a shelf. Your time and effort invested in its creation communicate genuine care and affection.
- Budget-Friendly Brilliance: Despite its high sentimental value, this craft requires only a handful of inexpensive materials. It’s an excellent option for those looking to give a meaningful gift without breaking the bank, proving that heartfelt gestures don’t require extravagant spending.
- Engaging & Fun: Not only is the crafting process enjoyable, but assembling the puzzle also provides a delightful activity for the recipient. It can be a relaxing solo endeavor or a fun group activity, leading to another shared experience.
- Versatile for All Occasions: Whether it’s a birthday, anniversary, Valentine’s Day, Mother’s Day, Father’s Day, a holiday, or a simple “thinking of you” gesture, this personalized photo puzzle fits seamlessly into any celebratory or comforting context.
- Wonderful Keepsake or Display Item: Once assembled, the puzzle can be glued together and framed as a unique piece of wall art or kept as a conversational tabletop item, serving as a constant reminder of a special moment and your thoughtful gesture.
Essential Materials for Your Creative Project
Gathering your materials is the first exciting step in bringing your personalized photo puzzle to life. The beauty of this project lies in its simplicity, requiring only a few common and affordable items. Here’s a detailed look at what you’ll need:
-
Quality Popsicle Sticks
The foundation of your puzzle! Standard craft popsicle sticks are ideal, readily available at any craft store, supermarket, or online. You might consider wider ‘jumbo’ sticks for larger photos or to create bigger puzzle pieces, offering a different tactile experience. Ensure they are clean, smooth, and uniform in size for the best results. The quantity will depend on the size of your chosen photo; always have a few extra on hand.
-
Your Chosen Printed Photo
This is where the personalization truly shines. Select a high-resolution photo with good contrast and vibrant colors that will translate well onto the sticks. Print your photo to the desired size, ensuring it’s slightly larger than the area the popsicle sticks will cover when laid out. A matte finish photo paper often works best as it prevents glare and accepts glue more readily than glossy prints. You can print it at home or at a local print shop.
-
A Sturdy Ruler
Crucial for achieving precise, straight cuts. A metal ruler is highly recommended as it provides a firm edge for guiding your X-Acto knife and prevents accidental cuts into the ruler itself, ensuring crisp lines every time.
-
Clear Tape or Any Strong Adhesive Tape
This tape acts as a temporary stabilizer, holding your popsicle sticks together in a neat, even row while you apply the photo. Clear tape is preferred because it’s less likely to leave residue or tear the paper when removed, but any strong, easily removable tape will do the trick.
-
X-Acto Knife or Craft Knife
For clean, precise cuts. An X-Acto knife, with its sharp, pointed blade, is perfect for this project. Always use a fresh blade for the cleanest cuts. If you don’t have one, a sharp utility knife or even a box cutter can work, but exercise extreme caution and always use a cutting mat underneath.
-
Scissors
Useful for initial trimming of your printed photo to roughly fit the stick arrangement before gluing, or for cutting the ribbon. A good pair of sharp craft scissors will make this easier.
-
Craft Glue
A reliable adhesive is key. PVA glue (like school glue or Elmer’s glue) or Mod Podge are excellent choices. They dry clear, bond well with paper and wood, and are generally non-toxic. Apply a generous but even amount to ensure the photo adheres completely without bubbles or lifting.
-
Decorative Ribbon
To elegantly bundle your finished puzzle pieces. Choose a ribbon that complements the colors in your photo or the occasion. It adds a lovely finishing touch and makes the gift ready for presentation. Alternatives include twine, jute string, or even a small decorative bag.
Remember to prepare a clean, flat, and well-lit workspace, and protect your surface with a cutting mat or old cardboard when using the X-Acto knife.
Step-by-Step Directions to Create Your Unique Photo Puzzle
Transforming your chosen photograph into a captivating puzzle is a straightforward process that yields impressive results. Follow these detailed steps to craft your beautiful, personalized gift.
Step 1: Preparing Your Canvas and Adhering the Photo
Begin by laying out your popsicle sticks on a clean, flat work surface. The number of sticks should be sufficient to accommodate the entire width of your printed photo. Arrange them side-by-side, ensuring there are no gaps between each stick and that they are perfectly aligned. Uniformity here is key to a successful puzzle. Once you have your sticks neatly aligned, carefully apply strips of clear tape across the width of the sticks on one side, making sure the tape firmly holds them together. This creates a stable ‘canvas’ for your photo. Flip the assembly over so the taped side is facing down, exposing the smooth, untaped surface of the sticks. Now, take your printed photo and apply a generous, even layer of craft glue to its entire backside. Carefully center and adhere the photo to the untaped surface of the popsicle sticks. Press down firmly across the entire photo, working from the center outwards, to remove any air bubbles and ensure excellent adhesion. Allow the glue to dry completely – this is a critical step that might take several hours, or even overnight, depending on the glue and humidity. Patience here will prevent your photo from tearing or smudging during the cutting process.
Step 2: The Art of Precision Cutting
Once the glue is completely dry and the photo is securely bonded to the popsicle sticks, carefully remove the tape from the backside of the sticks. You’ll now have a single, solid piece composed of the photo attached to the sticks. Place this piece photo-side up on a protective cutting mat. Grab your sturdy ruler and position it precisely along the lines where the popsicle sticks meet. Use the ruler as a guide for your X-Acto knife. With a steady hand and gentle pressure, begin to score the photo along these lines. It’s often best to make several light passes rather than one deep cut to achieve a clean separation and prevent the photo from tearing. Continue this process, cutting through the photo and slightly into the wood of each stick, until all the sticks are separated. You’ll effectively be cutting the photo into individual strips, each adhered to a single popsicle stick. Take your time to ensure each cut is straight and clean, as this defines the quality of your puzzle pieces.
Step 3: Presenting Your Masterpiece
After all the individual photo-covered popsicle sticks have been separated, carefully gather them together. You can either arrange them in order to form the complete picture, or mix them up to present a true puzzle challenge. Stack them neatly in a bunch. Now, take your chosen decorative ribbon and wrap it around the bundle of sticks. Tie a beautiful knot or a bow to secure them together. This not only keeps the puzzle pieces organized but also adds an elegant touch to your thoughtful gift. Your personalized DIY popsicle stick photo puzzle is now complete and ready to be gifted! Imagine the joy on your loved one’s face as they unwrap this unique and heartfelt present, knowing you created it just for them.
Tips for a Flawless Popsicle Stick Photo Puzzle
To ensure your DIY photo puzzle turns out perfectly, consider these helpful tips:
- Photo Quality Matters: Always use a high-resolution image. Blurry or pixelated photos will not look good when magnified on the sticks. Vibrant colors and clear subjects work best.
- Print Settings: For optimal glue adhesion and durability, print your photo on matte or semi-gloss photo paper. If using standard printer paper, you might consider laminating it before gluing for added protection, although this can make cutting slightly trickier.
- Cutting Surface: Always use a self-healing cutting mat under your project. This protects your work surface and provides a stable base for precise cuts with the X-Acto knife.
- Sharp Blade is Key: A dull X-Acto blade can tear the paper and splinter the wood. Replace your blade if you notice any resistance or ragged edges during cutting.
- Even Glue Application: Ensure the glue is spread evenly across the entire back of the photo. Uneven application can lead to bubbles, wrinkles, or parts of the photo lifting off the sticks. A thin, even layer is more effective than a thick, lumpy one.
- Thorough Drying: Do not rush the drying process. Incomplete drying will cause the photo to tear or smudge when cut. If possible, let it dry overnight.
- Pre-Align Your Sticks: Before taping, lay out your sticks and measure them against your photo to ensure the photo will cover all sticks adequately without too much overhang.
- Test Cuts: If you’re new to using an X-Acto knife, practice on some scrap paper or an extra popsicle stick before working on your main project.
- Personalize the Back: For an extra special touch, you can write a short message, the date, or even a dedication on the back of each popsicle stick before or after the photo is glued, adding another layer of personalization.
Variations and Creative Twists
While the basic popsicle stick photo puzzle is charming on its own, there are many ways to get creative and customize your project even further:
- Different Stick Sizes and Colors: Experiment with jumbo popsicle sticks for larger puzzles or use colored sticks to add a vibrant border or backing to your photo.
- Painted Sticks: Before gluing the photo, you could paint the sides or edges of the popsicle sticks with acrylic paint to match the colors in your photo or a favorite color of the recipient.
- Themed Collections: Create a series of smaller puzzles that collectively tell a story or represent different memories. For instance, a puzzle for each year of a relationship or each stop on a memorable trip.
- Decorative Elements: After cutting, you could carefully apply a thin layer of Mod Podge over the photo side to seal and protect it, giving it a slightly glossy or matte finish depending on the Mod Podge type. Be cautious not to oversaturate.
- Puzzle Display Stand: Once assembled, the puzzle pieces can be glued onto a sturdy backing (like cardboard or thin wood) to create a permanent display piece. You can even attach small feet or an easel stand.
- Message Reveal: Instead of a photo, you could print a secret message or a poem across the sticks, making the act of assembling the puzzle a reveal of words rather than an image.
- Double-Sided Puzzle: Glue different photos on both sides of the popsicle stick assembly for a two-in-one puzzle experience. This requires careful alignment and cutting on both sides.
The Lasting Impact of Your Handmade Gift
This DIY popsicle stick photo puzzle is more than just a craft; it’s an experience, a memory, and a tangible expression of love. In a world that often rushes by, taking the time to create something with your own hands for someone else is a powerful gesture. It demonstrates thoughtfulness, effort, and a deep appreciation that store-bought items simply cannot convey. The joy of receiving such a personalized gift, and the subsequent fun of assembling it, creates lasting memories for both the giver and the receiver.
So, gather your materials, choose that special photo, and embark on this rewarding creative journey. You’ll be amazed at how a few simple sticks and a picture can be transformed into such a meaningful keepsake. Give this project a try and watch the magic unfold!
*Many thanks to CRAFTASTIC ARTS & GIFTS via YouTube for the inspiring video tutorial and all images used here. If you found this project delightful, we highly recommend visiting their channel for more incredible craft and gift ideas. Don’t forget to subscribe to their channel to stay updated with their latest creative projects!