
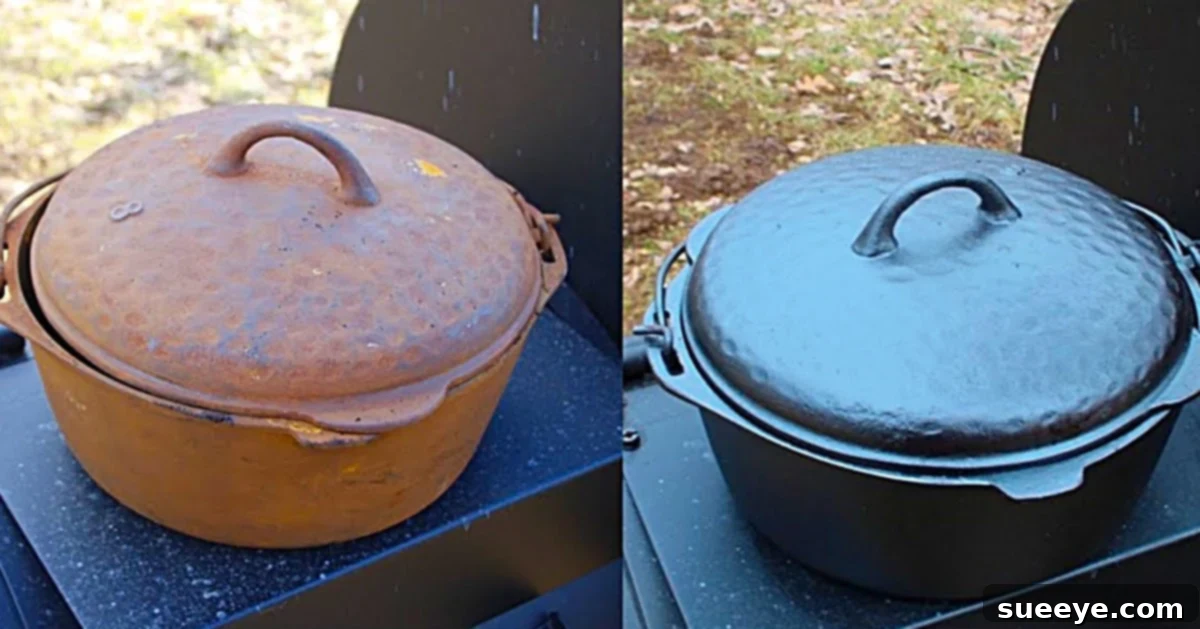
Revitalize Your Cast Iron: The Ultimate Guide to Restoring Rusty Skillets and Dutch Ovens
There’s a unique charm and unparalleled performance that comes with cooking on cast iron. For generations, these durable workhorses have been cherished for their exceptional heat retention and even distribution, making them the gold standard for everything from perfectly seared steaks and crispy fried chicken to comforting cornbread and hearty stews. Beyond their culinary prowess, cast iron cookware brings a nostalgic touch to any kitchen, connecting us to traditional cooking methods and often becoming treasured family heirlooms. However, even the most beloved cast iron pieces can fall victim to rust and a crusty, caked-on residue over time. This common problem can make a once-gorgeous skillet look beyond repair, leading many to mistakenly discard them. But fear not! A rusty cast iron skillet or Dutch oven is far from ruined. With a bit of dedicated effort and the right techniques, you can easily restore your cast iron cookware to its former glory, transforming it from an eyesore back into a cherished, non-stick cooking companion. This comprehensive guide will walk you through a foolproof, step-by-step method to clean, strip, and re-season your cast iron, ensuring it serves you beautifully for many more years to come.
Essential Materials for Cast Iron Restoration
Embarking on your cast iron restoration journey requires a few readily available items. Gathering these materials beforehand will ensure a smooth and efficient process as you bring your beloved cookware back to life. Here’s what you’ll need:
- Distilled White Vinegar: This acidic hero is crucial for dissolving rust. Its mild acidity safely breaks down iron oxide without damaging the underlying metal, making it an ideal, natural rust remover. You can use it undiluted for scrubbing or diluted for soaking.
- Heavy-Duty Steel Wool Pad (e.g., Grade #0 or #00): For aggressive scrubbing, steel wool is indispensable. It provides the necessary abrasive power to physically remove stubborn rust and carbonized buildup that the vinegar has loosened. Ensure you have a fresh pad ready for maximum effectiveness, as rust and grime can quickly clog it.
- Aluminum Foil: A simple sheet of foil serves multiple purposes. During the initial high-heat phase, it catches any drippings or flaking carbon, keeping your oven clean. Later, crumpled foil can act as a gentler abrasive than steel wool for lighter rust spots or sensitive areas, providing effective scrubbing without excessive scratching.
- A Hot Oven or BBQ Pit (with good ventilation): High heat is the first step in stripping old seasoning and loosening grime. An oven set to a high temperature, or even a barbecue grill, will effectively carbonize old residues, making them easier to remove. Ensure you have proper ventilation when using this method due to potential smoke.
- Protective Gloves (Optional but Recommended): While vinegar is relatively safe, prolonged exposure can dry out skin. Gloves will protect your hands during the scrubbing process, especially when handling rough steel wool and rusty surfaces, and can prevent minor cuts.
- Stiff-Bristled Brush or Scraper (Optional): For particularly stubborn carbon deposits or tight corners, a stiff nylon brush or a plastic scraper can be very helpful to dislodge material without scratching the bare metal.
- Paper Towels or Clean, Lint-Free Rags: Essential for applying oil, wiping away excess, and drying the pan thoroughly. Make sure they are lint-free to prevent fibers from sticking to your new seasoning.
- Neutral Cooking Oil or Solid Shortening for Seasoning: Options include Crisco (vegetable shortening), lard, flaxseed oil, grapeseed oil, or any high smoke point oil. This is vital for creating a new, durable, non-stick surface. We’ll delve into the best choices and application techniques later.
Detailed Steps to Restore Your Cast Iron Cookware
Step 1: The High-Heat Strip – Preparing Your Cast Iron for Restoration
The first critical step in restoring your cast iron involves a thorough high-heat treatment. This process, often referred to as “stripping,” is designed to burn off any old, sticky, or uneven seasoning, as well as loosen years of accumulated carbon buildup and superficial rust. It’s a foundational step that prepares the bare metal surface for effective rust removal and re-seasoning.
Preparation for Heat Treatment: Before placing your cast iron into the oven, ensure you have adequate ventilation. Open windows and turn on your kitchen exhaust fan, as there might be some smoke and odors as the old seasoning and food residues burn off. Place a sheet of aluminum foil on the bottom rack of your oven to catch any flaking debris or grease that might drip from the cast iron during this process, making cleanup much easier. This prevents the mess from settling on your oven floor.
The High-Heat Process: Preheat your oven to a high temperature, ideally between 440-450°F (225-230°C). Once preheated, carefully place your cast iron skillet, Dutch oven, or other cookware upside down on the middle rack. This position allows for better air circulation around the entire piece and encourages any loosened debris to fall away, rather than settling back onto the surface. Let it bake for approximately 2 to 2.5 hours. Alternatively, if you have an outdoor BBQ pit or a grill that can maintain a consistent high temperature, you can use it for this step. Using an outdoor heat source helps contain any smoke and odors outside your home.
During this time, the intense heat will cause the old, polymerized oil (seasoning) and any caked-on food residues to break down and turn into ash. You might notice some smoke, which is normal but reiterates the need for good ventilation. After 2 to 2.5 hours, turn off the oven and allow the cast iron to cool down completely inside the oven. This slow cooling process helps prevent thermal shock, which, while rare for cast iron, is always a good practice to ensure the integrity of the metal. Once cool enough to handle, carefully remove the cast iron from the oven. You should observe a somewhat grayish, dull appearance, with many of the old crusty bits now flaky and much easier to remove.
Step 2: Tackling Stubborn Rust – Vinegar and Focused Scrubbing
With the old gunk carbonized and removed, it’s time to confront the rust head-on. Distilled white vinegar is your best friend here, as its mild acidity effectively dissolves rust (iron oxide) without harming the cast iron itself, provided it’s used correctly and not for excessively long periods. This step requires a bit of elbow grease, but the results are incredibly satisfying.
Method A: Immediate Scrubbing with Vinegar and Steel Wool
Immediately after your cast iron has cooled down from the high-heat treatment (it can still be slightly warm to comfortably handle), place it in a utility sink or a large plastic basin. Pour a generous amount of distilled white vinegar directly over the entire surface of the cast iron. While the pan is still wet with vinegar, grab your heavy-duty steel wool pad. Begin scrubbing vigorously, focusing intently on all rusty areas and any remaining stubborn carbon buildup that didn’t fully flake off during the heat treatment. The vinegar acts as a chemical aid, loosening the rust and weakening its bond to the metal, while the steel wool provides the essential mechanical abrasion needed to strip it away.
Key Tips for Effective Scrubbing:
- Keep the Surface Wet: Continuously reapply vinegar as you scrub to keep the surface saturated. This ensures the acidic action is consistent and helps lubricate the scrubbing process, making it more efficient and preventing too much friction that could create new scratches.
- Thoroughness is Key: Pay close attention to all surfaces – the cooking surface, the sides, the bottom, the handle, and especially any crevices or decorative elements where rust tends to hide. Don’t be afraid to apply significant pressure; the cast iron is robust.
- Prioritize Safety: If you have sensitive skin, always wear protective gloves to avoid prolonged contact with vinegar and the rough steel wool.
- Patience and Persistence: This step can be the most labor-intensive part of the restoration. Depending on the severity of the rust, it might take considerable time and effort to achieve a completely rust-free surface. Be persistent and keep scrubbing until the metal appears uniformly gray and free of any orange or brown patches.
Method B: Vinegar Soaking for Heavy Rust (with caution)
For cast iron pieces with extremely heavy rust that seems deeply embedded, a vinegar soak can be incredibly effective, but it requires careful monitoring. Fill a sink or a large plastic basin (non-metal is preferred to avoid etching) with a solution of distilled white vinegar and water. A common and safe ratio is 1:1 (one part vinegar to one part water). For very severe rust, you can use a stronger solution or even pure vinegar if the item is small and heavily rusted. Submerge your cast iron completely in the solution, ensuring all rusted areas are covered. Let it soak for approximately 1-2 hours.
Crucial Caution: Do not soak for longer than 2-3 hours, especially with a strong concentration. Prolonged exposure to acid can begin to etch the cast iron, leading to pitting or damage to the metal surface. Always check the pan periodically.
After the soaking period, remove the cast iron from the solution and immediately begin scrubbing with steel wool and fresh vinegar, as described in Method A. The soak will have significantly loosened the rust, making the subsequent scrubbing much easier and less strenuous. Rinse thoroughly with water after scrubbing.
Step 3: Post-Scrub Wash and Immediate Drying to Prevent Flash Rust
Once you are absolutely confident that every speck of rust and old residue has been removed from all parts of your skillet or Dutch oven, and the metal appears uniformly dull gray, it’s time for a final, thorough wash. Using hot water and a mild dish soap (yes, for this one time, it’s perfectly acceptable and even recommended to use soap to ensure all acidic residue from the vinegar and any loose particles are completely gone), scrub the pan by hand with a stiff brush or sponge. Rinse it thoroughly under running water until all soap suds are gone and the water runs completely clear. At this point, the pan should appear completely bare and degreased – a true blank canvas, ready for its new seasoning.
Immediate and Thorough Drying is Paramount: This is a critical step to prevent “flash rust,” which can occur almost instantly on a bare cast iron surface when exposed to air and moisture. Do not air dry your cast iron! Immediately after washing, place the cast iron back into a hot oven (around 200-250°F or 90-120°C) for 15-20 minutes. Alternatively, you can place it directly over a burner on your stovetop on medium-high heat. The goal is to quickly evaporate all traces of moisture from the cast iron, ensuring it is absolutely bone-dry. You’ll know it’s dry when the pan is too hot to comfortably touch with bare hands and appears completely matte. If you observe any orange or reddish-brown spots forming, it means rust is returning, and you’ll unfortunately need to go back to the scrubbing step until it’s perfectly clean, then dry it immediately and completely.
Step 4: The Curing Process – Building a Durable and Non-Stick Seasoning
Once your cast iron is absolutely rust-free, bone-dry, and uniformly gray, you’re ready for the most crucial step: seasoning. Seasoning isn’t just about applying oil; it’s about creating a thin, hard, non-stick, and rust-preventative layer of polymerized oil on the surface of your cast iron. This process chemically transforms the raw metal into a smooth, dark, and resilient cooking surface that will improve with every use.
Understanding Seasoning Oils:
The choice of oil for seasoning is a subject of much debate among cast iron enthusiasts, but the fundamental principle is the same: select an oil with a relatively high smoke point and good polymerization properties. Polymerization is the process where oil bonds to the metal surface and hardens into a protective layer when heated. Here are some popular options:
- Crisco (Vegetable Shortening): A time-tested favorite and highly recommended for its consistent results. Crisco is a hydrogenated vegetable oil that forms a durable, slick, and dark seasoning layer. It’s affordable and widely available, making it an excellent choice for beginners and experts alike.
- Animal Lard or Bacon Grease: Many traditionalists swear by animal fats for their rich, deep seasoning. They impart a beautiful dark finish and have a high smoke point. However, they can sometimes leave a slightly stickier finish if not applied thinly enough, and can go rancid if not used frequently.
- Flaxseed Oil: Known for creating a very hard and durable seasoning due to its high omega-3 content, which polymerizes exceptionally well. However, it can be more expensive and sometimes prone to flaking if not applied in extremely thin layers.
- Grapeseed Oil: Another excellent choice with a high smoke point and neutral flavor. It creates a good, durable seasoning layer and is often favored for its lighter, less greasy feel.
- Vegetable Oil or Canola Oil: Readily available and economical. While they work effectively, they might require more layers to build up as robust a seasoning as Crisco or flaxseed oil.
For initial restoration, vegetable shortening (like Crisco) or lard is often recommended for its ease of use and consistent results. The important thing is not necessarily which oil, but how it’s applied – thin layers are key.
The Seasoning Process – Step-by-Step for Optimal Results:
- Preheat Oven and Pan: Preheat your oven to a moderate temperature, usually between 400-450°F (200-230°C). It’s helpful to briefly place your dry cast iron back in the oven for 5-10 minutes to warm it slightly. A warm pan helps the oil spread more evenly.
- Apply a Very Thin Layer of Oil: Once the cast iron is warm enough to comfortably handle (but not too hot to touch), apply a minuscule amount of your chosen oil. Using a paper towel or a clean, lint-free cloth, apply a thin, even coat over the entire surface of the cast iron – inside, outside, handle, and even the bottom. The key word here is “thin.” You want just enough to lightly coat the surface, but not enough to be visibly wet or pooling anywhere.
- Wipe Off All Excess Oil: This is arguably the most critical step for successful seasoning. Using a fresh, clean, lint-free cloth or paper towel, vigorously wipe off as much oil as you possibly can. Imagine you’re trying to remove all the oil, even though a microscopic layer will remain. Any excess oil will become sticky, gummy, or create uneven patches, leading to a poor and ineffective seasoning. The surface should look dry, not greasy.
- Bake Upside Down: Place the cast iron upside down on the middle rack of your preheated oven. Place a sheet of aluminum foil on the rack below it to catch any drips that might still occur (even after meticulous wiping, some minuscule excess can render during heating). This prevents smoking and oven messes.
- Bake for One Hour: Let the cast iron bake for at least one hour at the chosen temperature (400-450°F / 200-230°C). During this time, the oil will polymerize, transforming into a hard, protective, and non-stick layer. You might notice a slight smell, which is normal as the oil is bonding.
- Cool Down Slowly: After one hour, turn off the oven and allow the cast iron to cool down completely inside the oven. This can take several hours, so plan accordingly. Do not rush this step by removing the hot pan; slow cooling is important for the seasoning to properly set and harden.
- Repeat for Multiple Layers: For a truly durable and non-stick seasoning, especially after a full restoration, you will need to repeat steps 2 through 6 multiple times. Aim for at least 3-4 layers for a newly restored pan, or even more if you desire a very deep, dark, and slick finish. Each subsequent layer builds upon the previous one, adding to the overall strength, durability, and non-stick properties of the seasoning. More layers mean better rust resistance and a superior cooking experience.
After several seasoning cycles, your cast iron should have a uniform, dark, and slightly glossy finish. It will feel smooth to the touch, and you’ll immediately notice its newfound non-stick potential. The transformation from a rusty, neglected piece to a beautifully seasoned cooking tool is incredibly satisfying and a testament to the longevity of cast iron.
Ongoing Cast Iron Care: Keeping Your Restored Cookware Pristine for Decades
Congratulations! You’ve successfully restored your cast iron cookware from a rusty relic to a magnificent cooking tool. The journey from neglected to pristine is incredibly rewarding, and now the key is to maintain that beautiful seasoning. With proper ongoing care, your cast iron will not only endure but will actively improve with age, becoming darker, smoother, and more naturally non-stick with every use. A well-maintained cast iron pan is truly a joy to cook with and can last for generations.
Essential Maintenance Tips for Your Cast Iron:
- Hand Wash Only: This cannot be stressed enough. Never, ever put your cast iron in the dishwasher. Dishwasher detergents are incredibly harsh and will strip away your hard-earned seasoning, leading to immediate rust. Always wash your cast iron by hand.
- Avoid Harsh Soaps (Mostly): For general cleaning after cooking, hot water and a stiff nylon brush or a non-abrasive sponge are usually sufficient to remove food particles. If food is stuck, a little mild dish soap can be used *sparingly* on a well-seasoned pan without causing damage, but always rinse thoroughly and immediately.
- Scrape, Don’t Scrub with Abrasive Metal Tools: For stubborn stuck-on food, use a plastic pan scraper, a wooden spoon, or even a chain mail scrubber specifically designed for cast iron. Avoid using steel wool or abrasive metal scouring pads for daily cleaning, as they can scratch and damage your delicate seasoning layer.
- Immediate Drying is Paramount: Just like after the restoration process, always dry your cast iron immediately and completely after washing. Place it back on a low burner for a few minutes until all moisture has evaporated, or wipe it thoroughly with a clean towel. Leaving it to air dry, even for a short time, invites flash rust.
- Light Re-oiling After Each Use (Optional but Highly Recommended): After drying, and while the pan is still warm, apply a very thin coat of cooking oil (like vegetable, grapeseed, or even a tiny amount of Crisco) to the entire surface. Wipe off any excess with a clean paper towel until it looks dry to the touch. This light re-oiling helps protect the existing seasoning and slowly builds new, robust layers over time, enhancing its non-stick properties.
- Proper Storage: Store your cast iron in a dry place to prevent moisture buildup. If stacking multiple cast iron pieces, place a paper towel, dish towel, or a pan protector between them to prevent scratches and allow for air circulation, which helps deter moisture.
- Cook with It Frequently! The absolute best way to maintain and improve your cast iron’s seasoning is to use it frequently, especially for frying and baking with fats. Regular use will naturally build and strengthen the seasoning, making it increasingly non-stick and durable.
Common Mistakes to Avoid with Cast Iron:
- Leaving it Wet: As emphasized, the single biggest enemy of cast iron is moisture. Always dry immediately and completely after washing.
- Excessively High Heat Too Quickly: While cast iron handles high temperatures well, preheating slowly on medium heat prevents thermal shock and allows the pan to heat evenly. Extremely high, prolonged temperatures can cause the seasoning to burn off, leaving sticky spots or bare metal.
- Cooking Highly Acidic Foods for Too Long: Highly acidic foods like tomato sauce, lemon juice, or wine can strip away seasoning if cooked for extended periods, especially in a newly seasoned or less robustly seasoned pan. While occasional short-term cooking of acidic foods is usually fine in a well-seasoned pan, avoid simmering them for hours.
By following these simple care instructions, your restored cast iron will not only provide decades of exceptional cooking performance but will also become a source of pride in your kitchen. It’s an investment in quality, durability, and a truly unique cooking experience. Embrace the journey of cooking with your beautifully restored cast iron!