
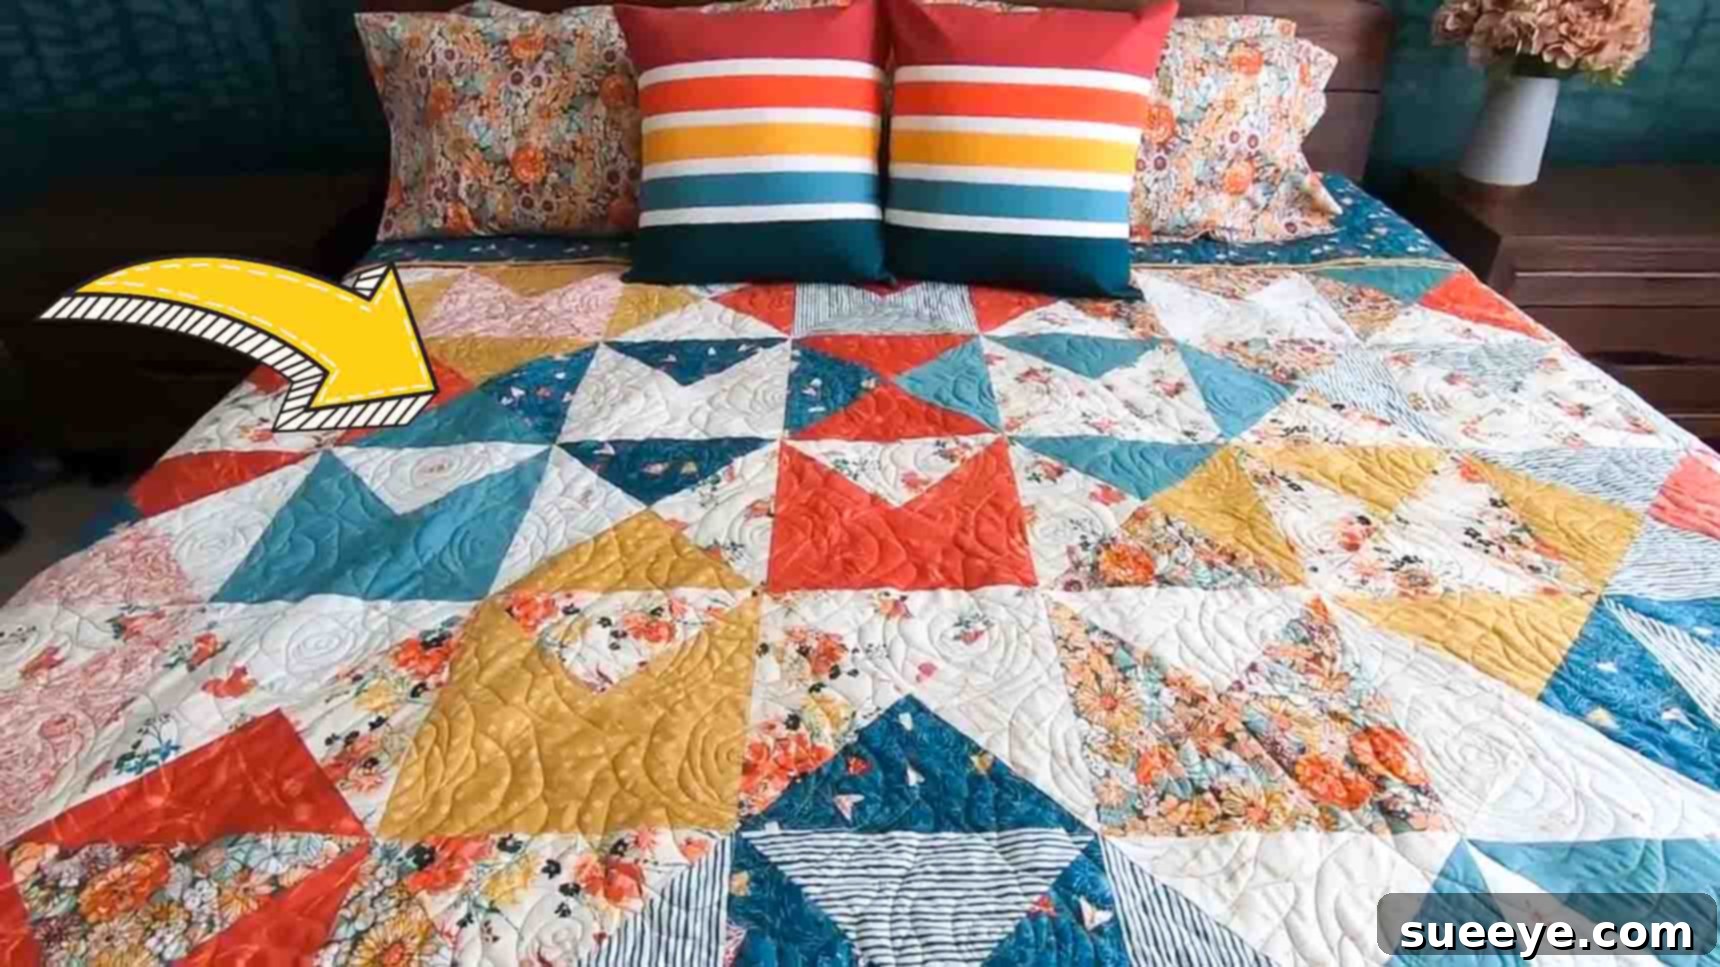
Craft Your Own Love Letters Quilt: An Easy Fat Quarter Tutorial for Beginners
Embark on a delightful quilting journey with the enchanting Love Letters Quilt, a project brought to life by the creative minds at Moonkin Stitchery on YouTube. This charming design is not only incredibly fun to create but also perfectly suited for quilters of all skill levels, especially those just starting out. Imagine crafting a heartfelt piece that speaks volumes, ideal for occasions like Valentine’s Day, a meaningful anniversary, or simply as a cozy addition to your home decor. What makes this project even more appealing is its reliance on readily available fat quarter bundles, making fabric selection both exciting and economical. Depending on the chosen size, you might even find yourself completing this beautiful quilt top in just a single day, offering immense satisfaction for anyone seeking a quick yet rewarding creative endeavor.
This comprehensive guide will walk you through each step of constructing your very own Love Letters Quilt. From the initial cuts to the final seams, we’ll ensure you have all the knowledge and confidence to bring this lovely design to life. Prepare your workspace, gather your fat quarters, and let’s dive into the satisfying world of quilting!
Essential Materials for Your Love Letters Quilt Project
Before you begin, ensure you have all the necessary tools and fabrics. Having everything organized will make your quilting process smoother and more enjoyable. Here’s a list of what you’ll need:
- Fat Quarters: The star of this project! Select a variety of coordinated prints and solids that inspire you. Consider a mix of lighter and darker fabrics for optimal contrast in your quilt blocks.
- Quilting Ruler: A transparent acrylic ruler, preferably 6″ x 24″ or a square ruler (like 12.5″ x 12.5″), is crucial for accurate measuring and cutting. Precision is key in quilting!
- Fabric Marking Tool: A fabric-safe pen, pencil, or chalk will be used to draw diagonal lines on your fabric. Ensure it’s easily visible and removable.
- Iron and Ironing Board: Essential for pressing seams flat and setting your fabric before cutting. A well-pressed quilt looks much more professional.
- Rotary Cutter: A sharp rotary cutter (45mm is standard) will allow for quick, precise, and straight cuts through multiple layers of fabric. Always use it with a self-healing cutting mat for safety and blade longevity.
- Sewing Machine: A reliable sewing machine with a 1/4″ seam foot (or the ability to accurately gauge a 1/4″ seam) is vital.
- Coordinating Thread: Choose a good quality thread that matches or blends with your chosen fabrics.
- Fabric Scissors: Useful for clipping threads or making small, precise cuts.
Step-by-Step Directions to Create Your Love Letters Quilt
Follow these detailed instructions carefully to construct your beautiful Love Letters Quilt. Remember, precision at each stage contributes to a stunning final product.
Step 1: Preparing Your Fabric and Creating Half-Square Triangle Units
The foundation of any great quilt lies in accurate preparation. Begin by taking all your chosen fat quarters and giving them a good press with a warm iron. This step removes any wrinkles or creases, ensuring your cuts are as precise as possible. For optimal results, some quilters choose to pre-wash and dry their fabrics to prevent any future shrinkage or color bleeding, though for smaller projects like this, it’s often optional if you’re using good quality quilting cotton.
Once your fat quarters are pressed flat, the next crucial step is cutting. Each fat quarter typically measures approximately 18 inches by 22 inches. You will first cut an 18-inch square from each fat quarter. To maximize your fabric, align your ruler carefully and make sure your cut is perfectly straight. After you have your 18-inch square, you will then sub-cut this into four 9-inch squares. This means you’ll make one cut across the middle (e.g., at 9 inches) and another cut perpendicular to it (also at 9 inches). Each fat quarter will yield four perfect 9-inch squares, which will form the basis of your quilt blocks. Repeat this process for all of your chosen fat quarters, organizing your stacks of 9-inch squares as you go.
Now comes the exciting part of pairing fabrics for your Half-Square Triangle (HST) units. Select two different prints or a print and a solid from your stack. For each pair, you will need four 9-inch squares from each print, totaling eight squares. On the wrong side of the fabric that is lighter in color (this helps visibility), draw a diagonal line from one corner to the opposite corner. Using a fabric marking tool, make sure the line is clearly visible but not too dark. This line will serve as your guide for cutting later.
With your diagonal line drawn, take one square from each print in your chosen pair. Lay them directly on top of each other, right sides together, ensuring all edges are perfectly aligned. This is critical for accurate piecing. Using your sewing machine, stitch a 1/4-inch seam allowance on both sides of the diagonal line you just drew. Do not sew on the line itself; sew parallel to it. This technique is a fundamental way to create two HSTs from a single square unit.
Step 2: Constructing Your Quilt Blocks with Half-Square Triangles
After you’ve sewn along both sides of the drawn diagonal line, it’s time to transform these units into half-square triangles. Carefully take your sewn square and, using your rotary cutter and ruler, cut precisely along the diagonal line you initially drew. This action will separate your single unit into two triangular pieces. Gently open up each piece to reveal your two newly formed half-square triangles. The next step is crucial for a flat and professional finish: pressing. Carefully press the seam allowance open or to one side, whichever you prefer or find yields a flatter result with your fabric choices. Pressing to the darker fabric is a common practice to prevent seam allowances from showing through lighter fabrics.
Now that you have your HSTs, it’s time to start forming your distinctive quilt blocks. The Love Letters Quilt design often features an “envelope” style block, created by arranging four half-square triangles. For a typical block, you will take four HSTs, ensuring they are from the same fabric pairing to maintain consistency. Lay them out in two rows of two, rotating each HST until they form the desired pattern – an ‘envelope’ or a pinwheel effect, depending on the orientation. Experiment with the arrangement until you achieve the look you desire for your block. Once satisfied with the layout, sew the two HSTs in the top row together with a 1/4-inch seam allowance, and then do the same for the two HSTs in the bottom row. Press these seams. Finally, join the top row to the bottom row, again with a 1/4-inch seam, carefully nesting your seams to ensure points align perfectly. This completes one envelope quilt block.
From your initial cuts, you will likely have many more half-square triangles. With the remaining four HSTs from your original eight 9-inch squares, you have a couple of creative options. You can either recreate an identical envelope block, giving you two matching blocks, or you can invert the design of the first block, creating a mirror image or an entirely new variation. This flexibility allows for unique design opportunities and helps prevent waste. Continue repeating these steps – pairing fabrics, sewing, cutting, pressing, and assembling into blocks – until you have the required number of quilt blocks for the desired size of your finished quilt. It’s always a good idea to refer to a quilt size chart to estimate how many blocks you’ll need.
Step 3: Assembling Your Quilt Top
With your individual quilt blocks completed, the next exciting phase is to assemble them into the full quilt top. This stage brings your design to life. The Love Letters Quilt often incorporates half-blocks along the edges to create a unique border effect that complements the envelope design. To achieve this, select a few of your completed quilt blocks and carefully cut them in half vertically. These will form the left and right sides of your quilt, providing a framed look. Similarly, choose a few more quilt blocks and cut them in half horizontally; these will be used for the top and bottom borders of your quilt.
Now, lay out your full blocks and half blocks on a design wall or a clean floor. This allows you to visualize the entire quilt top and make any adjustments to color placement or pattern arrangement before sewing. Start creating your quilt top by assembling your first row. A common layout for this design begins with a vertically cut half-block. Grab one of these half blocks and a horizontally cut half block. Sew them together with a precise 1/4-inch seam allowance. This forms the corner of your quilt.
For the subsequent rows, the pattern will vary. A typical second row might begin with a half block that was cut vertically, followed by two full, uncut quilt blocks, and then conclude with another half block that was cut horizontally. This creates a staggered, interesting edge. Carefully sew all these pieces together in sequence, maintaining that consistent 1/4-inch seam allowance. As you sew each row, make sure to press your seams efficiently. Some quilters prefer to press all seams in one direction within a row, then alternate direction for the next row; this allows seams to “nest” when you join the rows, reducing bulk and helping points to match perfectly.
Continue to assemble your rows according to your chosen layout, joining individual blocks and half-blocks until each row is complete. Once all your rows are sewn, it’s time to join them together. Pin the rows right sides together, carefully matching all seam intersections. Use plenty of pins to hold everything in place, especially where blocks meet. Sew the rows together with a 1/4-inch seam, taking care to maintain straight lines. Press these final long seams open or to one side. At this point, your beautiful quilt top is complete!
Finishing Your Love Letters Quilt: Beyond the Top
Once your quilt top is beautifully assembled, there are a few more steps to transform it into a functional and cherished quilt.
Adding Borders (Optional)
If you wish to increase the size of your quilt or frame your design, consider adding one or more borders. Borders can be made from solid fabrics that complement your fat quarters or from leftover scraps for a scrappy look. Measure your quilt top accurately through the center, both horizontally and vertically, and cut border strips to these precise lengths and your desired width. Attach the side borders first, press, then attach the top and bottom borders and press again.
Quilting Your Project
Quilting is the process of stitching through all three layers of your quilt: the top, the batting (a soft inner layer that provides warmth and dimension), and the backing fabric. First, create your quilt sandwich by laying your backing fabric wrong side up, smoothing it out. Then, layer your batting on top of the backing, followed by your quilt top right side up. Secure these layers together with basting pins, spray basting, or hand basting stitches. You can then quilt by hand, using a walking foot on your domestic sewing machine for straight lines, or by sending it to a professional longarmer for more intricate designs. The quilting lines add texture, durability, and a finished look to your quilt.
Binding Your Quilt
The final step is binding the edges of your quilt. This protects the raw edges and provides a neat, decorative finish. Create binding strips by cutting fabric into 2.5-inch wide strips, sewing them together end-to-end to create one long strip. Press the strip in half lengthwise. Attach the binding to the front of your quilt, aligning raw edges, and sew with a 1/4-inch seam. Miter the corners for a professional finish. Once sewn to the front, wrap the binding around to the back of the quilt and hand-stitch or machine-stitch it into place. Your Love Letters Quilt is now complete!
Personalization and Care for Your Handmade Quilt
One of the joys of quilting is the ability to personalize each project. Consider using specific colors that have meaning for the recipient, adding a small embroidered label with the date and your signature, or incorporating unique embellishments like decorative stitches or applique. This Love Letters Quilt pattern is incredibly versatile, allowing for endless creative interpretations with different fabric choices and color palettes.
To ensure your beautiful Love Letters Quilt lasts for years to come, proper care is essential. Generally, machine wash your quilt on a gentle cycle with cold water using a mild detergent. Avoid harsh chemicals or bleach. Tumble dry on low heat or, for best results, lay flat to dry. Handmade quilts are durable, but gentle care will help preserve their vibrant colors and stitches.
Embark on Your Quilting Adventure!
Creating your own Love Letters Quilt is a profoundly rewarding experience. From selecting the perfect fat quarters to piecing together each block, you’ll develop new skills and gain immense satisfaction from crafting something beautiful with your own hands. This beginner-friendly project is a fantastic introduction to the world of quilting, offering opportunities for creativity, precision, and heartfelt expression. So, gather your materials, follow these steps, and prepare to fall in love with your very own handmade Love Letters Quilt!
Happy quilting!