
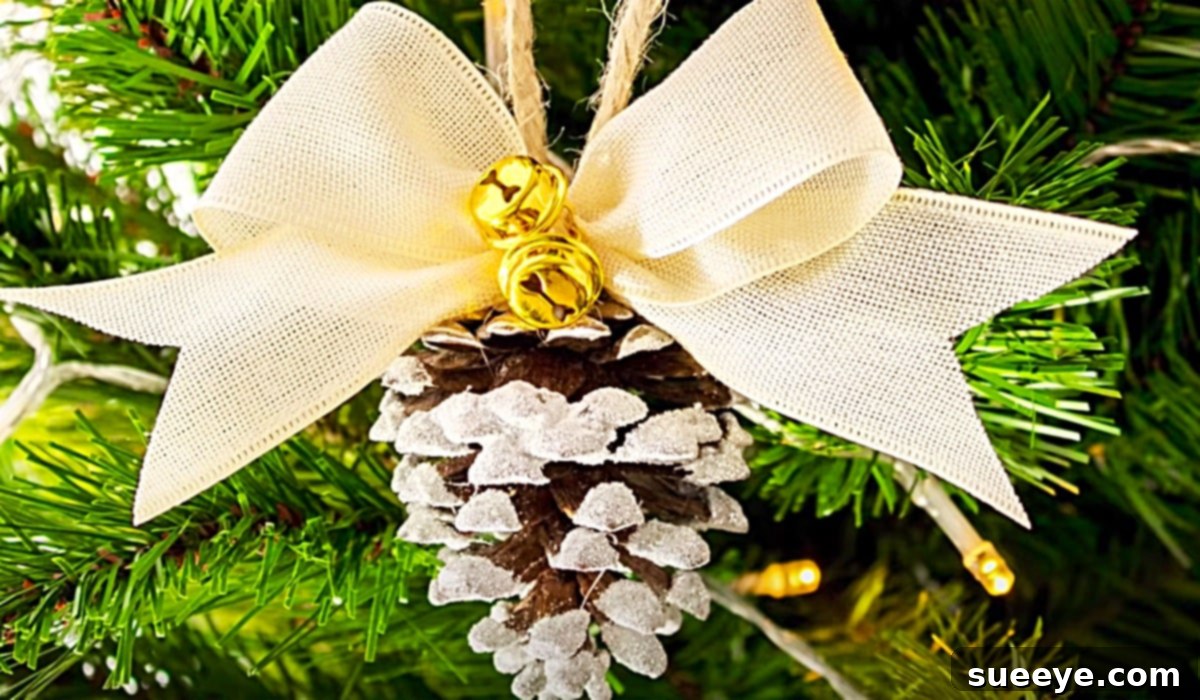
DIY Flocked Pinecone Christmas Tree Ornaments: Crafting Rustic Holiday Charm
There’s a special kind of magic that handmade decorations bring to the holiday season. They infuse our homes with warmth, character, and a touch of personal history that mass-produced items simply can’t replicate. Among the myriad of DIY Christmas projects, those that incorporate natural elements hold a particularly enchanting appeal. Pinecones, with their intricate textures and organic beauty, are a perennial favorite for crafting, especially when transformed into festive ornaments.
I absolutely adore incorporating pinecones into my DIY projects, and they truly shine as Christmas decorations. When I discovered the captivating flocked pinecone Christmas tree ornament video tutorial by Camila Rojas on YouTube, I instantly knew I had to make some for my own tree. The idea of adding a snowy, frosted look to these natural treasures was irresistible, promising to create ornaments that are both rustic and elegant.
Gathering supplies for crafting can be an enjoyable part of the process. For this project, I found a conveniently packaged bag of pinecones at Michael’s craft store. A little tip for savvy crafters: always check for coupons! While standing in the checkout line, I quickly searched my phone browser and found some fantastic discounts. Michael’s coupons are incredibly user-friendly; simply let the cashier scan your phone, and watch the savings add up! Don’t forget that you can often stack coupons, combining a percentage off your entire purchase with a percentage off a single item for even greater value. Smart shopping makes crafting even more rewarding.
These flocked pinecone ornaments are not just beautiful; they’re also surprisingly simple to create, making them a perfect project for crafters of all skill levels. Whether you’re looking to add a homemade touch to your own Christmas tree, create thoughtful gifts for friends and family, or simply enjoy a relaxing afternoon of festive crafting, this project is sure to bring joy and a beautiful result.
Essential Materials for Your Flocked Pinecone Christmas Tree Ornaments
Before diving into the creative process, ensure you have all your materials ready. Gathering everything beforehand makes the crafting experience much smoother and more enjoyable. Here’s a detailed list of what you’ll need:
- A Bag of Pinecones: You can purchase these at craft stores, or if you prefer a more natural approach, collect them from outdoors. If collecting, ensure they are clean and dry, perhaps even baked at a low temperature for an hour to kill any potential insects.
- A Spool of Ribbon: Choose a festive color and material that complements your holiday decor. Satin, velvet, or burlap ribbons all offer different aesthetic appeals. Consider patterns like plaid or simple solids.
- Elmer’s White Glue: A classic craft staple, white school glue works perfectly for adhering glitter. Its consistency allows for even application and it dries clear.
- Twine: Natural jute twine is ideal for creating a rustic hanging loop. You could also opt for metallic string or a thin ribbon for a different look.
- Glitter: The star of the “flocking” effect! Choose a color that evokes a snowy, frosted look – typically white, silver, or iridescent. Extra-fine glitter provides a more delicate shimmer, while chunky glitter offers a bolder sparkle.
- Small Bells or Other Christmas-Themed Decorations: Tiny jingle bells, miniature berry clusters, small bows, or even tiny wooden stars can be charming additions. These embellishments add personality and extra festive cheer.
- A Hot Glue Gun: Indispensable for quickly and securely attaching the ribbon, bells, and twine hanger.
- Glue Sticks: Ensure you have plenty of hot glue sticks to complete all your ornaments.
- Newspaper or Craft Mat: To protect your work surface from glue and glitter.
- Small Bowl or Plate: For holding the glitter.
Step-by-Step Guide: Crafting Your Flocked Pinecone Ornaments
This section provides a detailed, easy-to-follow guide to creating your beautiful flocked pinecone ornaments. Each step is designed to be clear and manageable, ensuring a successful and enjoyable crafting experience.
Step 1: Preparing Your Pinecones for Flocking
First, if you collected your pinecones from nature, ensure they are thoroughly clean and dry. Gently brush off any dirt or debris. If you bought them, they are likely ready to go. Lay down newspaper or a craft mat to protect your work surface, as glitter can be quite pervasive.
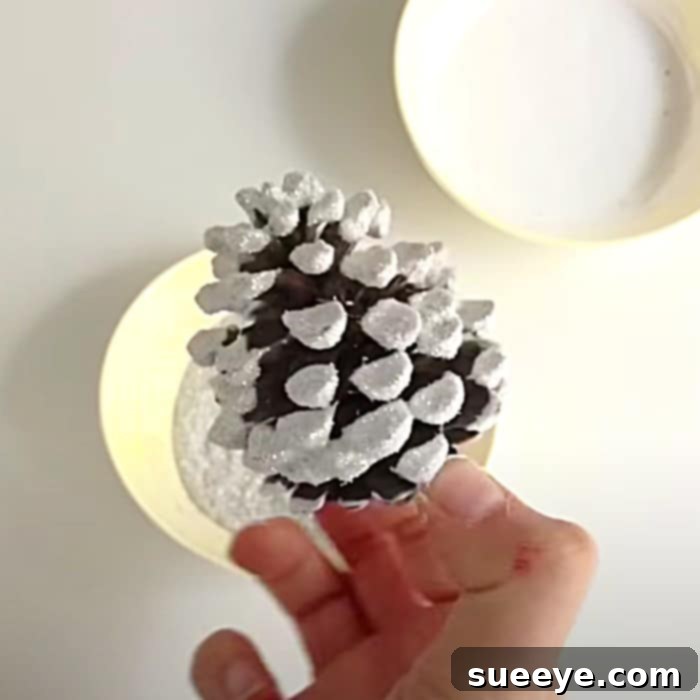
To achieve the “flocked” effect, you’ll start by applying white glue to your pinecone. Squeeze a generous amount of Elmer’s white glue onto a plate or into a shallow dish. Carefully roll the pinecone in the glue, ensuring that the tips of the scales, where the “snow” would naturally accumulate, are well coated. You don’t need to completely saturate the entire pinecone; focusing on the edges and tips will give it a more authentic, snow-dusted appearance. Use a small paintbrush or your finger to dab glue into any hard-to-reach crevices if desired.
Step 2: Applying the Glitter for a Snowy Effect
Once the pinecone is sufficiently coated with glue, it’s time for the magical part: the glitter! Pour your chosen glitter (white, silver, or iridescent are best for a snow effect) into a separate shallow bowl or plate. While the glue is still wet, gently roll the glue-coated pinecone in the glitter. You can also sprinkle glitter generously over the pinecone, turning it to ensure all glue-covered areas are sparkling. Don’t be shy with the glitter; excess can always be tapped off.
Once you’ve achieved your desired level of sparkle, gently tap off any loose glitter back into the bowl. Place the glittered pinecone on a clean piece of newspaper or a drying rack to allow the glue to dry completely. This might take a few hours, depending on how much glue you used and the humidity of your environment. For best results, allow at least 2-4 hours, or even overnight, to ensure the glitter is firmly set.
Step 3: Adding the Twine Hanger
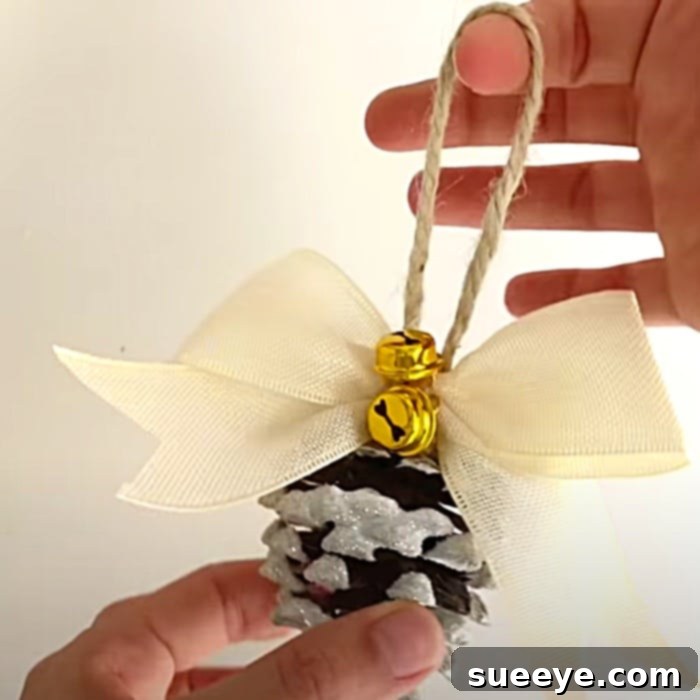
Once your flocked pinecone is completely dry and the glitter is securely attached, it’s time to add the hanging mechanism. Cut a piece of twine approximately 8-10 inches long. Form a loop with the twine and tie the ends together in a secure knot, creating a small hanger. Apply a small dab of hot glue to the very top center of your pinecone. Quickly press the knotted end of your twine loop into the hot glue, holding it firmly until the glue sets. Ensure the loop is strong enough to hold the weight of the ornament.
Step 4: Decorating with Ribbon and Bells
Now for the finishing touches that truly bring your ornament to life! Cut a piece of your chosen ribbon to a length that will allow you to tie a small bow or create a decorative loop. For a classic look, cut about 6-8 inches of ribbon. Tie a small bow and then, using your hot glue gun, carefully attach the bow near the base of the twine hanger, or directly onto one of the upper pinecone scales, allowing it to drape elegantly.
If you’re adding bells or other small embellishments, this is the time to do it. Place a tiny drop of hot glue on the back of a bell and press it firmly onto the ribbon, or directly onto a pinecone scale. You can cluster a few bells together or place a single one for a minimalist look. Ensure all embellishments are securely attached so they don’t fall off during handling or storage.
Tips for Achieving a Perfect Flocked Finish
- Pinecone Variety: Different types of pinecones offer varied textures. Experiment with larger, more open pinecones for a bolder look, or smaller, tighter ones for a delicate effect.
- Even Glue Application: For a uniform flocked look, ensure your glue is applied evenly. A foam brush can help if you find rolling difficult.
- Minimize Mess: Work over a tray or a large sheet of paper. This makes it easy to collect excess glitter and return it to its container, reducing waste and mess.
- Drying Time is Key: Patience is crucial. Rushing the drying process can lead to glitter falling off. Ensure the glue is completely dry before handling or decorating further.
- Alternative Flocking: If glitter isn’t your preference, you can achieve a similar “snowy” effect by using white craft paint. Lightly dry-brush white paint onto the tips of the pinecone scales for a more subtle, matte flock.
Creative Variations and Beyond the Tree
The beauty of DIY lies in customization! While the classic white glitter and twine combination is stunning, don’t hesitate to experiment with different looks:
- Color Play: Instead of white or silver glitter, try gold, rose gold, or even a festive red or green glitter for a bolder statement.
- Natural Accents: Incorporate small sprigs of faux evergreen, miniature faux berries, or cinnamon sticks for an extra touch of natural charm and fragrance.
- Ribbon Choices: Explore different ribbon textures and patterns. Plaid, velvet, or wired ribbons can completely change the character of the ornament.
- Beyond Ornaments: These flocked pinecones are incredibly versatile!
- Garlands: String multiple decorated pinecones together to create a festive garland for your mantel or staircase.
- Centerpieces: Arrange them in a bowl with other natural elements like evergreen branches, cranberries, and fairy lights for a stunning holiday centerpiece.
- Gift Toppers: Attach a single flocked pinecone to a wrapped gift for a beautiful, handmade touch.
- Wreath Enhancements: Hot glue them onto a plain evergreen wreath for added texture and sparkle.
Why Choose DIY Christmas Decor?
Creating your own Christmas decorations, like these flocked pinecone ornaments, offers numerous benefits beyond just a beautiful end product:
- Personal Touch: Handmade ornaments add a unique and personal touch to your holiday display, reflecting your style and creativity.
- Cost-Effective: Often, DIY projects are more budget-friendly than buying pre-made decor, especially when you can source natural elements like pinecones for free or at a low cost.
- Family Activity: Crafting can be a wonderful activity for families, creating cherished memories and traditions. It’s a great way to spend quality time together during the festive season.
- Eco-Friendly: Utilizing natural materials and reusing items can make your holiday decor more sustainable.
- Sense of Accomplishment: There’s immense satisfaction in looking at your beautifully decorated tree and knowing you created many of the elements yourself.
This is such an amazing project, I truly love the rustic farmhouse appeal of these awesome ornaments. They embody the cozy, traditional spirit of Christmas and bring a lovely, natural elegance to any tree or holiday display. They’re a testament to how simple materials, combined with a little creativity, can produce truly stunning results.
So, gather your supplies, put on some festive music, and enjoy the process of crafting these delightful flocked pinecone Christmas tree ornaments. Your home will be filled with the warmth and charm of handmade holiday cheer!