
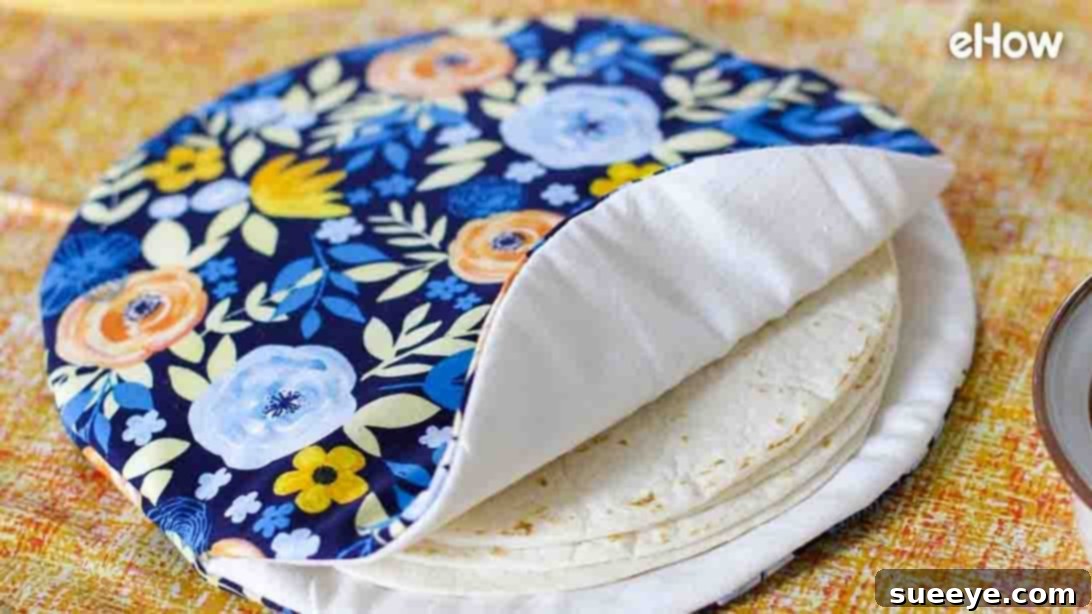
DIY Reusable Tortilla Warmer: Master the Art of Keeping Tacos Warm
Are you tired of your tortillas getting cold halfway through your delicious taco night? Nothing saps the joy from a perfect meal faster than a stack of lukewarm, stiff tortillas. Fret not, fellow food enthusiasts and DIY crafters! We have the ultimate solution for you: a handmade, reusable tortilla warmer. This fantastic sewing project, inspired by a brilliant tutorial from ehow on YouTube, is not only incredibly easy to make but also promises to keep your tortilla wraps wonderfully warm and pliable throughout your entire meal.
Imagine never having to rush back to the microwave to reheat your wraps again. With this simple yet effective DIY tortilla warmer, your tortillas will stay perfectly toasty, enhancing every bite. It’s a game-changer for casual weeknight dinners, lively gatherings, and even grand celebrations where warm food is key. Beyond its practicality, this project is a joy to create, perfect for beginners in sewing, and offers endless possibilities for customization. It’s also an excellent idea for a thoughtful, handmade gift or a popular item to sell at local craft fairs, guaranteed to be an instant hit.
This comprehensive guide will walk you through every step, ensuring you can confidently create your own beautiful and functional tortilla warmer. We’ll cover everything from selecting the right materials to detailed sewing instructions, essential usage tips, and even crucial care recommendations. Get ready to elevate your taco nights, impress your friends and family with your crafting prowess, and enjoy consistently warm tortillas from start to finish!
You might also be interested in: Easy Tortilla Warmer Sewing Tutorial
Why Make Your Own Reusable Tortilla Warmer? The Benefits Unveiled
Investing a little time and effort into creating a homemade tortilla warmer brings a wealth of advantages. This isn’t just a fun craft; it’s a practical, sustainable, and satisfying addition to any kitchen that loves to serve warm, fresh tortillas.
1. Keep Tortillas Perfectly Warm and Pliable
The primary benefit, of course, is its superb ability to retain heat. Crafted with multiple layers of 100% cotton fabric and specialized insulation, these warmers are designed to trap warmth efficiently. This means your tortillas, whether corn or flour, will remain soft, flexible, and deliciously warm from the first taco to the very last. No more rubbery or cold wraps interrupting your mealtime flow, ensuring every bite is as enjoyable as the first.
2. Eco-Friendly and Sustainable Choice
In an age where sustainability is paramount, choosing a reusable option over disposable alternatives is a smart and responsible move. Say goodbye to single-use foil, paper towels, or plastic bags often used for warming tortillas. Your DIY tortilla warmer is fully washable, exceptionally durable, and designed for countless uses, significantly reducing household waste and supporting an eco-conscious lifestyle. It’s a small change that makes a big difference.
3. Budget-Friendly Craft Project
Compared to purchasing specialized, often expensive, store-bought warmers, crafting your own is incredibly cost-effective. You can often utilize fabric scraps you already have on hand, or purchase inexpensive cotton remnants from a local craft store. This makes it an economical project that yields significant value for your money, especially when you consider its longevity and repeated use.
4. Ideal for Beginner Sewers
If you’re new to the world of sewing, this project is an absolute dream come true. It involves basic straight stitching, simple circular shapes, and fundamental fabric manipulation techniques. It’s an excellent way to practice your machine sewing skills, build confidence in your crafting abilities, and create a truly useful item without feeling overwhelmed by complex patterns or intricate details.
5. Fantastic Handmade Gift Idea
Looking for a unique, thoughtful, and incredibly practical gift? A handmade tortilla warmer fits the bill perfectly! It’s an excellent present for housewarmings, bridal showers, birthdays, or for anyone who loves to entertain, enjoys Mexican cuisine, or simply appreciates a good taco night. Personalize it with the recipient’s favorite colors, patterns, or even a monogram for an extra special and memorable touch.
6. Great for Craft Fairs and Selling
For those with an entrepreneurial spirit or a desire to share their talents, these reusable tortilla warmers are highly marketable. They are popular items at local craft fairs, farmers’ markets, online shops, and school bazaars. Their combination of functionality, customizable aesthetics, and handmade charm makes them an instant hit with customers looking for unique, practical kitchen accessories.
7. Endless Customization Options
One of the most exciting aspects of this DIY project is the freedom to choose your fabrics. Express your personal style with vibrant patterns, classic solids, whimsical prints, or themed fabrics to match your kitchen decor or a specific occasion. The possibilities for personalization are truly endless, making each warmer a unique reflection of your creativity.
Materials You’ll Need for Your Homemade Tortilla Warmer
Gathering the right materials is the essential first step to a successful project. It is crucial to ensure all your fabrics and thread are 100% cotton, as this is paramount for microwave safety and optimal heat retention. Synthetic materials can melt, scorch, or even pose a fire hazard in the microwave, so meticulous material selection is key.
- 2 – 11″ circles of 100% patterned cotton outer fabric: This will form the decorative exterior of your warmer. Choose a print or color scheme that you absolutely love and that complements your kitchen or recipient’s style.
- 2 – 11″ circles of 100% plain cotton lining fabric: These pieces will serve as the inner layers of your warmer. While plain is perfectly functional, you could also opt for a subtly coordinating pattern if you desire extra flair.
- 2 – 11″ circles of 100% cotton insulation (e.g., Warm & Natural batting): This is the crucial component responsible for effective heat retention. It is imperative that this insulation is 100% cotton and explicitly labeled as microwave-safe.
- 100% cotton thread: Select a thread color that either perfectly matches your chosen fabrics or a neutral shade that blends seamlessly. Using cotton thread is non-negotiable for microwave safety.
- Pins: An ample supply of good quality pins is essential for holding your various fabric layers securely in place during the sewing process, preventing shifting.
- Sharp Fabric Scissors or Rotary Cutter: For achieving precise and clean cuts of your fabric circles. A rotary cutter paired with a self-healing cutting mat is highly recommended for unparalleled accuracy and ease.
- Sewing Machine: A basic, functional sewing machine will make this project remarkably quick and straightforward, handling the layers with ease.
- Iron and Ironing Board: Indispensable tools for pressing seams flat as you go, and for giving your finished tortilla warmer a crisp, professional, and polished appearance.
- Circle Template (optional, but highly recommended): A dinner plate, a large bowl, or a specialized compass can be used to draw accurate 11-inch circles on your fabric, ensuring perfect symmetry.
Step-by-Step Directions: Crafting Your Reusable Tortilla Warmer
Follow these detailed, easy-to-understand instructions to create your beautiful and highly functional tortilla warmer. Take your time with each step, and don’t hesitate to refer to the original video tutorial from ehow if you need visual guidance for any specific technique.
Step 1: Prepare Your Fabric Circles with Precision
Begin by meticulously cutting out all six of your 11-inch fabric circles. You’ll have two patterned outer fabric circles, two plain cotton lining fabric circles, and two essential cotton insulation circles. Precision at this stage is paramount for a neat and perfectly round finished product. Once cut, lay them out and keep them organized to avoid any confusion during the subsequent assembly process.
Step 2: Assemble and Stitch the First Half of the Warmer
Take one insulation circle and place it flat on your work surface. On top of this, place one of your plain cotton lining fabric circles, ensuring its “right side” (the side you want to see) is facing up. Finally, place one of your patterned outer fabric circles on top, with its “right side” facing down. You should now have three distinct layers stacked in this order: insulation, lining (right side up), outer fabric (right side down).
Carefully align the raw edges of these three circles. Using your pins, secure these layers together around the perimeter, making sure to pin approximately halfway around the circle. Now, using your sewing machine, stitch along the pinned edge with a consistent 1/4-inch seam allowance. Remember to backstitch at the very beginning and end of your seam to securely lock the stitches in place. As you sew, remove the pins just before your needle reaches them to prevent sewing over them, which can damage your needle or machine.
Step 3: Trim, Turn, and Press the First Half for a Crisp Finish
Once you’ve sewn halfway around, it’s time to prepare the seam for a smooth turn. Along the sewn seam allowance, carefully cut small notches (V-shapes or triangles) into the fabric, especially around the curve. Be exceedingly careful not to cut through your stitch line. These notches are vital as they will help the curved seam lie flat and smooth once the project is turned right side out. After notching, gently turn the entire project right side out through the unstitched opening you left. Use a blunt tool, such as a turning tool or the end of a chopstick, to gently push out the curved seam and get a nice, smooth, and defined edge. Finally, take your iron and carefully press the curved seam flat. This creates a crisp, professional-looking finish for the first half of your tortilla warmer.
Step 4: Create the Second Identical Half of the Warmer
Repeat Step 2 and Step 3 precisely as described for the remaining three circles (one insulation, one lining, one outer fabric). You will now have two identical, semi-finished halves of your tortilla warmer. It’s crucial to ensure both halves are neatly turned right side out and thoroughly pressed before proceeding to the next step. Consistency in these two halves is key to achieving a perfectly round and functional warmer.
Step 5: Join the Two Halves Together to Form the Warmer
Now, take your two completed halves and place them right sides together. This means the beautiful patterned outer fabrics should be facing each other. Carefully align all the raw, unstitched edges from both halves. These are the edges that were left open in the previous steps. Pin these raw edges together securely, working your way around the entire circular perimeter. Precision in alignment here is crucial for ensuring a smooth, seamless join in your final product.
Step 6: Stitch the Halves, Finish, and Press
With the raw edges securely pinned, sew around the entire circle, using a 1/4-inch seam allowance. As you stitch, remember to leave a small opening of approximately 3-4 inches along one side. This opening is vital, as it will be used for turning the entire project right side out one last time. Remember to backstitch at the beginning and end of the seam enclosing this opening to reinforce it. Once sewn, carefully cut notches into the seam allowance around the entire circle, paying extra attention to the curved areas, being meticulous not to snip through your actual stitches. This will help the final seam lie beautifully flat and smooth.
Through the opening you deliberately left, gently turn the entire tortilla warmer right side out. Use a blunt tool (like a turning tool or a chopstick) to carefully push out all the curves smoothly and evenly. Once turned, meticulously fold in the raw edges of the opening and press them flat with your iron. You can then hand-stitch this opening closed using a ladder stitch for an almost invisible finish, or machine-stitch it very close to the edge for a more visible but equally secure closure. Give the entire warmer a final, thorough press with your iron to make it perfectly crisp, professional-looking, and ready for use.
How to Use Your DIY Reusable Tortilla Warmer
Using your newly crafted tortilla warmer is incredibly simple and remarkably effective. Follow these straightforward steps to ensure your tortillas stay perfectly warm and inviting throughout your entire meal, making every taco or fajita a delight:
- Stack Your Tortillas: Begin by warming your tortillas (whether corn or flour) using your preferred method—be it on a hot griddle, in a dry skillet, or even a few at a time in the microwave. Once warm, carefully stack them directly inside the center of your newly made tortilla warmer.
- Microwave (Optional for Extra Heat): For an extra boost of warmth, or if your tortillas are starting from room temperature, you can place the tortillas inside the warmer and then place the entire warmer into the microwave. Heat for an initial 30 to 60 seconds, depending on the number of tortillas and the wattage of your microwave. Always start with less time and add more if needed. It is absolutely critical to ensure that all materials used in your warmer (fabric, thread, and batting) are 100% cotton and explicitly labeled microwave-safe before using this method.
- Fold and Serve: Once the tortillas are to your desired warmth, simply fold the sides of the fabric warmer over your stack of tortillas, creating a neat, insulating pouch. The carefully selected cotton insulation will then work its magic, efficiently trapping the heat and keeping them warm for an extended period, allowing you and your guests to enjoy your meal without any cold interruptions.
This simple yet effective method ensures your tortillas remain soft, pliable, and delightfully warm, significantly enhancing your overall dining experience.
Caring for Your Handmade Tortilla Warmer
To ensure your beautiful and reusable tortilla warmer lasts for countless taco nights, picnics, and family gatherings, proper care and maintenance are essential. Following these simple guidelines will help preserve its beauty and functionality:
- Washing: When your tortilla warmer inevitably gets dirty from spills or general use, simply toss it into your washing machine. Use cold water and select a gentle cycle to help preserve the fabric’s integrity and the stitching. Avoid harsh detergents or bleach, which can degrade the cotton fibers and fade patterns.
- Drying: You have a couple of options for drying. You can either tumble dry it on a low heat setting in your dryer. For the best results, to prevent potential shrinking, and to significantly prolong its life, we recommend air drying it. Lay it flat on a clean surface or hang it to dry completely.
- Ironing: If your tortilla warmer becomes wrinkled after washing or drying, a quick press with a warm iron will make it look as good as new. Use a medium heat setting and iron both sides if necessary to achieve a crisp, fresh appearance.
Tips for Success and Customization of Your Tortilla Warmer
Elevate your tortilla warmer project from simply functional to truly extraordinary with these helpful tips and creative customization ideas. Make it uniquely yours or perfectly suited for a gift recipient!
- Thoughtful Fabric Selection: Don’t be afraid to mix and match vibrant patterns and classic solids to create visual interest. Consider holiday-themed fabrics for festive use (e.g., Cinco de Mayo, Christmas) or fabrics that perfectly match your existing kitchen decor. Always remember, 100% cotton is a non-negotiable requirement for microwave safety and optimal performance.
- Sizing Up or Down for Versatility: While an 11-inch diameter is a standard and highly versatile size, you can easily adjust the pattern to fit larger burritos or smaller street tacos. Just ensure all three layers (outer, lining, and insulation) are consistently cut to your desired new size to maintain proper structure and function.
- Adding Personal Embellishments: For a truly personalized touch, consider adding a small embroidered initial, a decorative fabric tag with care instructions, or even a small fabric loop for convenient hanging storage. Always ensure that any embellishments you choose are also 100% cotton and microwave-safe if you intend to use the warmer in the microwave.
- Precision Cutting for Professionalism: For perfectly round circles and cleaner edges, which contribute significantly to a professional finish, use a rotary cutter with a large circular template. A dinner plate or a pre-made craft template can also serve as excellent guides if you don’t own a rotary cutter.
- Efficient Batch Sewing: If you’re planning to make multiple tortilla warmers—perhaps for gifts, craft fairs, or just to have several on hand—consider streamlining your process by cutting all your fabric circles at once. This “batch cutting” method can significantly save time and improve efficiency.
- Practice Makes Perfect for Curves: If you’re relatively new to sewing or find sewing curves challenging, take a few moments to practice on some scrap fabric first. Don’t be discouraged if your first attempt isn’t absolutely flawless; every stitch is a valuable learning opportunity, and your skills will improve with practice!
Frequently Asked Questions About DIY Tortilla Warmers
Q1: Is this homemade tortilla warmer genuinely microwave safe?
A: Yes, absolutely! The paramount factor for microwave safety is to ensure that all your materials – the outer fabric, the lining fabric, the batting/insulation, and even the thread – are made exclusively from 100% cotton. Cotton is a natural fiber that can safely withstand microwave heat without melting or posing a fire hazard. Synthetic materials like polyester or fabric blends can melt, scorch, or even ignite in a microwave, so always double-check your fabric composition tags meticulously.
Q2: How long will my tortillas stay warm in this homemade warmer?
A: When properly insulated and used according to instructions, your DIY tortilla warmer can keep tortillas warm for a surprisingly long duration, typically 30-60 minutes, and sometimes even longer, depending on the initial temperature of the tortillas and the ambient room temperature. This extended warmth is usually more than enough time to enjoy a leisurely taco night or a multi-course meal without the inconvenience of cold interruptions.
Q3: Can I use different types of insulation besides cotton batting?
A: While 100% cotton batting (such as popular brands like Warm & Natural) is highly recommended for its proven safety and effectiveness, you might encounter other 100% cotton options specifically designed for microwave use. If considering an alternative, always verify that the insulation is explicitly labeled as “microwave-safe” and composed entirely of natural cotton fibers to prevent any potential hazards.
Q4: Can this versatile warmer be used for foods other than tortillas?
A: Definitely! This remarkably versatile warmer is perfect for keeping a variety of other small baked goods warm too. Think fluffy pancakes, crispy waffles, soft pita bread, warm naan, freshly baked dinner rolls, or even small biscuits. It’s an incredibly handy addition to any breakfast, brunch, or dinner spread, ensuring all your warm breads are ready to serve and enjoy at their best temperature.
Q5: What size tortillas does an 11-inch warmer typically accommodate?
A: An 11-inch diameter warmer is quite versatile and well-suited for common tortilla sizes. It comfortably holds standard 6-inch flour tortillas and most corn tortillas, allowing for a good, substantial stack. It can even accommodate slightly larger 8-inch flour tortillas, though the stack might be a bit smaller. For very large burritos or oversized flatbreads, you might consider scaling up the pattern to a 12 or 13-inch circle for optimal fit.
Q6: What if my sewing machine struggles with multiple fabric layers?
A: If your sewing machine struggles when stitching through the multiple layers of fabric and batting, there are several troubleshooting steps you can take. First, try installing a fresh, sharp needle (a denim or heavy-duty needle often works best for thicker fabrics). Adjust your stitch length slightly longer, and ensure you’re not pulling or pushing the fabric through the machine. Go slowly and steadily. For very thick layers, a specialized walking foot attachment can be a true lifesaver, as it helps feed all the layers evenly through the machine.
Final Thoughts: Enjoy Your Handmade Warmth!
Congratulations! You’ve successfully learned how to create your very own reusable tortilla warmer. This simple yet incredibly rewarding sewing project yields a truly functional, beautiful, and sustainable item that will undoubtedly enhance countless meal times and gatherings. Whether you’re hosting a lively taco party for friends or simply enjoying a quiet dinner at home, your homemade warmer ensures your tortillas stay perfectly toasty, soft, and inviting.
Beyond its immense utility, the act of crafting something with your own hands brings a unique sense of accomplishment and satisfaction. It’s a wonderful testament to your creativity and skill, and a fantastic way to add a personal, homemade touch to your kitchen or to share a thoughtful, handmade gift with loved ones. So, gather your materials, fire up your sewing machine, choose your favorite fabrics, and get ready to enjoy the warmth, convenience, and charm of your new DIY tortilla warmer. Happy sewing, and most importantly, happy taco eating!