
Mastering the Art of Scrap Quilting: An Easy Quilt Block for Beginners
Do you have a treasured collection of fabric scraps, perhaps remnants from cherished projects or unique patterns you simply couldn’t part with? If so, you’re sitting on a goldmine of creative potential! Instead of letting these beautiful pieces gather dust, transform them into something truly special. Fabric scrap quilting is not only an incredibly rewarding hobby but also a fantastic way to practice sustainability and create unique, personalized items for your home or as gifts.
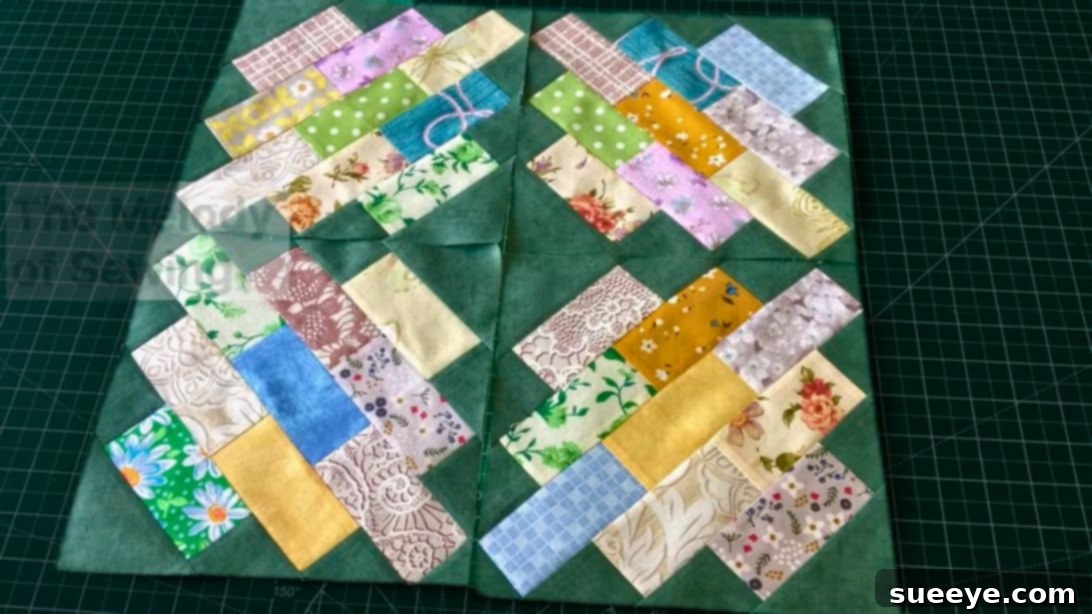
For those new to the world of quilting, or even experienced sewers looking for a quick and satisfying project, a simple yet stunning quilt block is the perfect starting point. We’re excited to share an easy quilt block pattern, courtesy of The Melody of Sewing, that’s designed with beginners in mind. This particular block stands out because it primarily uses rectangles and squares, allowing the individual beauty and design of each fabric piece to shine through without complex cutting or intricate piecing. It’s a gateway to endless design possibilities, from cozy quilts to decorative table runners and charming throw pillows.
Why Embrace Fabric Scrap Quilting? Sustainable Creativity at Your Fingertips
Fabric scrap quilting is more than just a craft; it’s a movement towards mindful creation and sustainability. In a world where textile waste is a significant concern, repurposing fabric scraps offers an eco-friendly alternative to discarding them. Every small piece of fabric, regardless of its size or shape, holds the potential to become part of a larger, more beautiful narrative. This practice not only reduces waste but also provides a sense of accomplishment knowing you’ve given new life to materials that might otherwise have been thrown away.
Beyond its environmental benefits, working with fabric scraps sparks incredible creativity. The limitations of working with smaller pieces often lead to innovative design solutions and unexpected color combinations. It encourages quilters to think outside the box, experimenting with textures, patterns, and hues they might not typically pair together. This process of discovery and improvisation makes each scrap quilt truly one-of-a-kind, reflecting the unique personality and artistic vision of its creator.
Moreover, scrap quilting is incredibly cost-effective. You no longer need to purchase large amounts of new fabric for every project. By utilizing your existing stash, you can create stunning pieces without breaking the bank. This makes quilting more accessible and enjoyable for everyone, allowing you to focus on the joy of creation rather than the cost of materials. It’s a fantastic way to develop your quilting skills, from precise cutting and accurate piecing to mastering the art of fabric arrangement, all while making a positive impact on your wallet and the planet.
RELATED: Discover more creative ways to utilize your fabric remnants in our guide: 7 Easy and Practical Ways to Use Up Tiny Fabric Scraps
The Perfect Start: A Beginner-Friendly Quilt Block Design
Choosing the right first project can make all the difference in your quilting journey. This particular quilt block is an ideal choice for beginners because it simplifies the piecing process without sacrificing visual appeal. By focusing on rectangular and square units, it minimizes complex angles and tricky seam alignments, allowing you to build confidence with each stitch. The design itself is incredibly versatile, making it suitable for a wide array of projects, from small decorative items to full-sized quilts.
The beauty of this block lies in its ability to highlight your chosen fabrics. Each rectangle and square gets its moment to shine, perfect for showcasing those beloved patterned fabrics or creating a vibrant interplay of solids. Even though it’s simple to construct, the addition of diagonally cut background squares introduces an element of sophisticated design, giving the finished block a dynamic and professional look.
This block isn’t just for beginners; it’s also a fantastic “go-to” pattern for experienced quilters looking for a quick sew or a way to bust their scrap stash. Once you master this basic block, you’ll be amazed at the myriad of designs you can create by simply altering the fabric choices or rearranging the blocks themselves. Let’s gather our materials and embark on this enjoyable quilting adventure!
Essential Supplies for Your Scrap Quilt Block Project
Before diving into the fun of cutting and sewing, ensure you have all the necessary supplies. Accuracy is key in quilting, so investing in good quality tools will make the process much smoother and yield better results. Here’s what you’ll need for one beginner-friendly quilt block, along with general quilting notions:
Quilt Block Specific Fabric Pieces:
- 9 pieces of different 2″ by 4″ rectangles (These will form the core design elements of your block. Vary your patterns and colors for a dynamic look.)
- 4 pieces of 2 1/2″ background squares (These will be cut diagonally to create corner triangles for your first two rows.)
- 1 piece of 3 1/2″ background square (This will be cut diagonally to create the top and bottom triangles of your central section.)
- 1 piece of 2″ background square (This will be cut diagonally to create the side triangles for your middle row.)
General Quilting Notions:
- Rotary Cutter: Essential for precise, straight cuts. Make sure your blade is sharp.
- Self-Healing Cutting Mat: Protects your work surface and your rotary blade.
- Quilting Rulers: Clear acrylic rulers with 1/4-inch markings are invaluable for accurate measuring and cutting. A 6×24 inch ruler and a smaller square ruler (e.g., 6.5×6.5 inch) are highly recommended.
- Sewing Machine: A reliable machine with a 1/4-inch presser foot attachment is a game-changer for consistent seam allowances.
- Thread: High-quality 100% cotton thread is ideal for quilting. Choose a neutral color like white or light gray, or a color that blends with your fabrics.
- Iron and Ironing Board: Proper pressing at each step is crucial for flat, accurate blocks.
- Fabric Scissors: For cutting thread and occasional fabric adjustments.
- Pins or Fabric Clips: To hold fabric pieces together before sewing.
- Seam Ripper: Every quilter needs one! Don’t be afraid to use it for accuracy.
Before you begin, ensure all your fabrics are pre-washed and pressed flat. This step prevents future shrinkage and ensures your finished quilt remains crisp and square.
Step-by-Step Guide: Crafting Your Easy Fabric Scrap Quilt Block
Follow these detailed instructions to create your beautiful quilt block. Precision in cutting and sewing will lead to a wonderfully professional finish.
Step 1: Prepare Your Background Squares
Take the four pieces of 2 1/2″ background squares. Using your rotary cutter and ruler, carefully cut each square in half diagonally from one corner to the opposite corner. This will yield eight identical background triangles. These triangles will form the corner accents of your first and last rows, adding a subtle touch of contrast and framing your main fabric rectangles.
Step 2: Lay Out Your Design Foundation
This is where your block truly begins to take shape! Arrange your nine different 2″ by 4″ rectangles on your work surface. The key is to create three rows, with three rectangles in each row. The photo below provides an excellent visual guide for the arrangement. Experiment with different color and pattern placements until you achieve a look that pleases your eye. This “dry-laying” step is crucial for visualizing your final design and making any adjustments before you commit to sewing.
Step 3: Add the First Corner Triangles
Now, take the triangles you created in Step 1. Carefully place these triangles on the short ends of the rectangles in your first two rows and your last two rows (referencing your dry layout). For the first row, place a triangle on each end of the three rectangles. Do the same for the last row. For the middle row, only place triangles on the ends of the two outer rectangles. Pin them securely, ensuring the raw edges are aligned. When sewing, use a consistent 1/4-inch seam allowance. Press the seams open or towards the darker fabric to minimize bulk and ensure a flat finish.
Step 4: Integrate the Top and Bottom Triangles
Retrieve the 3 1/2″ background square. Just like in Step 1, cut it in half diagonally from corner to corner, creating two larger triangles. These triangles will be placed along the top and bottom edges of your main block assembly, specifically where the outer rectangles meet the middle section. These larger triangles provide a visual anchor for the overall design, extending the background outwards and giving your block a finished, framed appearance. Pin and sew with a 1/4-inch seam, then press.
Step 5: Complete the Middle Row Accents
Finally, get the 2″ background square and cut it in half diagonally, yielding two smaller triangles. These will be strategically placed on the sides of the middle row of your quilt block. These smaller triangles serve to complete the geometric pattern and seamlessly integrate the central design element with the outer sections. Pay close attention to the photo below for precise placement, as these small details significantly impact the final look of your block. Pin, sew with a 1/4-inch seam, and press your seams.
Step 6: Assemble Your Quilt Block with Precision
With all your individual pieces prepared and triangles attached, it’s time to bring your block together. Start by sewing the pieces within each row together. Always use a consistent 1/4-inch seam allowance. Chain piecing can save time if you’re making multiple blocks. Once the three rows are completed and pressed, carefully sew the rows to each other, aligning your seams as precisely as possible. Nesting seams (pressing adjacent seams in opposite directions) can help reduce bulk and create flatter intersections.
After sewing all the rows together, give your entire block a final, thorough press. Pressing from the front and back ensures all seams lie flat. Finally, using your quilting ruler and rotary cutter, trim your finished block into an 8 3/4-inch square. This squaring-up step is critical for ensuring all your blocks are uniform in size, which will make assembling your final quilt much easier and result in a professional-looking finish. Congratulations, you’ve completed your first beginner-friendly fabric scrap quilt block!
Unleash Your Creativity: Project Ideas for Your Scrap Quilt Blocks
Now that you’ve mastered creating this versatile quilt block, the possibilities for its use are virtually endless. This block’s clean lines and adaptable design make it perfect for a wide range of projects. Here are some ideas to spark your imagination:
- Stunning Quilts: Combine multiple blocks to create beautiful baby quilts, lap quilts, or even full-sized bed quilts. Experiment with alternating this block with solid squares or other simple block patterns for added visual interest.
- Charming Pillows and Cushion Covers: One or two blocks can make a delightful accent pillow for your couch or bed. Add borders to achieve the desired size.
- Elegant Table Runners and Placemats: Piece together a few blocks in a row to create a unique table runner, or use individual blocks for personalized placemats.
- Practical Tote Bags and Pouches: Integrate a quilted block into the design of a handmade tote bag or a small pouch for a touch of handmade elegance.
- Decorative Wall Hangings: A single, well-executed block can be framed or simply bound and hung as a small piece of art, showcasing your favorite fabrics.
- Coasters: For a quick win, use a single trimmed block as a sturdy, fabric coaster.
- Apparel Accents: Quilted blocks can be incorporated into jackets, vests, or even as decorative pockets on garments for a truly unique fashion statement.
For even more inspiration on utilizing your leftover materials, check out: 49 Fabric Scrap Crafts Ideas for Leftover Material
Expert Tips for Successful Scrap Quilting
To ensure your quilting journey is as smooth and enjoyable as possible, keep these expert tips in mind:
- Accurate Cutting is Paramount: Take your time with every cut. A slight inaccuracy early on can compound into significant problems later. Use a fresh rotary blade and a non-slip ruler.
- Pressing, Not Ironing: When quilting, you “press” your seams, meaning you lift the iron and place it down, rather than sliding it. This prevents stretching and distortion of your fabric.
- Consistent Seam Allowance: The 1/4-inch seam allowance is the standard in quilting. Practice maintaining this consistency, as it directly impacts how well your pieces fit together. A 1/4-inch presser foot can be a huge asset.
- Organize Your Scraps: Categorize your fabric scraps by size, color, or fabric type. This makes finding the perfect piece for your next project much easier and more enjoyable.
- Embrace Imperfection: Especially as a beginner, don’t strive for absolute perfection. Enjoy the process, learn from your mistakes, and celebrate every finished stitch. Handmade items have character!
- Use a Design Wall: Even a simple flannel sheet tacked to a wall can serve as a design wall. It allows you to arrange and rearrange your blocks before sewing, helping you visualize the final layout.
- Color Confidence: Don’t be afraid to mix and match colors and patterns. Sometimes the most unexpected combinations yield the most stunning results. Trust your artistic instincts!
Final Thoughts: Your Quilting Journey Begins Here
Creating something beautiful from fabric scraps is an incredibly satisfying endeavor. This beginner-friendly quilt block is more than just a pattern; it’s a stepping stone into the wonderful world of quilting, offering a sustainable and creative outlet for your passion. Whether you’re making a gift for a loved one or a cherished item for your own home, each stitch carries a piece of your dedication and creativity.
We encourage you to dive into your fabric stash, experiment with colors, and enjoy the meditative rhythm of sewing. Remember, every master quilter started with a single stitch. Happy quilting, and may your journey be filled with joy and beautiful creations!