
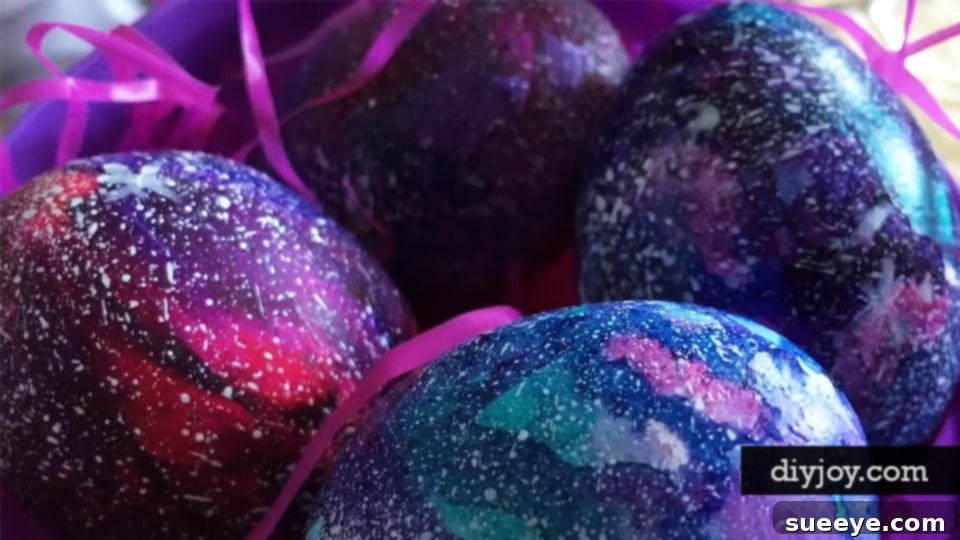
DIY Galaxy Easter Eggs: A Stellar Craft for All Ages
Tired of the same old pastel-colored Easter eggs? Looking for an exciting and visually stunning craft project that will truly impress? Dive into the cosmos this Easter with the captivating trend of DIY Galaxy Easter Eggs! This incredible painting technique transforms ordinary eggs into miniature swirling galaxies, complete with vibrant nebulae and twinkling stars. It’s a creative endeavor that transcends age, offering a fun and engaging activity for both children and adults alike. Forget simple dye kits; these galaxy eggs are an artistic statement, promising to bring a unique, celestial touch to your holiday decorations and Easter egg hunts.
The beauty of galaxy-themed crafts has taken the DIY world by storm, and it’s easy to see why. The endless possibilities of color combinations and the magic of recreating celestial wonders right in your home are undeniably appealing. Our comprehensive guide will walk you through everything you need to know, from selecting your eggs to mastering the art of splatter paint stars and the subtle blend of nebula clouds. Get ready to unleash your inner artist and create a collection of Easter eggs that are truly out of this world, making your Easter celebrations more memorable and spectacular than ever before.
Why Choose Galaxy Easter Eggs This Year?
Traditional egg dyeing is a beloved Easter tradition, but sometimes it’s refreshing to explore new horizons and embrace innovative designs. Galaxy Easter eggs offer a plethora of advantages that make them a standout choice for your festive crafting and decorating needs:
- Uniquely Beautiful Aesthetic: Unlike mass-produced decorations, each galaxy egg is a one-of-a-kind miniature artwork. The swirling colors and delicate stars create a breathtaking visual that is far more intricate and captivating than standard dyed eggs. They are sure to catch the eye and spark conversation.
- Engaging for All Ages: The techniques involved, from sponge dabbing to splatter painting, are simple enough for younger children with supervision, yet offer enough artistic depth to keep adults thoroughly entertained and challenged. It’s a perfect family bonding activity that caters to various skill levels, allowing everyone to contribute to the cosmic creation.
- Boosts Creativity: There’s no single “right” way to create a galaxy egg. Experimenting with different color palettes, layering techniques, and star placements encourages creative expression and personal artistic flair. This project allows for endless customization and imagination to run wild.
- Perfect for Home Decor: Beyond the egg hunt, these cosmic eggs make stunning decorative pieces. Arrange them in a clear vase, incorporate them into a spring wreath, or simply display them in a basket as an eye-catching centerpiece. Their unique design makes them suitable for modern or whimsical decor themes.
- Memorable & Shareable: Crafting these eggs creates lasting memories of a unique holiday activity. They also make fantastic, personalized gifts or conversation starters when guests admire your distinct Easter display, allowing you to share your artistic creations.
- Relatively Inexpensive: With a few basic craft supplies like acrylic paints, brushes, and sponges, you can transform humble eggs into extraordinary works of art without breaking the bank. Many of the required materials might even be items you already have at home.
Essential Supplies for Your Cosmic Creation
Before you embark on your intergalactic painting journey, it’s crucial to gather all your materials. Having everything at hand will make the process smoother, more efficient, and ultimately more enjoyable. Here’s a detailed list of what you’ll need to create your stunning galaxy Easter eggs:
- Eggs: You have two primary options. You can use either hard-boiled eggs (for immediate enjoyment or consumption after Easter, though the paint is not food-safe) or hollowed-out eggs (for long-lasting decorations that can be stored year after year). If opting for hollowed-out eggs, gently pierce both ends with a sturdy needle or a thumbtack and blow out the contents. Rinse the shells thoroughly and ensure they are completely dry before painting.
- Acrylic Paints: A diverse selection of colors is absolutely crucial for capturing the vibrant essence of a galaxy.
- Base Colors: Dark hues like black, deep navy blue, or rich dark purple will serve as the expansive, mysterious void of space. These provide the necessary contrast for your nebulae and stars to truly pop.
- Nebula Colors: Bright, contrasting colors are key for creating swirling nebulae. Think various shades of blue (sky blue, royal blue), purple (lavender, violet, magenta), vibrant pink, electric teal, and crisp white. Metallic silver or gold paints can also be incorporated to add a subtle shimmer and depth to your cosmic clouds.
- Star Colors: Primarily white or a brilliant metallic silver for creating those dazzling, twinkling stars against the dark backdrop.
- Paint Brushes: A variety of brushes will be helpful for different techniques.
- A larger flat brush or a foam sponge brush for applying smooth, even base coats.
- Small, fine-tipped brushes (like a detail brush or a liner brush) for intricate touch-ups or adding individual, prominent stars.
- An old, stiff-bristled toothbrush or a wider, stiff paint brush that you don’t mind getting messy, specifically for the splatter paint star effect.
- Sponges: Small pieces of natural sponge, sea sponge, or even a torn kitchen sponge work wonders for creating soft, cloudy, and ethereal nebula effects. The irregular texture of a torn sponge is ideal for this.
- Glitter (Optional): Fine craft glitter in silver, white, iridescent, or even cosmic dust blends can add an extra layer of sparkle and realism to your miniature galaxies.
- Clear Sealer (Optional): A clear acrylic sealant spray or a brush-on varnish will protect your finished eggs from chipping and fading, and give them a professional, durable sheen. This is especially recommended for hollowed-out eggs intended for long-term display.
- Protective Gear:
- Newspaper, an old tablecloth, or disposable craft paper to generously cover and protect your work surface from paint splatters and spills.
- Disposable gloves (optional, but highly recommended for keeping hands clean, especially during the splatter paint step).
- An apron or old clothes you don’t mind getting paint on.
- Drying Rack/Stands: An empty egg carton, thumbtacks stuck into a piece of cardboard, or thin skewers placed into styrofoam or a block of wood will help hold your eggs securely while they dry, preventing smudges.
- Small Palettes or Plates: Disposable paper plates, plastic lids, or a dedicated paint palette for squeezing out and mixing your paints.
- Water Container: A jar or cup filled with water for rinsing your brushes between colors.
- Paper Towels or Rags: Essential for dabbing excess paint from brushes, cleaning up spills, and drying brushes.
Step-by-Step Guide to Crafting Your Galaxy Eggs
Now that you have all your supplies meticulously gathered, let’s begin the exciting and transformative process of bringing your cosmic visions to life. Take your time with each step, enjoy the creative journey, and remember that just like real galaxies, no two galaxy eggs will ever be exactly alike – and that’s part of their charm!
1. Prepare Your Workspace and Eggs
Begin by spreading ample newspaper, an old tablecloth, or craft paper across your work surface to protect it from paint. If you’re using hollowed-out eggs, double-check that they are completely dry, both inside and out, after rinsing. For hard-boiled eggs, ensure they have cooled fully to room temperature. Position your chosen drying rack in an accessible yet undisturbed location, ready to receive your painted masterpieces.
2. Apply the Base Coat (The Void of Space)
Using your larger flat brush or sponge brush, apply a solid, even coat of your darkest chosen color – black, navy blue, or deep purple – to each egg. This layer forms the expansive, dark backdrop of your galaxy, against which the vibrant nebulae and stars will brilliantly stand out. For optimal, opaque coverage, you might need to apply two thin coats, allowing the first coat to dry slightly before carefully applying the second. Ensure the entire surface of the egg is thoroughly covered. This step is foundational, so allow the base coat to dry completely before proceeding; rushing this stage can lead to smudged colors later.
3. Create the Nebula Clouds (Swirls of Color)
This is where the true artistic expression begins! Squeeze small amounts of your chosen nebula colors (blues, purples, pinks, whites, teals) onto your palette. Lightly dab a small piece of sponge into one color, ensuring it’s not oversaturated, then gently blot it onto your egg. Don’t press too hard; the goal is a soft, cloudy, and irregular texture. Immediately, while the paint is still wet, dab another contrasting or complementary color next to it or slightly overlapping, blending the edges softly to create a harmonious, ethereal swirl. Continue layering and blending colors, rotating the egg to cover different sections. Visualize how clouds might drift and merge in the vastness of space. Use white or very light colors sparingly to create bright “hot spots” or glowing cores within your nebula formations.
Tip for Nebula Success: Start with lighter colors and then introduce darker contrasting shades, or vice-versa. Experimentation is highly encouraged! The key is to blend while the paint is still slightly wet for a seamless, smoky effect. Be mindful not to overdo it; leaving some of the dark base coat showing is essential to represent the deep, empty space between nebulae, giving your galaxy depth and realism.
4. Add the Twinkling Stars (Splatter Technique)
This is arguably the most exciting and dynamic part of the process! Dilute a small amount of white or metallic silver paint with a few drops of water until it reaches a milky, slightly watery consistency – not too thin to drip, but thin enough to splatter easily. Dip your stiff-bristled toothbrush or a stiff, wide brush into the diluted paint. Position the egg securely on your drying rack or hold it carefully over your protected surface. Aim the brush at the egg and gently run your thumb across the bristles, flicking tiny, delicate droplets of paint onto the egg. This technique creates a natural-looking, dispersed star field. For larger, more prominent individual stars, you can use the very tip of a fine-tipped brush to carefully dot them onto the egg’s surface.
Caution: This step can be quite messy! Ensure your workspace is thoroughly protected, and aim the splatters carefully. You might also consider covering parts of the egg you don’t wish to have stars on if you want to create a more defined starless zone.
5. Optional: Glitter and Sealing for Longevity
For an extra touch of cosmic twinkle and shimmering depth, lightly sprinkle very fine craft glitter onto your eggs while the star paint is still wet. This allows the glitter to adhere naturally. Alternatively, once the entire egg is completely dry (including all paint layers and glitter), you can apply a clear sealant. A spray sealer is often the easiest and most effective method; always follow the product instructions for safe and proper application, ensuring good ventilation. This crucial step protects the paint from chipping, provides a beautiful, lasting sheen, and makes your galaxy eggs significantly more durable for display, allowing them to last for many Easters to come.
6. Allow to Dry Completely
Once all painting and optional sealing steps are complete, carefully place your finished galaxy eggs back onto your drying rack. Allow them to dry undisturbed for several hours, or even overnight, especially if you’ve applied multiple layers of paint or a sealant. Patience during this final stage is paramount to ensure your beautiful artwork is fully set, cured, and ready for admiration without any smudges or damage.
Tips for Galaxy Egg Success
- Layering is Key: Always build up your colors in thin, gradual layers rather than thick, heavy blobs. This technique allows for better blending, prevents cracking, and creates greater depth and luminosity in your galaxy design.
- Don’t Be Afraid to Experiment: Remember, there are no mistakes in the cosmos! Embrace the creative freedom to play with different color combinations, blending techniques, and star placements. Each egg will be a unique work of art, reflecting your individual creativity.
- Work in Sections: If you find it challenging to hold and paint the entire egg without smudging wet areas, consider working on one half, allowing it to dry, and then carefully tackling the other half. This approach provides better control and cleaner results.
- Involve the Kids Safely: Younger children can enthusiastically handle the base coat application and perhaps the initial sponge dabbing with close adult supervision. The splatter paint is great fun but might require a little more adult guidance to minimize mess and ensure safety. Always ensure good ventilation, especially if using spray sealers.
- Less is More (Sometimes): For truly effective nebula effects, don’t feel compelled to cover every single inch of the egg with bright colors. Intentionally leaving some dark space enhances the “galaxy” feel, creating contrast and making the vibrant colors pop more effectively.
- Reference Images for Inspiration: Look up high-resolution images of real nebulae, star clusters, and galaxies online or in astronomy books for inspiration on color blending, cloud formations, and the distribution of stars. This can guide your artistic choices.
Displaying Your Cosmic Creations
Once your magnificent galaxy Easter eggs are completely dry and ready, it’s time to showcase them! Their unique beauty deserves a prominent place in your Easter decor. Here are a few creative and inspiring display ideas to highlight your cosmic craftsmanship:
- Classic Easter Basket Reinvented: Fill a traditional woven basket with soft faux grass, shredded paper, or even some dark crinkle paper, then artfully arrange your galaxy eggs among them. This elevates a classic display with a modern, celestial twist.
- Clear Glass Vase or Bowl: A transparent container, such as a tall glass vase, a wide-mouthed jar, or a simple glass bowl, allows the intricate designs and vibrant colors of your galaxy eggs to be admired from all angles, becoming a stunning centerpiece.
- Hanging Mobile: If you’ve opted for hollowed-out eggs, thread a fine fishing line or clear monofilament through them and tie them to a decorative branch or a simple craft hoop. This creates a mesmerizing celestial mobile that gently spins with the air currents.
- Spring Wreath Embellishment: Carefully attach your galaxy eggs to a spring-themed wreath using hot glue (for hollow eggs) or floral wire. This offers a unique and unexpected front door decoration that will surely capture attention.
- Elegant Table Centerpiece: Combine your cosmic eggs with fresh spring flowers (like tulips or daffodils) and lush greenery for a truly captivating dining table display. The contrast between natural elements and celestial art is striking.
- Thoughtful Gift Giving: Package a few of your beautifully crafted galaxy eggs in a small, decorative box or a clear cellophane bag with a ribbon. They make incredibly unique, thoughtful, and handmade gifts for friends, family, or your Easter host.
Conclusion: Embark on Your Galactic Easter Adventure!
Creating DIY Galaxy Easter Eggs is so much more than just another Easter craft; it’s an exhilarating opportunity to explore your creativity, enjoy a fun and engaging activity with loved ones, and produce truly unique and breathtaking decorations that will captivate everyone who sees them. With a few simple supplies, some patience, and our detailed step-by-step guide, you are now fully equipped to transform humble eggs into miniature, breathtaking celestial wonders. So, gather your paints, unleash your boundless imagination, and get ready to add a spectacular, cosmic glow to your Easter celebrations this year. Happy crafting, and may your Easter be filled with stellar beauty, unforgettable memories, and a galaxy of vibrant colors!