
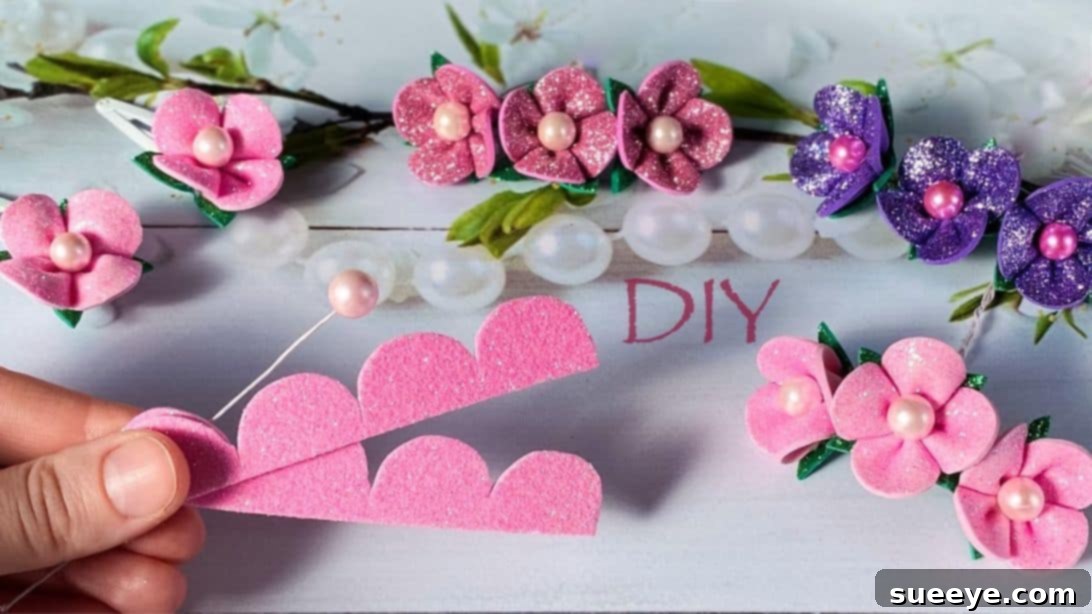
Craft Your Own Dazzling DIY Glitter Foam Flowers: A Step-by-Step Guide
Are you looking for an exciting way to repurpose those shimmering sheets of glitter foam lying around your home? Don’t let them gather dust or, worse, end up in the bin! Unleash your inner crafter and transform them into gorgeous, sparkling DIY glitter foam flowers. This brilliant idea, inspired by the creative minds at Foam Flower DIY on YouTube, offers a simple yet incredibly rewarding project that you can complete in mere minutes.
These exquisite handmade flowers are not only super easy to make but also incredibly versatile. Imagine adorning your hair with a custom-made clip that perfectly matches your outfit, or gifting a beautifully crafted flower to a friend or family member who appreciates unique hair accessories. Beyond personal use, these charming creations hold excellent potential for a small crafting business – you could easily sell them online and turn your hobby into a source of income! And if hair clips aren’t quite your style, consider using these vibrant foam flowers as delightful embellishments for countless other projects, from scrapbooking to gift wrapping, or even adding a touch of sparkle to home décor. The possibilities are truly endless!
One of the greatest joys of this DIY project is the freedom it offers for creativity. Experiment with a spectrum of colors, vary their sizes, or even combine different hues to create a truly unique floral masterpiece. Whether you’re a seasoned crafter or just starting your DIY journey, this tutorial is designed to be straightforward and fun. Dive in and discover how to create your very own dazzling glitter foam flowers. Continue reading for the comprehensive step-by-step instructions, or watch the original video for a visual guide.
Essential Materials for Your Glitter Foam Flowers
Gathering the right materials is the first step towards creating your beautiful glitter foam flowers. Most of these items are readily available at craft stores, and you might even have some of them on hand already! Here’s what you’ll need for this exciting DIY project:
- Glitter Foam Sheets: Opt for high-quality glitter foam, ideally around 0.08 inches thick, in your chosen colors. Pink is perfect for petals, and green for leaves, but feel free to explore other vibrant combinations to personalize your flowers.
- Small Beads with Wire: Approximately 0.3 inches in diameter. Look for beads that already have a thin, flexible wire inserted through their center. This feature significantly simplifies the process of attaching the bead securely to the flower’s core, ensuring it stays in place without extra fuss.
- Ruler: An essential tool for precise measurements, ensuring your foam pieces are cut to the exact dimensions needed for symmetrical and well-formed petals and leaves.
- Sharp Scissors: A good pair of sharp scissors will make cutting through the glitter foam much easier, resulting in clean edges and precise shapes. Dull scissors can lead to ragged cuts and frustration.
- Hair Clips: Choose standard metal hair clips if you intend to create hair accessories. These provide a sturdy base for your finished flower. You could also opt for brooch pins, headbands, or even magnets for alternative uses.
- Hot Glue Gun and Glue Sticks: A reliable hot glue gun is crucial for quickly and securely assembling the various parts of your flower. Hot glue provides a strong bond that dries rapidly, allowing you to work efficiently.
- Felt Pieces: Small scraps of felt, ideally in a color that complements your flower or matches your hair clip, will be used as a backing for the flower when attaching it to the hair clip. This provides a more finished look and a better surface for adhesion.
- Needle with Thick Thread: A sturdy sewing needle and thick, strong thread are needed to gather and secure the foam petals. Waxed thread or embroidery floss can be excellent choices for added durability.
Before you begin, ensure your workspace is clean, well-lit, and organized. Having all your materials within reach will make the crafting process smoother and more enjoyable. And remember, when using a hot glue gun, always exercise caution to prevent burns.
Crafting Your Glitter Foam Flower: A Detailed Guide
Now that you have all your materials ready, let’s dive into the step-by-step process of creating your beautiful glitter foam flower. Follow these detailed instructions carefully for the best results, and don’t hesitate to refer to the images or video if anything is unclear.
Step 1: Preparing Your Foam Pieces for the Flower and Leaf
Begin by precisely cutting your glitter foam sheets. Accuracy in this initial step is key to forming a well-proportioned flower. Take your pink glitter foam (or your chosen petal color), which should be 0.08 inches thick, and cut a rectangle measuring 0.8 inches in width by 3.94 inches in length. This piece will form the main body of your flower’s petals. Next, take your green glitter foam (or your chosen leaf color) and cut a perfect square measuring 1.18 inches by 1.18 inches. This square will be transformed into the elegant leaves that frame your flower.
Step 2: Shaping the Petals from the Pink Glitter Foam
With your pink glitter foam rectangle in hand, it’s time to create the individual petals. Along the longer side of the rectangle (the 3.94-inch side), use your ruler and a marker or a fine-point tool to lightly mark 1-inch segments. Once marked, carefully cut along these lines, but be very precise: do not cut all the way through the foam. You want to leave a small, uncut margin at one long edge, holding all the segments together. This uncut strip will be the base of your flower. After making these cuts, gently round the top and sides of each individual segment, shaping them into soft, natural-looking petals. The goal is to give each segment a graceful, curved appearance, mimicking real flower petals.
Step 3: Gathering and Forming the Flower Petals
Now, prepare your needle and thread. Use a sturdy, thick thread that won’t easily break. Thread your needle and create a knot at the end. Take your shaped pink glitter foam piece. Starting from one end, begin sewing a running stitch along the straight, uncut edge (the base) of the petals you created in Step 2. Make sure your stitches are even and pass through the foam securely. Once you’ve stitched across the entire length, gently pull the thread. As you pull, the foam petals will begin to gather and fold in on themselves, forming the circular shape of a flower. Continue pulling until the petals are tightly gathered and form a compact flower center. Finally, sew the two end petals together firmly to secure the flower’s shape, creating a complete, circular bloom. Fasten the thread with a strong knot to ensure it holds.
Step 4: Adding the Shimmering Bead Center
With your flower petals formed, it’s time to add the sparkling centerpiece. Take your small bead, which should already have a thin wire inserted through its middle. Carefully push the wire through the exact center of your gathered foam flower, from the front to the back. Ensure the bead sits snugly in the middle of the petals, adding a beautiful focal point. Once positioned correctly, apply a small dab of hot glue to the back of the flower, around where the wire emerges, to secure the bead firmly in place. This will prevent the bead from shifting or falling out over time.
Step 5: Crafting and Attaching the Green Foam Leaves
Now, let’s create the natural-looking leaves for your flower. Take your 1.18-inch green glitter foam square. Fold the square in half once, then fold it in half again, creating a smaller square. With the foam still folded, carefully cut along the open sides in a rounded, leaf-like shape. Be mindful not to cut through the folded corner, as this will be the base where your leaves connect. Once you unfold the foam, you should have a beautiful four-leaf clover-like shape. Gently stretch and manipulate each leaf segment a little; this helps to give the foam a more organic, natural look and feel. Take your finished flower from the previous step and insert the wire protruding from its back through the center of your newly formed foam leaves. Position the leaves so they sit just beneath the petals. Apply another dab of hot glue to the back of the flower and the center of the leaves to firmly glue them together, securing both the leaves and the wire in place.
Step 6: Final Assembly – Attaching to a Hair Clip
This is the final step to complete your glitter foam flower hair clip! First, take a small piece of felt, cut to a size that will fit neatly onto the top flat surface of your chosen hair clip. Apply a generous amount of hot glue to this piece of felt and firmly press it onto the top part of the hair clip, creating a soft, adhesive base. Next, carefully trim any excess wire from the back of your assembled foam flower, ensuring it’s flush with the back of the leaves and bead. Apply a good amount of hot glue to the back of the flower, particularly where the wire was inserted and secured, and press it firmly onto the felt-covered hair clip. Hold it in place for a few moments until the glue sets. Allow the glue to cool and dry completely before using or handling your beautiful new glitter foam flower hair clip. And there you have it – a stunning, handmade accessory ready to dazzle!
Beyond Hair Clips: Creative Ways to Use Your Glitter Foam Flowers
While these glitter foam flowers make exquisite hair clips, their potential extends far beyond personal adornment. Their durable yet flexible nature, combined with their vibrant sparkle, makes them ideal for a multitude of creative applications. Here are some inspiring ideas to spark your imagination:
- Fashion Embellishments: Elevate simple clothing items like plain T-shirts, jackets, or handbags by sewing or gluing on a few of these unique flowers. They can transform an ordinary item into a personalized fashion statement.
- Home Decor Accents: Use them to adorn throw pillows, curtains, or picture frames. Create a charming floral garland for a child’s room or add a pop of color to a monochrome space. They can also be glued onto small magnets to decorate your refrigerator or a magnetic board.
- Gift Wrapping and Card Making: Forget traditional bows! A handmade glitter foam flower instantly adds a luxurious and personal touch to any gift package. They also make fantastic 3D embellishments for handmade greeting cards, making your message truly stand out.
- Party Decorations: Craft several flowers in various sizes and colors to create unique centerpieces, banner decorations, or even charming party favors. They can add a festive and whimsical touch to any celebration.
- Brooches and Pins: Instead of a hair clip, glue a brooch pin to the back of your flower. This allows you to wear it on lapels, scarves, or hats, offering a versatile accessory option.
- Headband Adornments: For a different hair accessory, attach a cluster of smaller glitter foam flowers to a plain headband. This creates a more elaborate and eye-catching look, perfect for special occasions.
- Scrapbooking and Journaling: Add texture and sparkle to your memory pages or journal entries. These flowers can highlight special photos or sections, bringing your stories to life with dimension.
Don’t be afraid to experiment! Combine different colors, add extra beads or sequins, or even layer petals for a fuller effect. The beauty of DIY lies in its boundless possibilities for personalization.
Tips for Success and Troubleshooting Common Issues
Even with a simple project like this, a few helpful tips and tricks can ensure your success and make the crafting process even more enjoyable. Here’s some advice to keep in mind:
Achieving Perfect Petals:
- Sharp Tools are Key: Always use very sharp scissors for clean, crisp cuts on your glitter foam. Dull scissors can lead to jagged edges, which can be frustrating to work with and detract from the final look of your flower.
- Practice Makes Perfect: If you’re new to cutting foam or shaping petals, try practicing on a scrap piece of foam first. This allows you to get a feel for the material and refine your technique before working on your main pieces.
- Consistent Marks: When marking your 1-inch segments, use a ruler and a light pencil or non-permanent marker to ensure consistent spacing. Uniform segments will result in a more symmetrical and pleasing flower.
Working with Hot Glue:
- Less is More: While hot glue provides a strong bond, using excessive amounts can create a messy look and even squish out from under your pieces. Apply just enough glue for a secure hold.
- Quick Application: Hot glue dries rapidly, so be prepared to position your pieces quickly once the glue is applied. Have all components ready and within reach.
- Safety First: Hot glue guns can reach high temperatures. Always be cautious when using one to avoid burns. Keep children supervised if they are participating in the craft.
Thread and Needle Tips:
- Strong Thread: Choose a durable thread like embroidery floss, waxed thread, or upholstery thread. This will prevent snapping when you pull to gather the petals, ensuring your flower holds its shape.
- Needle Size: A sturdy needle with a slightly larger eye will be easier to thread with thicker material and will penetrate the foam more effectively.
Troubleshooting:
- Petals Not Gathering Evenly: If your petals aren’t gathering smoothly, check if your stitches are uniform and if you’ve pulled the thread evenly. You might need to gently adjust individual petals before securing the knot.
- Bead Feels Loose: If the bead wiggles after gluing, apply a tiny additional dab of hot glue around its base on the back of the flower. Ensure the wire is properly secured.
- Leaves Look Flat: Remember to gently stretch and manipulate the foam leaves after cutting them. This adds dimension and a more natural curve, preventing them from looking stiff.
By keeping these tips in mind, you’ll be well on your way to crafting beautiful and professional-looking glitter foam flowers with ease!
Conclusion: Embrace Your Creativity with Glitter Foam Flowers
There you have it – a comprehensive guide to crafting stunning DIY glitter foam flowers! This project is a fantastic example of how simple materials and a little creativity can result in something truly beautiful and functional. Whether you’re repurposing old craft supplies, looking for an affordable way to personalize your style, or seeking a charming handmade gift, these sparkling flowers tick all the boxes.
We’ve walked through every step, from precisely cutting your foam pieces and delicately shaping the petals to adding a shimmering bead center and securely attaching your creation to a hair clip. Beyond the basic hair accessory, we’ve explored a wealth of other applications, encouraging you to use these versatile flowers as embellishments for clothing, home décor, gift wrapping, and so much more. The joy of DIY lies in its endless possibilities for customization and self-expression. Don’t limit yourself to the instructions; let them be a springboard for your own unique ideas.
So, gather your glitter foam, unleash your imagination, and start crafting. You’ll be amazed at how quickly and easily you can create a collection of these delightful flowers. They’re perfect for adding a touch of sparkle to your everyday, celebrating special occasions, or even starting a small crafting venture. Share your creations, inspire others, and most importantly, enjoy the rewarding process of making something beautiful with your own hands!