
Do you find joy in your kitchen, but often struggle with clutter, disorganization, or a lack of functional space? Every home chef dreams of a beautifully organized, efficient kitchen where everything has its place and is easily accessible. While professional kitchen makeovers can be costly, a little ingenuity and some clever DIY solutions can go a long way in transforming your culinary haven.
Transform Your Kitchen: 5 Brilliant DIY Organization Hacks You Didn’t Know You Needed
Whether you’re a seasoned chef or a casual cook, a well-organized kitchen can significantly enhance your cooking experience, reduce stress, and even save you time. Forget rummaging through overcrowded cabinets or dealing with dull knives; these brilliant kitchen hacks, inspired by creative minds like those at Hometalk, are designed to make your life easier and your kitchen more functional. From ingenious spice organizers to custom knife holders and smart pantry solutions, these simple yet effective projects can be completed with minimal effort and cost. Get ready to discover innovative ways to maximize your space, protect your tools, and bring a new level of efficiency to your kitchen. Share these ideas with friends and family; they might just find the perfect hack to revolutionize their own kitchens!
Discover These Game-Changing Kitchen Organization Secrets:
#1 The DIY Lazy Susan: Revolutionize Your Spice Cabinet
Is your spice cabinet a chaotic jumble, making it nearly impossible to find that elusive cumin or turmeric when you need it most? An overcrowded collection of herbs and spices can be frustrating and lead to forgotten ingredients. This ingenious DIY lazy Susan offers a simple, elegant solution to bring order and accessibility to your spice collection.
What You’ll Need:
- Two round cake pans (or similar flat, round metal trays) of the same size.
- One bag of marbles (approximately 100-150 marbles, depending on the size of your pans).
How to Create Your Spice Organizer:
- Start by placing one of your cake pans on a flat, stable surface within your cabinet or pantry.
- Carefully pour the entire bag of marbles into this pan, spreading them out evenly across the bottom. The marbles will act as miniature ball bearings, allowing for smooth rotation.
- Gently place the second cake pan directly on top of the marbles. Ensure it rests level and securely.
- Voila! You now have a custom-made, rotating lazy Susan for your herb and spice bottles.
Benefits of This Hack: This DIY rotating tray makes accessing every single spice bottle a breeze. No more digging through layers of jars or pulling everything out just to find what you’re looking for. It maximizes vertical space in your cabinet, prevents items from being pushed to the back and forgotten, and adds a touch of organization that will streamline your cooking process. It’s an incredibly affordable and effective way to manage your growing collection of seasonings.
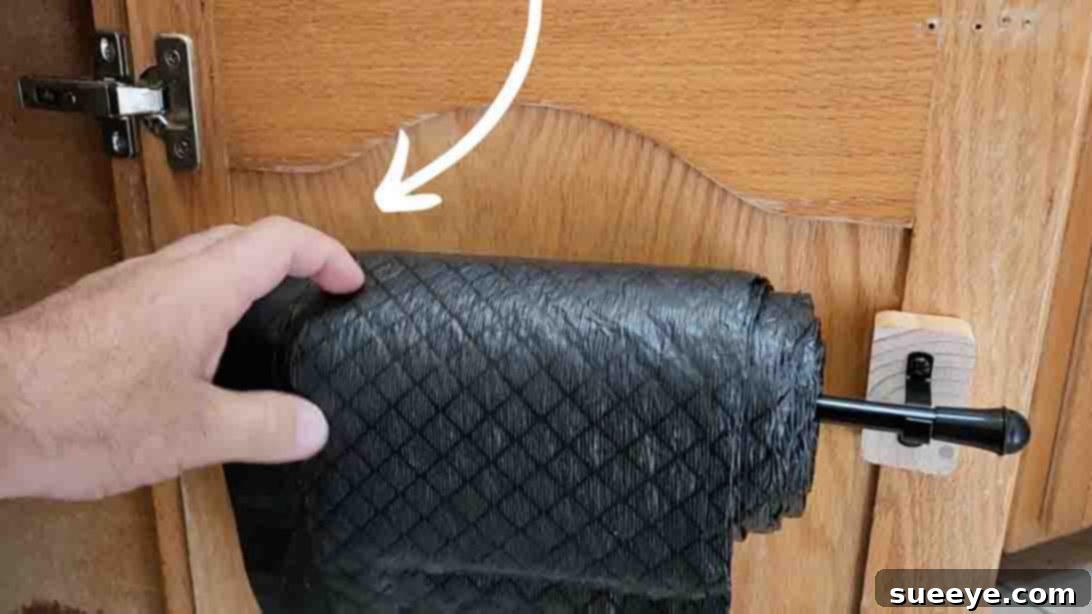
#2 The Hidden Curtain Rod: Smart Storage for Trash Bags and More
Are your rolls of trash bags taking up valuable drawer or cabinet space, or perhaps constantly unrolling and becoming a tangled mess? This clever curtain rod hack provides a discrete and highly functional solution, keeping your trash bags neat, accessible, and out of sight, maximizing the often-underutilized space inside your cabinet doors.
What You’ll Need:
- A tension curtain rod (or a standard curtain rod that can be cut).
- A measuring tape or ruler.
- A cutting tool (if using a standard rod and needing to trim its length).
- Mounting hardware (if using a standard rod that isn’t tension-based).
How to Install Your Roll Dispenser:
- Begin by measuring the inside width of your cabinet door where you intend to install the rod. This will determine the ideal length for your rod to fit snugly.
- If you’re using a standard curtain rod, mark the desired length and carefully cut it to size. For tension rods, simply ensure it fits the measured space.
- Thread your roll of trash bags onto the rod. Make sure the bags are facing the correct direction for easy dispensing.
- Attach the rod securely to the inside of your cabinet door. If it’s a tension rod, simply twist and extend it until it’s firmly wedged between the two sides of the door. For standard rods, use small mounting brackets and screws to fix it in place.
Benefits of This Hack: This simple addition instantly frees up drawer space and makes grabbing a new trash bag incredibly convenient. It keeps the rolls tidy and prevents them from unraveling, ensuring your cabinet remains organized. This hack isn’t just for trash bags; it can also be used to store and dispense rolls of aluminum foil, plastic wrap, parchment paper, or even cleaning cloths, making it a versatile storage solution for any kitchen.
#3 DIY Magnetic Knife Holder: Safety, Style, and Space-Saving
Traditional knife blocks can take up valuable counter space and, over time, dull the edges of your knives. Storing knives loosely in a drawer can be dangerous and damage the blades. A magnetic knife holder offers a sleek, space-saving, and blade-friendly alternative. This DIY version allows you to customize it to your kitchen’s aesthetic while ensuring your knives are always within reach and safely stored.
What You’ll Need:
- Two strips of sturdy wood, such as oak (e.g., 1-inch thick, 2-3 inches wide, and your desired length).
- Strong rare-earth magnets (e.g., neodymium disc magnets, sized appropriately for your wood thickness).
- Wood drill bit (slightly larger than your magnets’ diameter).
- Wood glue.
- Wood clamps.
- Sandpaper or a sander (optional, for finishing).
- Mounting hardware (screws, wall anchors if needed).
How to Craft Your Magnetic Rack:
- Take one strip of oak. Carefully measure and mark where you want each magnet to be placed. Space them evenly along the strip, considering the length of your knives.
- Using a wood drill bit slightly larger than your magnets, drill shallow holes at each marked spot. Ensure the holes are deep enough for the magnets to sit flush or slightly recessed, but not go all the way through the wood.
- Place the magnets into the drilled holes. A dab of super glue can help secure them if they’re not a tight fit.
- Apply a generous amount of wood glue over the entire surface of the wood strip containing the magnets.
- Carefully place the second strip of oak directly on top, aligning it perfectly with the first strip. This will sandwich the magnets between the two pieces of wood.
- Use wood clamps to hold the two strips firmly together. Apply even pressure along the entire length. Allow the glue to dry completely according to the manufacturer’s instructions (usually several hours to overnight).
- Once dry, remove the clamps. You can sand the wood for a smoother finish or apply a wood stain or sealant if desired.
- Finally, mount your newly created magnetic knife holder securely to a wall in your kitchen using appropriate screws and anchors. Test the magnetic strength to ensure it holds your knives firmly.
Benefits of This Hack: This magnetic holder keeps your knives organized, visible, and easily accessible. More importantly, it helps maintain the sharpness of your blades by preventing them from clanking against each other in a drawer or scraping against wooden slots. It also frees up valuable counter or drawer space and adds a touch of rustic or modern elegance to your kitchen decor.
#4 Vertical Snacks Holder: Declutter Your Pantry with a Shoe Hanger
Is your pantry a bottomless pit of snack bags, half-eaten boxes, and items constantly falling off shelves? Keeping snacks organized can be a challenge, especially in busy households. This incredibly simple and effective hack utilizes vertical space to bring order to your snack selection, making it easy to see what you have and prevent items from getting lost or expired.
What You’ll Need:
- An over-the-door shoe hanger with clear pockets.
How to Organize Your Snacks:
- Simply hang the shoe hanger on the back of your pantry door. Many come with hooks designed to fit standard door thicknesses.
- Fill each clear pocket with individual snack items, such as granola bars, fruit pouches, small bags of chips, candy bars, or even individual juice boxes.
Benefits of This Hack: This genius solution instantly transforms unused door space into valuable storage. The clear pockets allow you to see exactly what snacks you have at a glance, helping to reduce duplicates and minimize food waste. It keeps your pantry shelves clear for larger items, makes it easy for kids (and adults!) to grab a quick snack, and prevents bags from piling up in a messy heap. This method is also fantastic for organizing other small kitchen items like packets of gravy, baking mixes, or even small cleaning supplies.
#5 The Skewer Knife Block: A Unique and Blade-Friendly Knife Storage Solution
For those who love a custom touch and want an even gentler approach to knife storage than traditional blocks, this DIY skewer knife block is a fantastic option. It protects your blades, offers complete flexibility in knife placement, and adds a unique, modern aesthetic to your kitchen.
What You’ll Need:
- Scrap wood pieces (for the box structure and base).
- Wood glue.
- Small nails or screws.
- A saw (to cut wood pieces).
- Sandpaper or a sander.
- Wooden skewers (bamboo or similar, in large quantities).
- Optional: Wood stain or paint.
How to Build Your Custom Knife Block:
- Design and Cut Your Box: Determine the desired dimensions for your knife block. Consider the length of your longest knives and the amount of counter space you have. Cut four pieces of scrap wood for the sides of the box and one piece for the bottom.
- Assemble the Box: Apply wood glue to the edges of the side pieces and assemble them into a rectangular or square box shape. Secure the joints with small nails or screws for added strength.
- Attach the Bottom: Once the sides are secure, apply wood glue to the bottom edges of the box and place the pre-cut bottom piece onto it. Again, secure with nails or screws.
- Add a Stand (Optional): If you want the block to sit at an angle or be elevated, you can create a small wooden stand or feet and attach them to the bottom.
- Sand and Finish: Once the glue has dried completely and the structure is solid, sand all surfaces and edges thoroughly to ensure a smooth, splinter-free finish. This is also the stage where you can apply wood stain, paint, or a clear sealant to match your kitchen decor.
- Fill with Skewers: The final and most unique step! Gather a large quantity of wooden skewers (bamboo skewers work great). Begin filling the interior of your wooden box with the skewers, standing them upright and packing them tightly together. Fill the box completely until the skewers are snug and cannot easily shift.
- Insert Your Knives: Now, gently push your knives into the skewer-filled block. The skewers will part and conform to the shape of each blade, holding it securely without dulling the edge.
Benefits of This Hack: This innovative knife block design offers superior blade protection, as the skewers cradle each knife individually without friction. It’s also incredibly versatile – you can insert knives of any shape or size, and easily adjust their positions. The skewer setup is more hygienic than traditional slotted blocks, as the open top allows for better air circulation and easier cleaning. Plus, it’s a fantastic conversation starter and a stylish, custom addition to your kitchen!
Transform Your Kitchen Today with These Simple DIY Solutions!
These five brilliant kitchen hacks offer practical, affordable, and incredibly effective ways to tackle common organization challenges in your home. From reclaiming cabinet space with a DIY lazy Susan for spices to protecting your valuable knives with custom magnetic strips or unique skewer blocks, each project is designed to enhance functionality and bring a sense of calm to your culinary environment. Maximizing vertical space with a shoe hanger for snacks or optimizing cabinet door storage for trash bags are small changes that yield significant improvements in daily efficiency.
Embracing these DIY kitchen organization ideas not only saves you money but also allows you to personalize your space to perfectly fit your needs and style. A well-organized kitchen is a joy to cook in, inspiring creativity and making every meal preparation a smoother, more enjoyable experience. Don’t let clutter hold you back any longer. Pick your favorite hack, gather your materials, and start transforming your kitchen into the efficient, beautiful space you deserve. Happy organizing!