
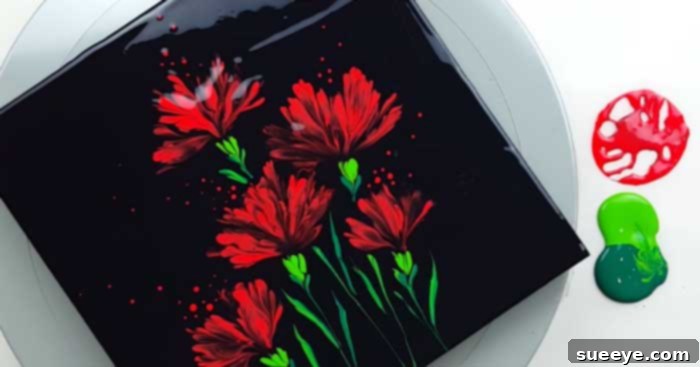
DIY Cotton Swab Carnation Painting: Create Stunning Carnations with Ease!
Are you searching for a unique and personal touch to add to your home decor? Look no further than your own creativity! Crafting your own wall art is not only incredibly rewarding but also allows for unparalleled customization to perfectly match your aesthetic. This innovative carnation flowers tutorial, utilizing a surprisingly simple tool – cotton swabs – comes to us from the talented Designer Gemma77 on YouTube. It promises to be the perfect addition to any wall, infusing your space with handmade charm and vibrant color.
What makes this DIY painting project so appealing? Firstly, it’s remarkably customizable. You have complete freedom to choose colors that complement your existing decor, or even experiment with bold new palettes that reflect your personality. Secondly, it’s incredibly budget-friendly, often requiring materials you might already have around your home. The most significant purchase you’ll likely make is a blank canvas. Forget expensive paintbrushes or intricate techniques; this method simplifies the art-making process, making it accessible even for complete beginners. Get ready to transform ordinary cotton swabs into extraordinary floral masterpieces, bringing a fresh, artistic vibe to your living space!
Why Choose Cotton Swabs for Your Floral Art?
The ingenuity of this painting technique lies in its simplicity and the unique texture it effortlessly creates. Traditional paintbrushes can sometimes feel intimidating, especially for those new to painting. However, cotton swabs offer a forgiving and intuitive way to apply paint, making the process less daunting and more enjoyable. They are inexpensive, readily available in most households, and, when bundled, create a distinctive dappled or stippled effect that perfectly mimics the delicate, layered petals of a carnation. This method encourages experimentation and removes the pressure often associated with achieving artistic perfection, allowing you to relax, express yourself, and truly enjoy the creative journey. It’s an excellent way to introduce yourself, or even your children, to the joys of painting and crafting without a steep learning curve or significant investment in specialized art supplies.
Materials Needed For This Delightful DIY Carnation Project:
Gathering your materials beforehand ensures a smooth and enjoyable crafting experience. You’ll be surprised how few items are required to create such stunning art!
- Cotton Swabs: A generous supply will be beneficial. Look for standard cotton swabs with firm cotton tips, as these hold paint well and maintain their shape during application.
- Canvas: Choose a size that suits your space. Smaller canvases (e.g., 8×10 or 11×14 inches) are great for practice or small accents, while larger ones (e.g., 16×20 or 18×24 inches) make a bold statement. Pre-primed canvases are ideal for immediate painting.
- Acrylic Paints: A selection of colors for your background, flowers (e.g., classic red, soft pink, sunny yellow, crisp white), and stems (typically green or earthy brown). Acrylics are highly recommended for their quick drying time, vibrant pigmentation, versatility, and easy cleanup with water.
- Rubber Bands: Essential for bundling your cotton swabs effectively and securely, creating your unique painting tool.
- Paint Knife (Optional but Recommended): This tool is excellent for creating crisp, clean lines for the stems, giving them a professional finish. If unavailable, a stiff paintbrush with a flat edge, or even the edge of a sturdy plastic card, can serve as an alternative.
- Heat Gun (Optional): Useful for speeding up drying time between layers and for eliminating any unsightly air bubbles that might appear on your base coat, ensuring a smooth foundation.
- Palette or Paper Plate: Provides a convenient surface for mixing and holding your paints. Disposable options like paper plates make cleanup a breeze.
- Paper Towels or Rags: Indispensable for blotting excess paint, wiping tools, and general cleanup throughout the process.
- Cup of Water: Essential for rinsing paint knives or brushes if you use them, especially when switching between colors.
Step-by-Step Directions to Paint Cotton Swab Carnations:
Step One: Preparing Your Canvas – The Foundation of Your Art
Your artistic journey begins with preparing your canvas. Select your canvas and apply a solid, even base color. In her demonstration, Designer Gemma77 expertly chose a sophisticated black background, which serves as a striking contrast and dramatically enhances the vibrancy of the carnations. However, the choice of background color is entirely yours and should reflect your personal style or complement your existing decor. Consider a soft pastel for a delicate look, a deep navy for elegance, or even a bright white for a clean, modern aesthetic. Use a wide brush or foam roller to ensure smooth, uniform coverage across the entire surface of the canvas. Aim for a consistent layer without visible brush strokes.
After applying the paint, you might notice small air bubbles forming. If you have a heat gun, gently pass it evenly over the painted surface from a safe distance. The heat helps these bubbles rise to the surface and pop, resulting in a perfectly smooth, professional-looking finish. If a heat gun isn’t available, don’t fret! You can carefully pop larger bubbles with the tip of a toothpick, or simply allow the paint to dry naturally in a dust-free environment; often, smaller bubbles will self-level as the paint dries. It is crucial to ensure this base coat is completely dry before moving on to the next step, as painting on wet paint can lead to unwanted color bleeding and muddy results.
Step Two: Crafting Your Unique Cotton Swab Painting Tool
This is where the innovative aspect of the cotton swab technique truly comes to life. Take a generous handful of cotton swabs. The exact number will depend on how large and dense you envision your carnation petals to be. Typically, a bundle ranging from 10 to 20 swabs works wonderfully for creating a medium-sized, full bloom. Carefully bunch them tightly together, ensuring that the cotton tips are relatively even at one end. This uniformity will help create a consistent stamp-like effect. Secure this bundle firmly with a rubber band, tying it a few inches from the cotton tips. This creates a makeshift “brush” with multiple points of contact, perfectly designed to simulate the delicate, clustered texture of real flower petals. You can experiment with different numbers of swabs to achieve varying flower sizes and petal densities.
Image Credit: Designer Gemma77 via YouTube video. This image beautifully illustrates the simple yet effective cotton swab bundling technique, demonstrating the primary tool for your carnation painting.
Step Three: Bringing Your Carnations to Life – The Petal Technique
Now, prepare your chosen flower color! Designer Gemma77 chose a classic, vibrant red paint for her carnations, which creates a striking and timeless look. However, this is your opportunity to personalize your artwork. Feel free to explore other beautiful hues like soft pinks, cheerful yellows, regal purples, or even a sophisticated mix of colors. Pour a small amount of your selected paint onto your palette or a disposable plate. Dip the bundled cotton swabs into the paint, ensuring that just the tips are coated. Avoid saturating them too much, as this can lead to a less defined, messy application. Blot off any excess paint if necessary.
With paint on your unique swab bundle, gently press it onto the canvas where you envision your first flower blooming. The key to creating the distinctive carnation texture is to drag the paint in a delicate downward motion while simultaneously moving your hand in a small, continuous outward circular pattern. This unique motion helps to spread the paint unevenly, building up layers and creating the ruffled, voluminous effect characteristic of carnation petals. A beautiful aspect of this technique is that the base color of your canvas should subtly “run-in” or show through the applied flower color. This interplay of colors adds incredible depth and dimension to your blooms, giving them a more realistic and dynamic appearance. Experiment with varying pressure and motion to achieve different petal densities and textures. Remember, don’t strive for photographic perfection; embrace the organic and slightly abstract nature of the cotton swab strokes, as this is what gives your art its unique charm.
Step Four: Building Your Bouquet – Adding More Blooms
Once you’ve successfully painted your first captivating carnation, you’re ready to expand your floral arrangement and bring your canvas to life! Repeat Step Three as many times as you desire, strategically placing additional flowers to create a captivating cluster, a graceful scattered field, or a lush, abundant bouquet across your canvas. In her demonstration, Designer Gemma77 gracefully paints five distinct flowers on her canvas, showcasing a balanced and harmonious composition. However, the number and precise placement are entirely subject to your artistic vision and the size of your canvas. I highly recommend filling your canvas adequately to create a rich, abundant look that truly captures attention and makes a statement. Consider varying the sizes of your flowers slightly – perhaps a few larger, more prominent blooms flanked by smaller buds – to add visual interest and a more natural, organic feel to your arrangement. You can also introduce secondary colors for some of your flowers, or add lighter and darker shades to the existing ones to create subtle highlights and shadows, further enhancing the illusion of depth and movement within your floral masterpiece.
Step Five: Grounding Your Flowers – Creating Stems and Foliage
With your beautiful, vibrant carnations now blooming on your canvas, it’s time to give them a sturdy and natural foundation with elegant stems. Select a new paint color for this crucial step. Traditional greens, ranging from a vibrant lime to a deep forest green, are perfect for a classic botanical look. However, don’t hesitate to experiment with a deep earthy brown, a muted grey, or even a contrasting shade for a more artistic and contemporary statement. If you possess a paint knife, this is its moment to shine. Dip the very edge of the knife into your chosen paint color, ensuring it’s evenly coated but not overloaded. Then, with a steady hand and a confident stroke, drag the knife downwards from the base of each flower, creating elegant, crisp, and defined lines for the stems. The flat edge of the knife allows for remarkably clean and precise strokes that are difficult to achieve with a brush.
If you don’t have a paint knife, don’t worry! A small, flat-tipped paintbrush can achieve a similar effect, or even the sharp edge of a sturdy piece of cardboard can be used for thin lines. To truly complete your composition, don’t hesitate to add a few simple leaves radiating from the stems. You can use a small detail brush for this, or even the corner of your paint knife for a more abstract, textured leaf shape. This small addition of foliage can significantly enhance the botanical feel of your artwork and tie the entire composition together beautifully. Allow all layers of paint to dry completely and thoroughly before proudly displaying your stunning handmade masterpiece.
Image Credit: Designer Gemma77 via YouTube video. A beautiful example of the completed carnation painting, showcasing the vibrant colors, distinctive textures, and elegant stem work.
Creative Variations and Tips for Your Cotton Swab Art
The beauty of DIY art lies in its endless possibilities for customization and personalization. Once you’ve mastered the basic technique of this cotton swab carnation painting, you’ll find countless ways to make each piece uniquely your own:
- Color Palette Exploration: Beyond the classic red, don’t limit your imagination! Experiment with vibrant pinks for a playful look, sunny yellows for cheer, serene blues for tranquility, or even a sophisticated multi-colored approach within a single flower. Consider a monochromatic scheme, utilizing different shades and tints of a single color for a truly elegant and modern aesthetic.
- Background Alternatives: While a solid color provides a strong foundation, explore other background treatments. Try a subtle gradient where colors fade into one another, a textured background created with a sponge or fabric, or even a faint abstract wash of complementary colors applied before adding your flowers.
- Varying Flower Sizes and Shapes: Adjust the number of cotton swabs in your bundle to create flowers of different sizes – more swabs for larger, fuller blooms and fewer for delicate, smaller buds or unopened flowers. Alter your circular motion slightly to create variations in petal arrangements and overall flower shape, making each bloom distinct.
- Adding Dimension and Depth: To give your carnations more realism, once the first layer of petals is completely dry, dip your cotton swabs into a slightly lighter or darker shade of the same flower color. Apply smaller, concentrated strokes towards the center of the flower. This layering technique will instantly add perceived depth and make your blooms appear more three-dimensional.
- Sparkle and Shine: For a touch of glamour, consider mixing fine glitter into your paint for a subtle shimmer, or apply a glitter sealant or spray once the entire painting is completely dry. This can add a festive or ethereal quality to your artwork.
- Beyond Carnations: The bundled cotton swab technique is incredibly versatile. Experiment with it to create other floral shapes like hydrangeas or cherry blossoms, or even abstract patterns and textures. The multi-point application can simulate a wide variety of visual effects.
- Practice Makes Perfect: If you’re feeling hesitant or want to perfect your technique before committing to your main canvas, try practicing your strokes and circular motions on a piece of scrap paper, cardboard, or an old canvas. This helps build confidence, refines your muscle memory, and allows you to test color combinations without pressure.
- Embrace Imperfections: Remember, handmade art has a unique character and charm. Don’t strive for photographic realism; instead, celebrate the unique qualities and slight variations that make your piece one-of-a-kind. These “imperfections” are often what give handmade art its soul.
The Joy of DIY Wall Decor
Creating your own wall decor offers a multitude of benefits that extend far beyond simply saving money. It provides a wonderfully therapeutic outlet for creativity, allowing you to unwind, de-stress, and express your inner artist. The profound sense of accomplishment and pride you feel when you step back and admire your finished artwork, knowing you created it with your own hands, is truly unparalleled. Furthermore, a handmade piece instantly infuses your home with warmth, personality, and a unique story that mass-produced art simply cannot replicate. It can serve as a captivating conversation starter, a cherished handmade gift for a loved one, or a beautiful, ever-present reflection of your personal style and artistic journey. This cotton swab carnation painting project is a fantastic entry point into the rewarding world of DIY art, proving that stunning, gallery-worthy results can be achieved with minimal fuss and readily available materials. Embellishing your home with your own creations fosters a deeper connection to your living space and a greater appreciation for the power of personal expression.
Final Thoughts on Your Cotton Swabs Carnations Painting
Congratulations on embarking on this wonderful artistic journey and bringing a touch of handmade beauty into your home! This cotton swab carnation painting project, brought to life through the ingenuity and clear guidance of Designer Gemma77, is a testament to how simple tools can yield spectacular and surprisingly sophisticated results. Whether you’re an experienced artist seeking a fresh technique or picking up a brush (or cotton swabs!) for the very first time, the process is designed to be enjoyable, relaxing, and incredibly rewarding. The vibrant textures and charming appearance of these cotton swab carnations are sure to brighten any room. Display your vibrant new artwork proudly in your living room, bedroom, entryway, or even as a thoughtful, personalized handmade gift for a loved one. Your walls will undoubtedly thank you for the splash of color, unique charm, and the personal touch you’ve added. Now go forth, continue to create, and let your artistic spirit bloom – the possibilities are as endless as your imagination!