
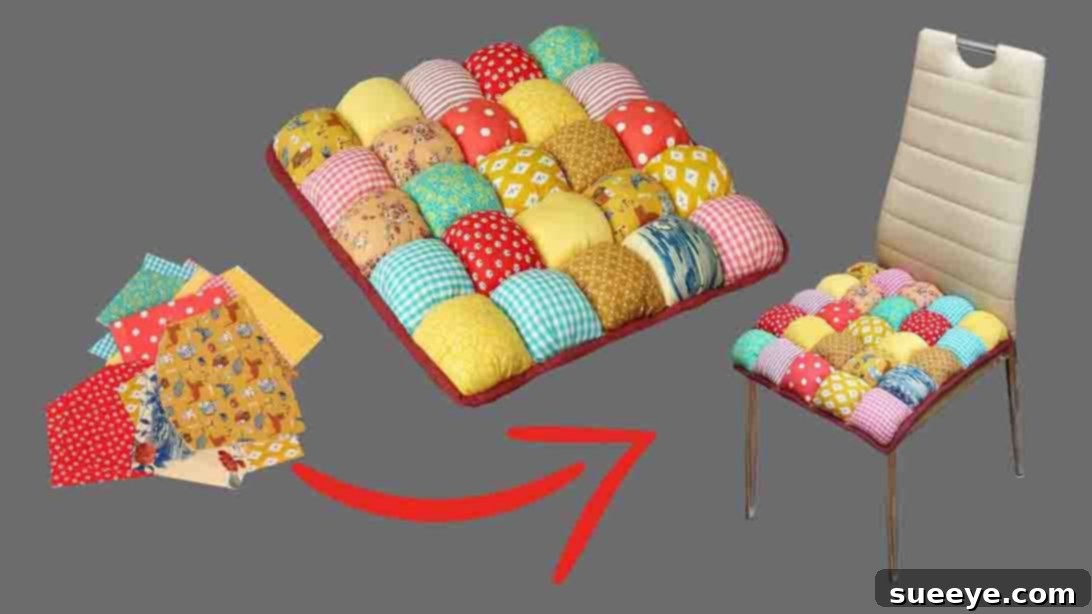
Transform Your Fabric Scraps: A Comprehensive Guide to Crafting DIY Chair Cushions
Are you a sewing enthusiast constantly searching for creative ways to utilize those charming leftover fabric scraps? Do you dream of adding a touch of personalized comfort and style to your home without breaking the bank? Look no further! This detailed guide will walk you through creating a beautiful and functional DIY chair cushion using your fabric remnants. This project, inspired by the innovative techniques shared by Miarti – Sewing Tips on YouTube, proves that what might appear complex can actually be a surprisingly simple and rewarding endeavor. It’s the ultimate upcycling project for any crafter, transforming small pieces of fabric into a cohesive, plush, and unique home accessory. Dive into this tutorial today and discover the joy of crafting your very own custom chair cushion!
Why Choose a DIY Fabric Scrap Chair Cushion?
Creating your own chair cushion from fabric scraps offers a multitude of benefits, making it an ideal project for both seasoned sewers and enthusiastic beginners:
- Embrace Sustainability and Reduce Waste: This project is a fantastic way to give new life to fabric remnants that might otherwise end up in landfill. It promotes an eco-friendly approach to crafting and home decor, turning waste into warmth and comfort.
- Cost-Effective Home Decor: Instead of purchasing expensive new cushions, you can leverage materials you already own. This significantly reduces the cost of enhancing your home’s comfort and aesthetic, making stylish decor accessible on any budget.
- Unleash Your Creativity and Personal Style: Fabric scraps come in an endless array of colors, patterns, and textures. This allows you to mix and match to create a truly unique cushion that perfectly reflects your personal taste and complements your existing decor. No two scrap cushions will ever be exactly alike!
- Skill-Building for All Levels: While the finished product looks sophisticated, the techniques involved are straightforward, making it an excellent project for honing basic sewing skills like cutting, stitching straight lines, and hand-sewing closures.
- Enhance Comfort and Functionality: A well-padded cushion can significantly improve the comfort of any chair, whether it’s a dining chair, office chair, or a favorite armchair. The addition of ties ensures it stays securely in place.
This project isn’t just about making a cushion; it’s about making a statement of creativity, sustainability, and personal touch in your living space.
Essential Materials and Tools for Your Upcycled Chair Cushion Project
Before you begin, gather all your materials and tools. Having everything at hand will ensure a smooth and enjoyable crafting experience. Here’s a comprehensive list:
- Fabric Scraps: This is the star of our project! Aim for a variety of medium-weight cotton or cotton-blend fabrics. Ensure they are clean and ironed. You’ll need enough scraps to cut 25 squares of 13cm x 13cm. Different colors and patterns will create a vibrant patchwork effect.
- 13 cm x 13 cm Template: A sturdy piece of cardboard, plastic, or even a pre-made quilting ruler will work perfectly. This ensures all your larger squares are uniform in size, crucial for a neat finish.
- 11 cm x 11 cm Template: Similarly, a template for the smaller squares is essential. You’ll need to cut 25 pieces of this size, ideally from a single, larger piece of coordinating cotton fabric for a consistent backing on each “puffed” segment.
- Fabric Marker or Tailor’s Chalk: For accurately tracing your templates onto the fabric. Choose a marker that disappears with water or heat, or tailor’s chalk that brushes off easily.
- Sharp Fabric Scissors or Rotary Cutter and Mat: Precision is key in this project. Sharp scissors will give clean edges, while a rotary cutter with a self-healing mat offers even greater accuracy and speed, especially when cutting multiple layers.
- Holofiber or Other Stuffing Material: Holofiber is lightweight, hypoallergenic, and maintains its loft well, making it ideal for cushions. Other options include polyester fiberfill, cotton batting scraps, or even shredded fabric scraps for an ultra-sustainable approach.
- Large Cotton Fabric (for backing and ties): You’ll need a piece of cotton fabric large enough to cover the entire back of your assembled cushion (approximately 60cm x 60cm, depending on your final cushion size). This fabric will also be used to create the four tie straps. Choose a durable, non-stretch cotton in a color that complements your patchwork.
- Matching Thread: High-quality polyester all-purpose thread that matches your main backing fabric or blends well with your fabric scraps.
- Sewing Machine: While parts of this project can be hand-sewn, a sewing machine will significantly speed up the process and ensure strong, consistent seams for the bulk of the construction.
- Pins or Fabric Clips: Essential for holding fabric layers together securely before sewing, ensuring everything stays aligned.
- Iron and Ironing Board: Pressing your seams flat as you go will make a huge difference in the professional appearance and overall neatness of your finished cushion.
Having these items ready before you start will streamline your crafting process and help you achieve a beautifully finished chair cushion.
Step-by-Step Guide to Crafting Your Own Fabric Scrap Chair Cushion
Step 1: Preparing Your Fabric Squares and Initial Assembly
The foundation of your unique chair cushion lies in the careful preparation and assembly of individual fabric squares. Start by gathering your diverse collection of fabric scraps. Take your 13cm x 13cm template and meticulously trace its outline onto various pieces of your fabric scraps. Aim for clear, accurate lines. Once traced, carefully cut out a total of 25 squares. These will form the colorful, patterned top layer of your cushion’s individual segments.
Next, take your 11cm x 11cm template. Using a larger, solid-colored piece of cotton fabric (or a consistent selection of coordinating scraps), trace and cut another 25 squares of this smaller size. These will serve as the bottom layer for each individual puffed segment, providing a neat and uniform base. To prepare these smaller squares for stuffing later, grab one 11cm x 11cm fabric square, fold it precisely in half, and make a small, approximately 2-3cm long slit in the very center of the fold. This slit will be the opening through which you’ll add the holofiber. Repeat this process for all 25 of the 11cm x 11cm fabric pieces.
Now, let’s combine these layers. Lay one of your 11cm x 11cm fabric squares flat, right side facing up. Position one of your larger 13cm x 13cm fabric squares directly on top of it, ensuring the “right side” (the decorative side) is facing outwards. The key here is to align the edges of the smaller fabric underneath with the edges of the larger fabric on top. You’ll notice that the 13cm x 13cm square will overhang the 11cm x 11cm square by 1cm on each side. Carefully pin the edges of the larger square to the smaller square, ensuring they are perfectly lined up. This creates a neat border. The excess fabric of the larger square will extend beyond the smaller square. To manage this excess and create the puffy effect, gently fold the protruding fabric inwards towards the center, making a pleat on each of the four sides. Pin these folds securely in place, ensuring they are evenly distributed. Once everything is pinned, take it to your sewing machine and stitch all around the four edges, sewing approximately 0.5cm from the outer edge of the smaller square. This will create a secure pocket with a slightly raised, puffy center when completed. Repeat these detailed steps for all 25 sets of fabric squares.
Step 2: Assembling the Cushion Top and Stuffing the Puffs
With all 25 individual puffed squares created, it’s time to assemble them into the main body of your chair cushion. Imagine your cushion as a grid of 5 squares by 5 squares. Start by laying out five of your prepared squares in a single row, ensuring the right sides are facing up and your desired pattern or color flow is achieved. Carefully align the adjacent squares, right sides together, and pin their sides securely. Once pinned, sew these five pieces together along their shared edges using a straight stitch, remembering to maintain a consistent seam allowance (e.g., 1cm or 3/8 inch). Press the seams open or to one side for a flatter finish. Repeat this process to create a total of five identical rows, each composed of five stitched squares.
Now, take these five completed rows and arrange them one above the other to form your full 5×5 cushion top. With right sides facing, align the long edges of two adjacent rows. Pin them together meticulously, ensuring that the seams where the individual squares meet are perfectly matched. This step is crucial for a professional-looking patchwork. Sew these pinned rows together along their entire length. Continue this process, attaching each subsequent row until all five rows are joined, forming the complete top panel of your chair cushion. Press all seams thoroughly to achieve a crisp, flat surface.
Next, we will add the side inlay, which gives the cushion its depth and structure. Cut a long strip of fabric, approximately 6cm wide, from your chosen cotton backing fabric. This strip should be long enough to go around the entire perimeter of your assembled cushion top (e.g., if your cushion top is 55cm x 55cm, you’ll need a strip at least 220cm long, plus seam allowance). With right sides together, pin one long edge of this 6cm width inlay strip around all four edges of your cushion top. Start and end at a corner, leaving a small overlap to join the ends. Sew the inlay strip to the cushion top, creating a consistent seam. Once sewn, press the seam carefully, folding the inlay strip outwards.
Now comes the satisfying part: stuffing each individual puff! Locate the small slit you cut in the 11cm x 11cm fabric on the underside of each segment. Using small handfuls of holofiber, gently push the stuffing through each slit until the individual square is plump and firm but not overstuffed. Aim for an even distribution of holofiber within each segment. Once satisfied with the stuffing, hand-sew each slit closed using a ladder stitch (also known as an invisible stitch). This technique creates a clean, almost invisible closure, securing the stuffing within each puff.
Step 3: Finishing Touches: Backing, Ties, and Final Assembly
With the cushion top assembled, inlay attached, and all puffs plumped, it’s time to add the backing and ties for a complete, functional chair cushion. Lay your assembled cushion top with the right side facing down on a large, flat surface. Place your large cotton backing fabric on top of it, ensuring it covers the entire cushion top and extends slightly beyond all edges. Carefully cut the backing fabric down to the exact size and shape of your cushion top with its attached inlay. This piece will neatly cover the “ugly side” of your work, concealing all the seams and hand-stitched slits, giving your cushion a professional finish.
Now, let’s create the tie straps that will secure your cushion to the chair. From the remaining cotton backing fabric, cut four long fabric strips. The ideal dimensions are typically around 4cm wide and 40-50cm long (adjust length based on your chair size). Fold each strip lengthwise, right sides together, and stitch along the raw edge to create a tube. Turn these tubes right side out and press them flat. You can topstitch along the edges for a cleaner, more finished look. Take one tie strap and fold it in half to form a loop. Position this looped end onto one corner of the cushion, underneath the cushion top but within the seam allowance of the inlay, ensuring the raw edges of the tie are aligned with the raw edge of the cushion. Pin it securely. Repeat this for all four corners.
Finally, it’s time to attach the backing and complete the cushion. Place the backing fabric on top of the cushion (right side down), aligning all raw edges. The tie straps should be tucked inside, away from the seam line, to avoid accidentally stitching over them. Pin the backing to the cushion top, making sure to also catch the raw edge of the inlay and the folded-in ties. Sew all around the perimeter of the cushion, leaving a gap of about 10-15cm along one side for turning. Trim the seam allowances and clip the corners to reduce bulk. Turn the cushion right side out through the opening. Gently push out the corners to make them crisp. The remaining half of the inlay fabric, which you previously attached to the cushion top, should now be visible along the sides. Fold the raw edge of this inlay inward and the raw edge of the backing fabric inward into the opening. Hand-sew this opening closed using a neat ladder stitch. Your DIY chair cushion is now beautifully finished, ready to add comfort and style to your home!
Tips for a Perfect DIY Chair Cushion
To ensure your fabric scrap chair cushion project turns out beautifully and stands the test of time, consider these helpful tips:
- Fabric Selection Harmony: While using scraps, try to maintain a cohesive color palette or a consistent fabric type (e.g., all cottons) to ensure your cushion drapes and washes well. Mixing very different fabric weights (like denim with silk) can lead to an uneven finish.
- Precision in Cutting: The accuracy of your initial square cuts directly impacts how neatly your final cushion will come together. Take your time with tracing and cutting, using sharp tools. Consider using a rotary cutter and quilting ruler for ultimate precision.
- Consistent Seam Allowances: Maintain the same seam allowance throughout the entire project, especially when joining individual squares and rows. This consistency is vital for your cushion to lay flat and square.
- Press, Press, Press!: Ironing your fabric before cutting and pressing your seams after every sewing step makes an enormous difference. Flat seams are easier to join and result in a much more professional and neat appearance.
- Even Stuffing: When filling each individual puff, ensure you distribute the holofiber evenly. Too much in one spot or too little in another will create an uneven and lumpy surface. Gently massage each puff after stuffing to help settle the fiberfill.
- Strong Hand-Sewing: The ladder stitch for closing the slits and the final opening is crucial for an invisible and durable finish. Practice this stitch on a scrap piece of fabric if you’re unfamiliar with it. Use a double thread for extra strength.
- Customization Opportunities: Don’t limit yourself to a 5×5 grid. Adjust the number of squares to fit the exact dimensions of your chair. Experiment with different fabric patterns in each square to create unique designs, like a checkerboard, stripes, or a random collage.
- Secure Ties: Reinforce the attachment points for your tie straps with extra stitches, as these areas will experience stress when the cushion is tied to a chair.
Caring for Your Handmade Cushion
To keep your beautiful DIY chair cushion looking its best, follow these simple care instructions. Assuming you’ve used mostly cotton fabrics and holofiber stuffing, most cushions can be gently machine washed. Use a mild detergent and wash on a delicate cycle with cold water. Avoid harsh chemicals or bleach. If your cushion is large, you might want to wash it alone to allow it to move freely in the machine. After washing, gently reshape the cushion and tumble dry on a low heat setting, or air dry flat to prevent shrinkage and maintain the loft of the holofiber. Ensure it is completely dry before placing it back on your chair to prevent mildew.
Conclusion: Enjoy Your Unique, Handcrafted Comfort
Congratulations! You’ve successfully transformed a collection of humble fabric scraps into a magnificent, personalized chair cushion. This project not only breathes new life into forgotten materials but also adds a unique touch of handmade charm and comfort to your home. Each stitch and every carefully chosen scrap tells a story, making your cushion a true conversation starter. Embrace the satisfaction of creating something beautiful and functional with your own hands. We encourage you to share your creations and inspire others to embark on their own fabric scrap adventures. Now, sit back, relax, and enjoy the unparalleled comfort of your one-of-a-kind DIY chair cushion!