
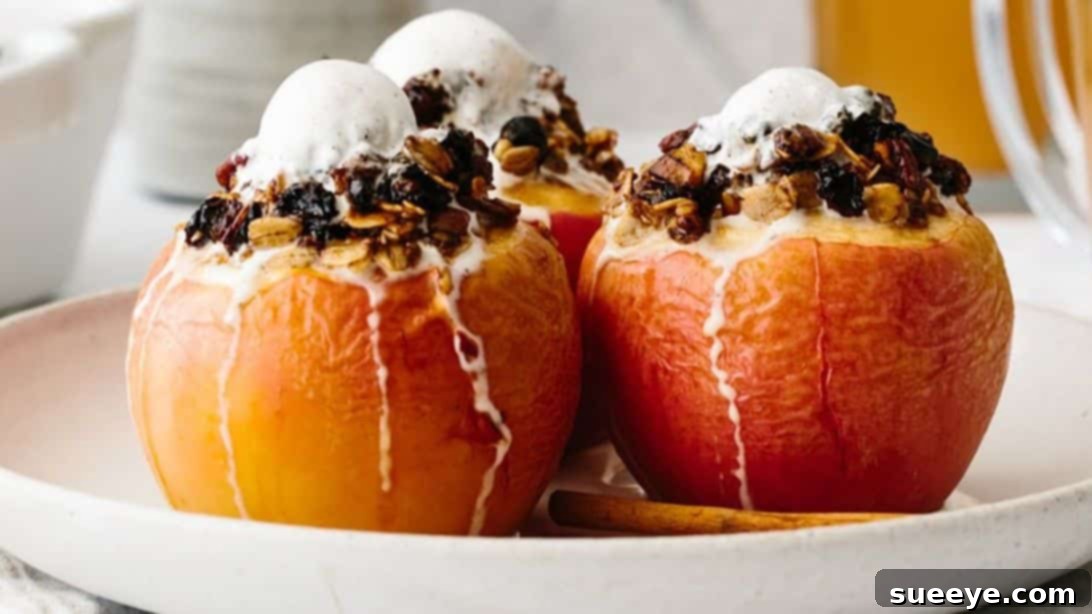
As the vibrant colors of autumn sweep across the landscape and a crisp, inviting chill fills the air, our thoughts naturally turn to warm, comforting treats. If you find yourself with a bountiful harvest of apples from a recent trip to the orchard or a generous haul from the farmer’s market, you’re in the perfect position to create something truly special. This recipe for **Easy Baked Apples with Cinnamon Oat Filling** is not just a dessert; it’s a celebration of the season, transforming simple apples into an irresistible, wholesome delight that captures the very essence of fall.
The inspiration for this comforting recipe came to me while browsing Downshiftology’s YouTube channel, a fantastic resource for wholesome and delicious meal ideas. I was specifically on the hunt for apple dessert recipes, and the moment I saw these baked apples, I knew I had to try them. The concept of tender, sweet-tart apples generously stuffed with a fragrant, cinnamon-spiced oat mixture, studded with pecans and dried fruit, was simply too appealing to resist. I finally made them last weekend, and the results were nothing short of amazing. The dish truly did not disappoint; the flavors were incredibly satisfying, bursting with warmth and autumnal goodness in every single bite.
What makes this recipe so special is its elegant simplicity. It’s an approachable dessert that delivers big on flavor without demanding hours in the kitchen. The ingredients are straightforward and likely already in your pantry, making it an ideal choice for both seasoned bakers and beginners alike. It’s a dessert that feels both indulgent and wholesome, perfect for a cozy evening at home, a charming addition to a festive gathering, or even a delightful, healthier breakfast option. Get ready to fill your home with the inviting aroma of cinnamon and baked apples!
RELATED RECIPE: If you’re looking for another fantastic way to enjoy apples and cinnamon, be sure to check out our recipe for Easy Bakery-Style Apple Cinnamon Muffins. They’re light, fluffy, and bursting with fall flavors!
Why You’ll Fall in Love with These Cinnamon Oat Baked Apples
There are numerous reasons why these baked apples are destined to become a beloved staple in your fall recipe collection. They are the epitome of comfort food, offering a warm and inviting treat that perfectly complements the cooler temperatures. Their preparation is surprisingly easy, involving minimal hands-on time and allowing your oven to do most of the work. Furthermore, this recipe champions wholesome, readily available ingredients, transforming everyday pantry staples into an extraordinary culinary experience.
The magic lies in the harmonious blend of textures and flavors. The apples bake until they are incredibly tender, their natural sweetness slightly concentrated, while still retaining a delicate tartness. This provides the perfect counterpoint to the rich, chewy, and slightly crunchy cinnamon oat filling. The classic pairing of ground cinnamon and nutmeg infuses the dish with that unmistakable autumnal warmth, creating an aroma that alone is enough to bring a smile to your face. And the versatility doesn’t stop there: these baked apples are truly delightful on their own, yet they transform into an even more decadent treat when adorned with a scoop of creamy vanilla ice cream, a generous dollop of homemade whipped cream, or a luxurious drizzle of warm caramel sauce. They even present a wonderfully healthy-ish option for breakfast or brunch, perhaps alongside a spoonful of Greek yogurt and a sprinkle of granola.
Essential Ingredients for The Best Baked Apples with Cinnamon Oat Filling
Creating these remarkably delicious baked apples begins with selecting the right components. While the recipe itself is straightforward, a little attention to your ingredients will ensure an outstanding result. Here’s a detailed look at what you’ll need and the role each plays in this delightful fall dessert:
- 4 Large Baking Apples: The star of our show! It’s crucial to choose apples that are firm, slightly tart, and known to hold their shape well during baking. Excellent varieties include Honeycrisp (for sweetness and crispness), Fuji, Gala (sweet and mild), Granny Smith (for a lovely tart contrast), Rome Beauty, or Braeburn. Avoid softer, mealy varieties like Red Delicious, which can turn to mush in the oven. The size is important too, as larger apples provide a good cavity for the filling.
- 1/3 Cup of Old-Fashioned Oats: These oats form the hearty, chewy base of our delectable filling. Old-fashioned (also known as rolled) oats are superior to quick-cooking or instant oats for this recipe because they maintain their texture beautifully, offering a satisfying chew without becoming mushy. They also absorb the fragrant spices and apple juices wonderfully, contributing to a rich, cohesive filling.
- 1/4 Cup of Chopped Pecans: Toasted pecans introduce a delightful crunch and a deep, buttery, nutty flavor that complements the apples and spices perfectly. If pecans aren’t readily available, or if you prefer a different nut, walnuts or almonds make excellent substitutes. For an enhanced flavor, consider lightly toasting your nuts in a dry pan for a few minutes before chopping.
- 1/4 Cup of Raisins, Dried Cranberries, or Other Dried Fruit (Roughly Chopped): These little gems bring bursts of natural sweetness and a pleasant chewiness to the oat filling. Raisins are a classic choice, offering a familiar sweetness. Dried cranberries provide a lovely tart counterpoint, while chopped dried apricots or cherries can also introduce unique and delicious fruity notes. Feel free to use your favorite or a mix of several for added complexity.
- 1/4 Cup of Coconut Sugar: This natural sweetener provides a beautiful, subtle caramel-like flavor and has a lower glycemic index compared to refined white sugar. Brown sugar is an excellent alternative, offering a similar depth and molasses-like sweetness. You can adjust the quantity slightly based on the natural sweetness of your chosen apples and your personal preference.
- 1 Teaspoon of Ground Cinnamon: An indispensable spice in any apple dessert, cinnamon infuses our baked apples with its characteristic warmth, sweetness, and an inviting aroma that immediately evokes the coziness of autumn. This is a flavor you don’t want to skimp on!
- 1/4 Teaspoon of Ground Nutmeg: A pinch of nutmeg works synergistically with cinnamon, adding a nuanced depth, a hint of earthiness, and a complex aroma that elevates the overall spice profile. For the freshest and most potent flavor, consider grating whole nutmeg freshly.
- 2 Tablespoons of Butter or Ghee (Melted): This essential ingredient acts as a binding agent for the oat filling, ensuring it holds together beautifully within the apple cavity. It also imparts a rich, decadent flavor and helps the oats toast slightly as they bake, adding to their texture. For those following a vegan diet, a plant-based butter alternative or coconut oil can be used with equally delicious results.
- 3/4 Cup of Apple Cider or Apple Juice: Poured into the baking dish around the apples, this liquid is key to the apples’ tenderness. It creates a steamy environment in the oven, preventing the apples from drying out and ensuring they bake up incredibly juicy and soft. Moreover, it infuses the apples with even more apple flavor and creates a luscious, sweet syrup at the bottom of the pan, perfect for spooning over the finished dessert. In a pinch, water or even a dry white wine can be used.
- 1/2 Lemon (Cut into Wedges): Fresh lemon juice serves a dual purpose: it provides a bright, acidic counterpoint to the sweetness of the apples and filling, enhancing their natural flavors. More importantly, squeezing it over the exposed apple flesh after coring helps to prevent oxidation, keeping your apples looking fresh and appealing rather than turning brown.
How to Make Baked Apples with Oat Filling: A Step-by-Step Guide
Creating these delightful baked apples is an enjoyable process. Follow these detailed steps to ensure your apples turn out perfectly tender, flavorful, and beautifully presented every time.
Step 1: Preheat Your Oven and Prepare Your Baking Dish
Begin by setting your oven to preheat to a steady 350°F (175°C). Proper preheating is crucial for even baking and ensures that the apples start cooking immediately upon entering the oven. While your oven is coming to temperature, select an appropriate baking dish. A glass pie plate, an 8×8 inch square baking dish, or a small rectangular casserole dish will work wonderfully, provided it’s large enough to accommodate your four apples standing upright with a little space between them.
Step 2: Create the Aromatic Cinnamon Oat Filling
In a medium-sized mixing bowl, combine all the dry components of your filling. Add the old-fashioned oats, chopped pecans, your chosen dried fruit (whether raisins, cranberries, or a mix), coconut sugar, ground cinnamon, and ground nutmeg. Use a whisk or a fork to thoroughly mix these ingredients, ensuring that the spices and sugar are evenly distributed throughout the oats and fruits. Next, pour in the two tablespoons of melted butter or ghee. Stir everything together with a spoon or spatula until the oats and dried fruits are uniformly coated and slightly moistened by the butter. The mixture should be pleasantly clumpy, indicating it will hold together well once stuffed into the apples.
Step 3: Carefully Core and Prepare the Apples
This step is key to making space for your delicious filling. Wash and thoroughly dry your four large baking apples. Using either a melon baller or a small, sharp paring knife, carefully remove the core from the top of each apple. The goal is to create a well that is approximately 1.5 inches wide, extending about three-quarters of the way down into the apple. It is critically important to **avoid coring all the way through the bottom** of the apple, as this would cause your precious filling to leak out during baking. Scoop out a bit of the apple flesh around the core to expand the cavity, making sure to leave a sturdy wall of apple flesh to contain the filling.
Step 4: Prevent Bursting and Stabilize the Apples
To ensure your apples bake without splitting or bursting, which can happen due to steam pressure, take your paring knife and carefully score a continuous ring or remove a thin band of skin, about 1/2 inch wide, around the top edge of each apple. This small incision allows steam to escape safely. Next, arrange your cored and scored apples in your prepared baking dish. They should stand upright. If any apple seems wobbly or unstable, you can gently slice a tiny, thin piece off the very bottom to create a flat, secure base. Finally, take your lemon wedges and squeeze fresh lemon juice liberally over the top edges of the cored apples. This not only adds a bright flavor but also effectively prevents the exposed apple flesh from browning prematurely.
Step 5: Fill the Apples and Add Baking Liquid
Now comes the most satisfying part! Using a spoon, generously fill each apple cavity with the fragrant cinnamon oat mixture. Gently press the filling down, but avoid compacting it too much; you want the oats to have a little room to expand and absorb moisture. Mound the filling slightly over the top of each apple for an abundant, rustic look. Once all apples are stuffed, carefully pour the 3/4 cup of apple cider or apple juice into the bottom of the baking pan, ensuring it surrounds the base of the apples without spilling into the filling. This liquid is essential; it will simmer during baking, creating a steamy environment that keeps the apples incredibly moist and tender, and developing a delicious, spiced syrup in the process.
Step 6: Bake Until Golden and Tender
Carefully transfer the baking dish into your preheated oven. Bake the apples for approximately **45 to 60 minutes**. The exact baking time can vary depending on the size and variety of your apples, so it’s important to monitor them. Throughout the baking process, and especially after the first 20-30 minutes, it is highly recommended to baste the apples several times. Use a spoon to drizzle the warm, flavorful juices from the bottom of the pan over the tops of the apples. This not only keeps them wonderfully moist but also infuses them with deeper flavor and encourages a beautiful, glossy finish. The apples are fully baked when they are tender enough to be easily pierced with a fork, yet still hold their structural integrity. The oat filling should be golden brown and slightly crisp on top.
Step 7: Serve Warm and Savor Every Bite
Once your baked apples have reached peak perfection, carefully remove the baking dish from the oven. Before serving, take a moment to spoon some of the warm, luscious pan juices over each apple. This adds an extra layer of moisture, sweetness, and concentrated apple flavor. These baked apples are utterly delightful served just as they are, but for an elevated experience, consider adding a generous scoop of creamy vanilla ice cream, a cloud of homemade whipped cream, or a luxurious drizzle of warm caramel sauce. A light sprinkle of extra cinnamon or a few chopped nuts can add a lovely finishing touch. Enjoy them while they’re warm, as this is when their comforting flavors and aromas are at their absolute best!
Expert Tips for Perfectly Baked Apples Every Time
While this recipe is straightforward, these professional tips will help you achieve flawless baked apples consistently:
- Choose Wisely: Reiterate the importance of using firm, baking-friendly apple varieties. Overly soft apples will turn to mush, while very firm ones like Granny Smiths might need a slightly longer baking time.
- Don’t Overfill: Resist the urge to pack the filling too tightly or too high. Leave a small amount of space at the top (about 1/4 inch) to prevent spillage as the oats expand and the apples soften.
- Consistent Basting: This step is non-negotiable for moist apples. Basting every 15-20 minutes ensures the apples stay hydrated and absorb more flavor from the pan juices, also helping the filling caramelize slightly.
- Check for Doneness: Use a small knife or fork to gently pierce the side of an apple. It should slide in easily with minimal resistance, but the apple should still feel structurally sound, not mushy.
- Prevent Over-Browning: If you notice the tops of the apples or the filling browning too quickly before the apples are tender, simply tent the baking dish loosely with aluminum foil for the remainder of the baking time.
- Flavor Boost: For an extra layer of flavor, you can brush the outside of the cored apples with a little melted butter or ghee before placing them in the baking dish.
Creative Variations and Serving Suggestions
This basic recipe provides a fantastic foundation, but it’s also wonderfully adaptable! Don’t hesitate to experiment and personalize your baked apples:
- Nutty Swaps: Beyond pecans, consider chopped walnuts for an earthy flavor, slivered almonds for a more delicate crunch, or even toasted hazelnuts for a richer taste in your filling.
- Fruity Additions: Elevate the filling with other dried fruits like finely chopped dried apricots, dates, figs, or even a handful of fresh blueberries or raspberries added during the last 15 minutes of baking for a burst of fresh flavor.
- Spice Adventures: Introduce a small pinch of ground ginger, cardamom, allspice, or a ready-made apple pie spice blend to the cinnamon and nutmeg for a more complex aroma.
- A Touch of Decadence: Add a teaspoon of finely chopped candied ginger or a few mini chocolate chips to the oat filling for a delightful surprise.
- Boozy Infusion: For an adult twist, substitute a portion (1/4 cup) of the apple cider with a splash of brandy, rum, or Grand Marnier for a sophisticated flavor profile.
- Vegan/Dairy-Free Adaptation: This recipe is easily made vegan by simply swapping dairy butter or ghee for a high-quality plant-based butter alternative or coconut oil.
- Gluten-Free Friendly: Ensure your old-fashioned oats are certified gluten-free if you are catering to individuals with gluten sensitivities or celiac disease.
- Savory-Sweet Hint: A tiny pinch of flaky sea salt added to the filling can beautifully enhance the sweetness and add a sophisticated depth of flavor.
Beyond the classic pairings of ice cream or whipped cream, here are more imaginative ways to serve your baked apples:
- Wholesome Breakfast: Enjoy a warm baked apple with a dollop of Greek yogurt, a drizzle of maple syrup or honey, and a sprinkle of extra granola for a nourishing and satisfying start to your day.
- Elegant Brunch Feature: Baked apples make a stunning and delicious addition to any brunch spread, complementing both sweet and savory dishes beautifully.
- Dessert Platter: Serve them as part of a larger autumnal dessert selection, perhaps alongside pumpkin pie bites or mini pecan tarts.
- Simple Evening Treat: Savor a baked apple on its own with a warm cup of herbal tea or a rich coffee for a comforting and mindful end to your day.
Storage and Reheating Instructions
While these baked apples are truly at their peak when served warm and fresh from the oven, any leftovers can be stored and reheated to be enjoyed again:
- Storage: Allow the baked apples to cool completely to room temperature. Transfer them to an airtight container and store them in the refrigerator for up to 3-4 days. The delicious apple cider syrup at the bottom of the pan will thicken slightly upon chilling, creating a lovely sauce.
- Reheating:
- Microwave: For the quickest reheat, place an individual baked apple in a microwave-safe dish. Microwave on high for 30-60 seconds, or until it is thoroughly warmed through. Be mindful not to overheat, which can make the apple rubbery.
- Oven: For the best results, especially if reheating multiple apples or if you prefer a crispier filling, place the apples in an oven-safe dish. Add a splash of water or apple juice to the bottom of the dish to maintain moisture. Reheat in a preheated oven at 300°F (150°C) for 10-15 minutes, or until the apples are heated through and the filling is warm.
There you have it – a comprehensive guide to creating the most comforting, flavorful, and beautifully presented baked apples with cinnamon oat filling. This recipe is much more than just a dessert; it’s a delightful culinary experience that celebrates the abundance of autumn, bringing warmth and joy to any table. Its versatility allows for easy customization, and its simplicity guarantees success even for novice bakers. It’s a dish that is sure to become a cherished family favorite, invoked year after year as the leaves begin to turn. So, gather your best baking apples, embrace the aromatic spices, and prepare to fill your home with an aroma that truly signals pure bliss. We wholeheartedly encourage you to try this recipe, make it your own, and share your wonderful experiences with us!
You might also like: Don’t forget to explore another chewy and delightful favorite from our collection, our Chewy Oatmeal Raisin Cookies, for yet another comforting treat!