
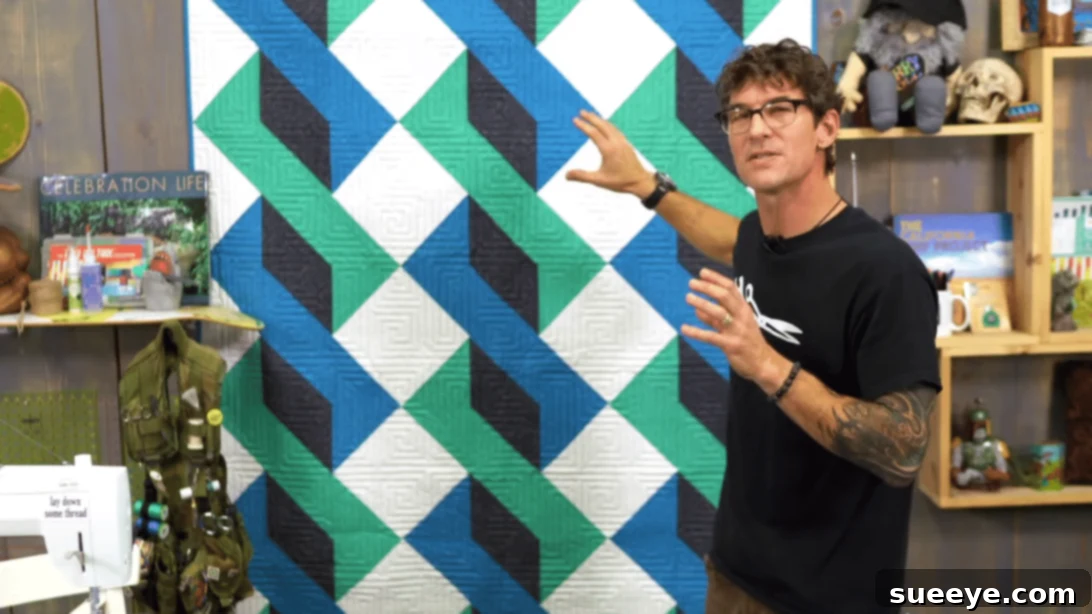
Mastering the Ribbon Pole Quilt: A Beginner-Friendly DIY Tutorial for Stunning Results
The moment I first encountered the captivating Ribbon Pole Quilt design, expertly presented by Rob Appell of Man Sewing on YouTube, I was instantly captivated. Its unique pattern and accessible approach immediately intrigued me, sparking a desire to try my hand at creating this beautiful piece. What began as a simple inspiration quickly evolved into one of the most rewarding and satisfying quilting projects I’ve undertaken in recent memory. The finished quilt exceeded all expectations, radiating such charm and elegance that I find myself eager to replicate the design again and again.
This particular quilt pattern isn’t just visually appealing; it’s remarkably beginner-friendly, making it an ideal entry point for anyone new to the world of quilting or looking for a straightforward yet impressive project. I wholeheartedly recommend the Ribbon Pole Quilt to all aspiring quilters, especially those who are just starting their journey. You’ll discover that not only is this project incredibly enjoyable, but the steps are surprisingly easy to follow, leading to a professional-looking result.
What truly sets this tutorial apart is the inclusion of a clever technique designed to simplify the quilting process, making the construction of this Ribbon Pole Quilt a breeze even for absolute novices. This ingenious method helps demystify some of the more intimidating aspects of quilting, ensuring a smooth and confident crafting experience. Prepare to embark on a delightful creative adventure that culminates in a truly cherished handmade item. Watch the comprehensive video tutorial below to master this fantastic technique and begin your own Ribbon Pole Quilt today!
Why the Ribbon Pole Quilt is Perfect for Every Quilter
The Ribbon Pole Quilt stands out in the vast landscape of quilt patterns for several compelling reasons, making it a beloved choice for both beginners and experienced quilters alike. Its charm lies in its deceptive simplicity, offering a sophisticated aesthetic that belies the straightforward construction process. For those new to quilting, the pattern provides an excellent opportunity to build fundamental skills without feeling overwhelmed. You’ll gain confidence in cutting, piecing half-square triangles (HSTs), and assembling a quilt top, all while creating something truly beautiful.
Experienced quilters will appreciate the Ribbon Pole Quilt for its versatility and the speed with which it can be completed. It’s a fantastic pattern for showcasing favorite fabric collections, using up scraps, or experimenting with color palettes. The repeating block design allows for a rhythmic workflow, making it a meditative and enjoyable project. Whether you’re aiming for a cozy throw, a decorative wall hanging, or a thoughtful handmade gift, this quilt can be easily adapted to suit various sizes and purposes. Its modern yet timeless appeal ensures that a Ribbon Pole Quilt will be a cherished addition to any home, providing warmth and a touch of handmade artistry.
Essential Materials for Your Ribbon Pole Quilt Project
Gathering the right materials before you begin is crucial for a smooth and enjoyable quilting experience. The quality of your fabrics and tools will significantly impact the final look and durability of your Ribbon Pole Quilt. Here’s a detailed list of what you’ll need, along with some helpful tips for selection:
- 1½ yards of white fabric: This will serve as the background, providing a crisp canvas that makes your colorful ribbons pop. Opt for a high-quality, pre-washed 100% cotton fabric to prevent shrinkage and ensure colorfastness.
- 1¼ yards each of blue fabric in different shades: The magic of the “ribbon” effect comes from varying shades within your chosen color family. Select 2-3 distinct shades of blue (e.g., light blue, medium blue, navy) to create depth and movement. Ensure these are also high-quality quilting cottons.
- Black fabric: This will form the “pole” element of your design, providing a striking contrast and defining the ribbon shapes. A solid black or very dark patterned fabric works best.
- Marking pen, pencil, or chalk: Essential for transferring pattern lines onto your fabric. Choose a tool that is easily visible on your chosen fabrics and disappears with washing or pressing.
- Ruler: A clear acrylic quilting ruler (at least 6×24 inches) is indispensable for accurate cutting. Look for one with clear markings for easy measurement.
- Needle and thread: For hand-stitching elements if desired, and for your sewing machine. Use a good quality polyester or cotton thread that matches your dominant fabric color or is a neutral like grey or beige.
- Scissors or rotary cutter and a cutting mat: A rotary cutter dramatically speeds up cutting and improves accuracy. A self-healing cutting mat is essential to protect your work surface and prolong the life of your blade. Always use a fresh, sharp blade for clean cuts.
- Iron, for pressing: A good steam iron is your best friend in quilting. Consistent and accurate pressing is just as important as accurate sewing for flat, professional-looking seams.
- Sewing machine: Any standard sewing machine in good working order will suffice. Ensure it’s clean, oiled, and has a fresh needle suitable for quilting (e.g., a universal or quilting needle).
- Pattern: This is your blueprint! Make sure to download and print the official Ribbon Pole Quilt pattern from Man Sewing. It contains all the precise measurements and layout diagrams you’ll need.
Step-by-Step Guide: Crafting Your Ribbon Pole Quilt
Embarking on a quilting project can feel like a grand adventure, and with this detailed guide, you’ll navigate each step with confidence. Remember, precision in cutting and sewing, coupled with diligent pressing, are the keys to a beautiful finish. Take your time, enjoy the process, and let your creativity shine.
Step 1: Preparing Your Fabrics for Half-Square Triangles
The foundation of your quilt’s design relies on accurately cut fabric squares. Begin by carefully cutting your various fabrics into 10-inch squares. Use your rotary cutter and ruler with precision, ensuring each square is exactly 10×10 inches. Any deviation here can lead to misaligned blocks later on. Before proceeding, consult your pattern guide to understand the specific color combinations required for your half-square triangles (HSTs). The pattern will dictate which colors should be paired together to create the distinctive ribbon effect. Lay out your cut squares into these pairs, ensuring you have enough combinations for your desired quilt size.
Step 2: Constructing Your Half-Square Triangles (HSTs)
Half-square triangles are fundamental to many quilt patterns, and mastering them is a valuable skill. To create your HSTs, take two chosen 10-inch fabric squares and stack them together, ensuring their right sides are facing each other. Align all edges perfectly. Using your marking pen or pencil, draw a diagonal line from one corner to the opposite corner on the wrong side of the top fabric. Then, draw another diagonal line connecting the other two corners, creating an “X” shape. Now, sew all four sides of the stacked squares with a precise ¼-inch seam allowance. This creates a secure perimeter. Once sewn, carefully trim off the corners at an angle, making sure not to cut into your stitching lines. This reduces bulk when turning the fabrics right side out later.
Step 3: Precision Cutting and Pressing Your HSTs
With your sewn squares, it’s time to transform them into individual HST units. Carefully cut the block in half diagonally from both directions, following the “X” lines you drew. This will yield a total of four individual half-square triangle units from each pair of 10-inch squares. Once cut, gently open each fabric unit. The next crucial step is pressing the seams. Lay each HST flat and press the seams open, or, for this particular quilt, press the seams towards the blue (or darker) fabric. Pressing towards the darker fabric often helps to prevent the lighter fabric from showing through the seam allowance, ensuring a cleaner finish. This step is vital for creating flat, crisp blocks that will fit together seamlessly in the final quilt top.
Step 4: Arranging Your Quilt Design
Now comes the exciting part where your quilt design starts to take shape! With all your half-square triangle blocks prepared, it’s time to arrange them according to the Ribbon Pole pattern. Refer closely to the video tutorial and the pattern guide for the exact layout. This step is best done on a large flat surface, like a design wall or the floor, where you can see the entire quilt top come together. Experiment with different orientations of your HSTs until the “ribbon” and “pole” effect is clearly visible and aesthetically pleasing. Take a photo of your layout for reference before you begin sewing to avoid mix-ups.
Step 5: Stitching Your Quilt Top Together
Once your layout is finalized, begin stitching the blocks together. It’s often easiest to stitch the blocks one at a time, creating smaller units. Then, stitch these units together to form rows. After completing all your rows, meticulously stitch the rows to each other, carefully matching all seam intersections. As you go, remember the golden rule of quilting: press your seams! After stitching each block, and certainly after stitching each row, take your units to the ironing board and press the seams flat. This ensures your quilt top lies flat and prevents bulkiness, making the final quilting stage much easier and yielding a more professional finish. Continue this process until your entire Ribbon Pole Quilt top is assembled.
Step 6: Finishing Your Quilt
Congratulations, your quilt top is complete! The final step is to finish your quilt in your preferred manner. This typically involves three main components: batting, backing, and binding. First, create a “quilt sandwich” by layering your backing fabric (wrong side up), then the batting, and finally your completed quilt top (right side up). Baste these layers together using pins, basting spray, or thread to prevent shifting. Next, quilt the layers together using your sewing machine or by hand. You can opt for simple straight-line quilting to echo the ribbon design, or choose a more elaborate free-motion quilting pattern. Finally, add the binding – a fabric strip sewn around the edges of the quilt – to provide a neat finish and protect the raw edges. Don’t forget to add a label with the quilt’s name, date, and maker to personalize your beautiful creation!
Tips for Success and Quilting Joy
To ensure your Ribbon Pole Quilt project is not only successful but also a truly enjoyable experience, consider these additional tips:
- Take Your Time: Quilting is a journey, not a race. Rushing through steps often leads to mistakes. Enjoy each phase of the process.
- Accurate Cutting is Key: Invest in good quality cutting tools and use them meticulously. Even a slight inaccuracy in cutting can compound and affect the overall alignment of your quilt.
- Press, Don’t Iron: When quilting, we “press” seams, which means lifting and placing the iron down, rather than sliding it. This prevents stretching and distortion of your fabric. Consistent pressing throughout the project makes a huge difference.
- Good Quality Thread: Use a high-quality 100% cotton or polyester thread. It’s less likely to break, ensures stronger seams, and your sewing machine will thank you.
- Don’t Fear the Seam Ripper: Everyone makes mistakes! A seam ripper is a quilter’s essential tool. Don’t be afraid to unpick and redo a section for a better result. Precision pays off.
- WOF (Width of Fabric) Cuts: When cutting strips for your squares, utilize the “Width of Fabric” (WOF) to maximize efficiency and minimize waste.
- Chain Piecing: For efficiency, especially with repetitive blocks like HSTs, try chain piecing. Sew multiple units consecutively without lifting the presser foot or cutting threads between them.
- Personalize Your Quilt: While the pattern provides a great guide, feel free to experiment with different color schemes or fabric prints once you’re comfortable with the basic construction. Make it uniquely yours!
- Join a Community: Connect with other quilters online or in person. Sharing experiences, tips, and finished projects is incredibly motivating and inspiring.
Following these guidelines will not only help you create a beautiful Ribbon Pole Quilt but will also enhance your overall quilting skills and satisfaction. Happy quilting!
*All images in this tutorial are credited to Man Sewing via YouTube. For more inspiring quilting projects, detailed tutorials, and creative insights, we highly recommend visiting Rob Appell’s channel and subscribing for regular updates!