
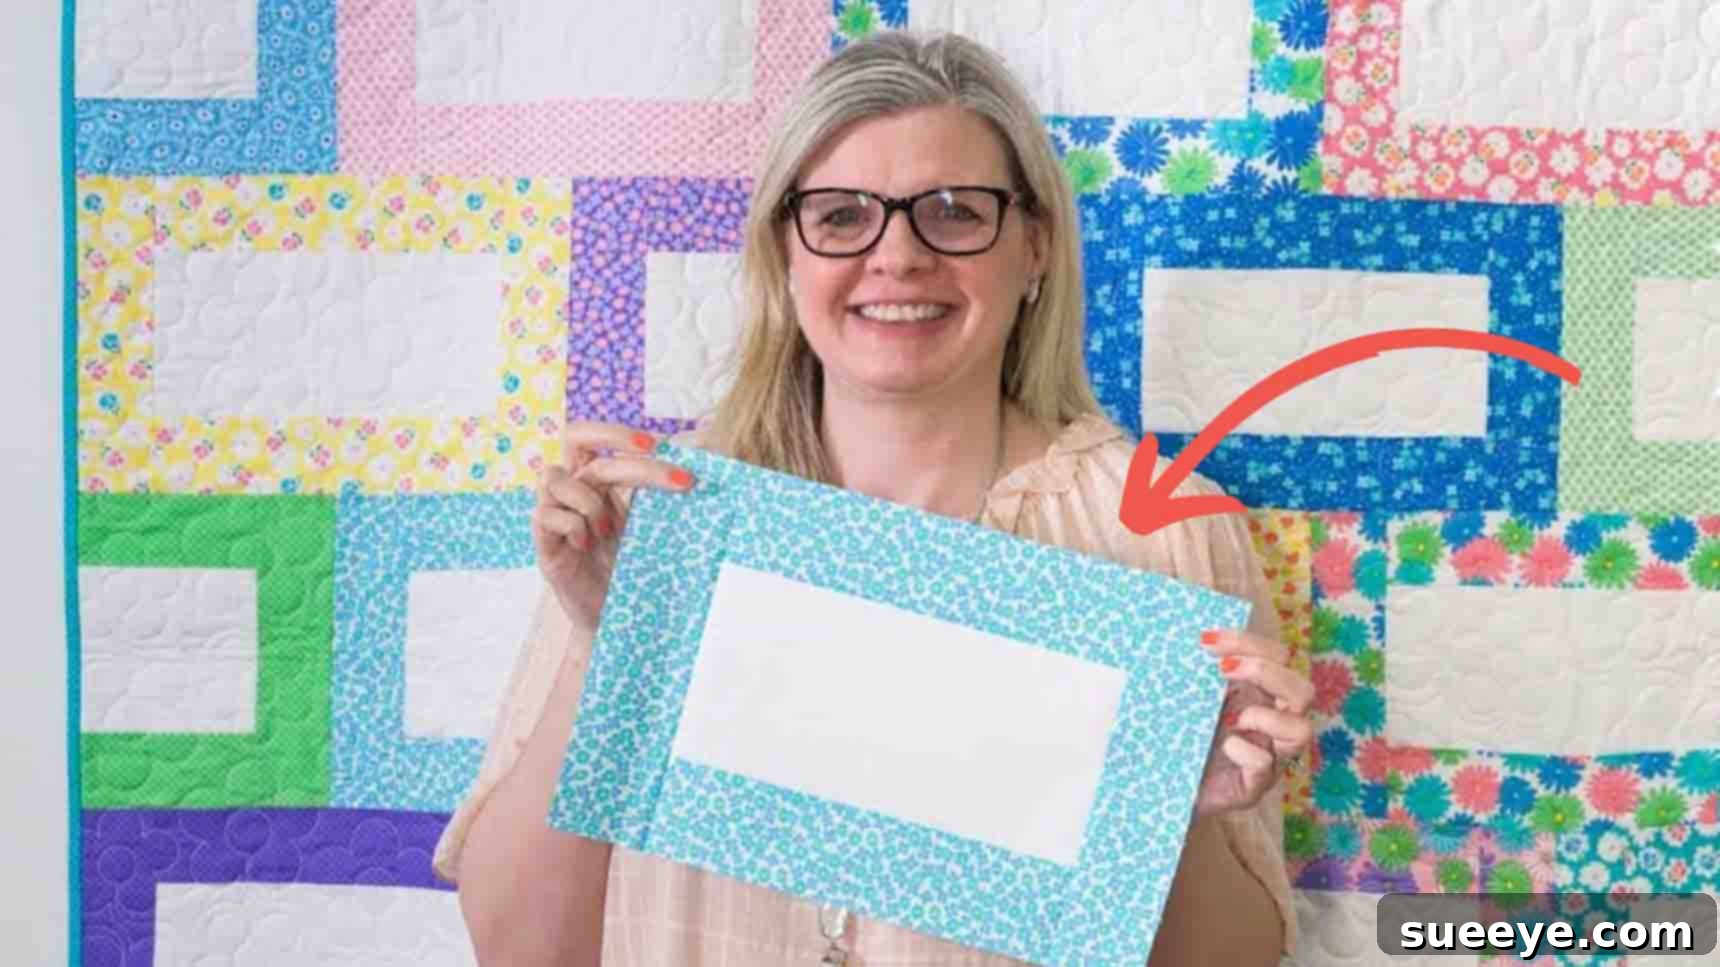
Jelly Belly Bars Quilt: The Perfect Beginner-Friendly Project (Free Pattern Included!)
Embark on a delightful quilting adventure with the incredibly charming Jelly Belly Bars Quilt! Whether you’re a seasoned quilter looking for a quick and satisfying project or a complete beginner eager to dive into the world of fabric and stitches, this quilt pattern is an absolute must-try. Renowned for its simplicity and stunning visual appeal, the Jelly Belly Bars Quilt offers an ideal entry point into quilting, allowing you to create a beautiful, finished piece without feeling overwhelmed. We’re excited to share insights from the fantastic tutorial by Fat Quarter Shop on YouTube, which makes the process even more accessible and enjoyable.
This project stands out for its clever use of pre-cut fabrics, specifically jelly rolls and jolly bars, which dramatically streamline the cutting process and get you to the fun part – sewing – much faster. Imagine creating a cozy lap quilt, a vibrant wall hanging, or a thoughtful gift in what feels like no time at all. The repetitive yet engaging block design ensures a quick learning curve, allowing you to build confidence with every seam. Get ready to discover why this quilt design becomes a fast favorite, promising a beautiful outcome that you’ll be proud to show off. Dive into the detailed guide below, and don’t forget to grab your free PDF pattern here to get started!
Why the Jelly Belly Bars Quilt is Perfect for You
The beauty of the Jelly Belly Bars Quilt lies in its exceptional beginner-friendliness combined with a striking finished look. Many aspiring quilters are daunted by complex patterns, intricate cutting, or long fabric lists. This pattern eliminates those barriers, making quilting accessible and enjoyable from the very first stitch.
The Magic of Pre-Cuts: Jelly Rolls and Jolly Bars
One of the primary reasons this quilt is so popular among beginners is its reliance on pre-cut fabrics. Instead of spending hours meticulously cutting individual strips from yardage, you’ll utilize:
- Jelly Rolls: These are bundles of 2½-inch wide fabric strips, typically 40 or 42 strips, each cut from the full width of the fabric (WOF), usually around 40-42 inches. They come coordinated in specific fabric lines, making fabric selection a breeze.
- Jolly Bars: These are bundles of 5-inch by 10-inch rectangles, often containing 42 pieces, also from coordinated fabric collections.
Using these pre-cuts saves a tremendous amount of time and ensures consistent strip widths, which is crucial for accurate piecing. This convenience means you can jump straight into sewing, focusing on technique rather than preliminary prep, which is invaluable for building momentum and confidence.
Essential Materials for Your Jelly Belly Bars Quilt
Before you begin your quilting journey, gathering the right materials is key. The Jelly Belly Bars Quilt is designed to make the most of convenient pre-cut fabrics, simplifying your fabric selection and preparation. Here’s a comprehensive list of what you’ll need, along with some helpful notes:
- One Print Jelly Roll: This will be your primary fabric source for the accent strips. Alternatively, you can use thirty-one 2½-inch x WOF (Width of Fabric) strips. Choosing a jelly roll offers a beautifully coordinated collection of prints, eliminating the guesswork of selecting individual fabrics.
- One Solid Jolly Bar: This will provide the central rectangles for your blocks. If you prefer to cut from yardage, you’ll need thirty-one 5-inch x 10-inch rectangles. A solid color provides a lovely contrast to the prints from your jelly roll, making the design pop.
- 5/8 Yard Binding Fabric: This fabric will frame your finished quilt, giving it a neat and professional edge. We recommend choosing a color that complements or contrasts nicely with your main quilt top fabrics.
- 3 5/8 Yards Backing Fabric: This fabric will form the backside of your quilt, providing warmth and stability. Consider a soft, cozy fabric that enhances the comfort of your finished project.
- Click here for the free Jelly Belly Bars Quilt pattern PDF, which includes detailed diagrams and instructions.
In addition to these fabrics, you’ll need basic quilting supplies such as a sewing machine, good quality thread (preferably cotton), a rotary cutter, a self-healing cutting mat, quilting rulers, an iron and ironing board, and pins or fabric clips.
Preparing Your Fabrics: Precise Cutting Instructions
Accurate cutting is the cornerstone of successful quilting. Even with pre-cut fabrics, a few precise cuts are necessary to prepare your pieces for assembly. Take your time with this step, as well-cut pieces will lead to perfectly aligned seams and a beautiful finished quilt.
Cutting Fabric A & B (From Jelly Roll Strips)
From each of your 2½-inch x WOF jelly roll strips, you will make the following cuts:
- 2 – 2½-inch x 10-inch rectangles (Fabric A): These 62 pieces in total (from 31 strips) will form the top and bottom sections of your Jelly Belly Bars block, bordering the central Jolly Bar piece.
- 2 – 2½-inch x 9-inch rectangles (Fabric B): These 62 pieces in total (from 31 strips) will be used to extend the sides of your blocks, adding to the distinctive “bar” look.
When cutting, use a rotary cutter and a clear quilting ruler for straight, precise lines. Stack a few jelly roll strips together to cut multiple pieces at once, but be careful not to stack too many, as accuracy can decrease with thickness. Remember to trim the selvage ends from your WOF strips before measuring and cutting.
Cutting Fabric C (From Jolly Bar Rectangles)
If you are using a Jolly Bar, your 5-inch x 10-inch rectangles (Fabric C) are already perfectly sized. If you’re cutting from yardage, you will need to cut 31 – 5-inch x 10-inch rectangles. These pieces will serve as the central element of each block, providing a solid anchor for the printed strips.
Preparing Your Binding Fabric
From your 5/8 yard of binding fabric, cut:
- 7 – 2½-inch x WOF strips (Fabric D): These strips will be sewn together end-to-end to create one long strip for your quilt binding. The 2½-inch width is a standard size that provides a sturdy and attractive finish.
Once all your pieces are cut, organize them by label (Fabric A, B, C, D). This will make the assembly process much smoother and prevent confusion.
Step-by-Step Quilt Assembly: Creating Your Jelly Belly Bars Masterpiece
With your fabrics meticulously cut and organized, it’s time to bring your Jelly Belly Bars Quilt to life! The assembly process is straightforward, focusing on building individual blocks and then joining them to form the quilt top. Pay close attention to seam allowances and pressing techniques for the best results.
Step 1: Crafting the Iconic Jelly Belly Bars Block
The heart of this quilt lies in its unique block design. You will make 31 identical Jelly Belly Bars blocks. Precision in this step will ensure your entire quilt top comes together beautifully.
- Assemble the Center Unit: Begin by taking one Fabric C rectangle (your 5-inch x 10-inch solid piece). Now, select two Fabric A rectangles (your 2½-inch x 10-inch print strips). Place one Fabric A rectangle on top of Fabric C, aligning the 10-inch edges with right sides together. Stitch along this edge with a consistent 1/4-inch seam allowance.
- Pressing for Perfection: After stitching, press the seam allowance towards your Fabric A rectangle. This “pressing towards the dark” or “pressing open” technique helps the seams lie flat and reduces bulk. Repeat this process for the second Fabric A rectangle, attaching it to the opposite 10-inch side of Fabric C. Again, press the seam allowance towards Fabric A. You should now have a strip set with Fabric C sandwiched between two Fabric A strips.
- Adding the Side Extensions: Next, take two Fabric B rectangles (your 2½-inch x 9-inch print strips). Align one Fabric B rectangle with the short side of your newly formed strip set, right sides together. Stitch with a 1/4-inch seam allowance. Repeat on the opposite short side with the second Fabric B rectangle.
- Final Pressing: Press these new seams outwards, towards your Fabric B rectangles. This completes one Jelly Belly Bars block. It should now have a distinct rectangular shape with the solid Fabric C in the center, flanked by print strips.
- Repeat: You will need to make 31 identical Jelly Belly Bars blocks following these steps. Consistency in your 1/4-inch seam allowance and pressing direction is paramount for blocks that fit together perfectly.
Step 2: Assembling Your Quilt Top for a Lap-Sized Design
Once all 31 Jelly Belly Bars blocks are complete, it’s time to arrange and piece them into your quilt top. The pattern provided by Fat Quarter Shop outlines a specific layout for a lap-sized quilt, which is an excellent starting point for beginners.
- Prepare for Sub-Cutting (Lap Size Specific): For the recommended lap size, you will need to sub-cut six of your Jelly Belly Bars blocks. The pattern will detail the exact dimensions for these trimmed blocks, which are used to create staggered rows and add visual interest to the overall design. Careful measurement here will ensure your rows align correctly.
- Arrange Your Rows: The lap-size quilt top will consist of seven rows.
- Four Rows: Each of these rows will be made up of four full Jelly Belly Bars blocks, stitched together side-by-side.
- Three Rows: Each of these rows will contain three full blocks and two of the previously sub-cut (trimmed) blocks. The trimmed blocks are strategically placed at the ends of these rows, creating the offset pattern.
- Piece the Rows Together: Once you have your rows laid out as desired (a design wall or even a clean floor can be helpful for this!), begin stitching the blocks together within each row. Use a consistent 1/4-inch seam allowance and press your seams. For joining blocks within a row, it’s often helpful to press seams in opposite directions for adjacent blocks. This allows you to “nest” the seams when joining rows, reducing bulk and improving accuracy.
- Join the Rows: Finally, sew your seven completed rows together, one by one, to form the complete quilt top. Again, use a 1/4-inch seam allowance. When joining rows, ensure that your block seams line up perfectly. Pins are your best friend here! Insert pins at each seam intersection to hold the fabrics in place before stitching. Press these final long seams open or to one side, whichever creates the flattest finish.
Congratulations! Your Jelly Belly Bars Quilt top is now complete. The vibrant prints and solid contrasts will create a stunning visual effect, showcasing your hard work and newfound quilting skills.
Beyond the Quilt Top: Basting, Quilting, and Binding
While the tutorial focuses on creating the quilt top, a finished quilt requires a few more crucial steps: basting, quilting, and binding. These steps transform your pieced top into a functional and durable textile.
- Basting: This is the process of temporarily securing the three layers of your quilt (the backing, batting, and quilt top) together. You can use safety pins, spray basting, or hand-stitching to ensure these layers don’t shift during quilting.
- Quilting: This is where you stitch through all three layers to create texture, design, and to hold the layers permanently together. You can choose simple straight lines, a meandering free-motion design, or follow the lines of your piecing (stitch-in-the-ditch).
- Binding: The final step involves attaching your prepared binding strips (Fabric D) around the edges of the quilt. This not only covers the raw edges but also provides a durable and attractive frame for your masterpiece.
Each of these steps offers opportunities for creativity and further skill development. There are numerous resources available for learning these techniques, and completing them will give you the immense satisfaction of a fully finished quilt.
Expert Tips for Aspiring Quilters
Quilting is a journey of learning and discovery. Here are a few tips to help you along the way, especially with projects like the Jelly Belly Bars Quilt:
Precision is Key
While this is a beginner-friendly quilt, developing good habits early will serve you well. Use an accurate 1/4-inch seam allowance (a specialized presser foot can help), and measure your cuts carefully. Small inaccuracies can compound over many blocks, affecting the final size and squareness of your quilt.
Pressing Matters
Pressing isn’t ironing. It’s lifting and setting the iron down, rather than sliding it, to avoid distorting your fabric. Pressing seams flat and in consistent directions (as instructed in Step 1) helps your blocks lie flat and fit together better, making subsequent steps much easier.
Embrace the Process
Don’t be afraid to make mistakes! Every quilter, no matter their experience level, has used a seam ripper. View it as an opportunity to refine your technique. The goal is to enjoy the creative process and the satisfaction of making something beautiful with your own hands.
Customize Your Quilt: Making It Uniquely Yours
The Jelly Belly Bars Quilt pattern is wonderfully versatile. While the lap size is excellent, don’t hesitate to experiment once you’ve mastered the basic design:
- Size Variations: Adjust the number of blocks and rows to create a crib quilt, a throw, or even a twin-sized quilt. Simply plan your layout on paper first.
- Color Palettes: Play with different jelly rolls and jolly bars. Use bright, playful prints for a child’s quilt, sophisticated muted tones for a modern aesthetic, or festive holiday fabrics for seasonal decor.
- Alternate Layouts: Once you’re comfortable with the basic block, explore rotating blocks or altering the sub-cutting to create new patterns and designs.
Your Quilting Journey Starts Here
The Jelly Belly Bars Quilt is more than just a project; it’s an invitation to experience the joy and fulfillment of quilting. Its straightforward approach, combined with the convenience of pre-cut fabrics, makes it an ideal choice for anyone ready to create something beautiful. So, gather your materials, watch the fantastic tutorial from Fat Quarter Shop, and get ready to stitch your way to a stunning, handmade quilt. Happy quilting!
Don’t forget to share your finished project with us and the quilting community!