
DIY Repurposed Tin Can Planters: Transform Your Garden with Eco-Friendly Charm
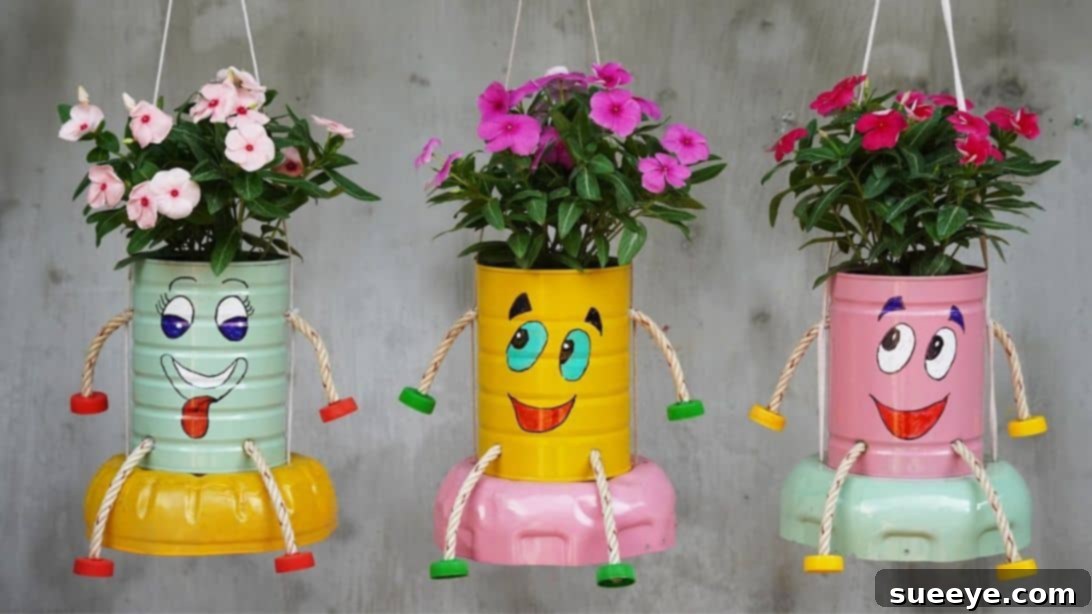
Who says beautiful garden decor has to break the bank? With a little creativity and some materials you likely already have around your home, you can craft truly adorable and unique planters. This inspiring project, courtesy of Balcony & Garden on YouTube, demonstrates how to transform everyday items into charming, character-filled planters that will bring joy and vibrancy to any space. It’s an incredibly satisfying way to embrace sustainability, personalize your environment, and add a touch of handmade magic to your balcony, patio, or indoor plant collection. Get ready to repurpose, create, and watch your garden flourish with these delightful DIY tin can planters!
Why Choose DIY Repurposed Planters?
Beyond the immediate satisfaction of creating something with your own hands, embarking on a DIY project like this offers a wealth of benefits. Firstly, it’s a powerful step towards sustainability. By repurposing old tin cans and plastic bottles, you’re diverting waste from landfills, giving these items a new life and reducing your environmental footprint. This upcycling process is not only eco-friendly but also incredibly rewarding, allowing you to contribute to a healthier planet while enhancing your home.
Economically, making your own planters is significantly more budget-friendly than purchasing new ones. You utilize materials that might otherwise be discarded, saving money while still achieving a stylish and functional result. This makes sustainable living accessible and enjoyable for everyone. Aesthetically, handmade planters possess a unique charm that mass-produced items often lack. Each planter you create can be customized to reflect your personal style, adding a distinctive and heartwarming touch to your decor that tells a story.
Moreover, engaging in DIY crafts can be a therapeutic and enjoyable hobby. It provides an opportunity for creative expression, stress reduction, and a profound sense of accomplishment. Imagine the compliments you’ll receive on your personalized, eco-conscious garden additions! These planters aren’t just containers; they’re conversation starters, reflections of your creativity, and a testament to the beauty of giving old items a fresh purpose. They encourage mindful consumption and inspire a deeper appreciation for handmade goods.
Essential Materials for Your Repurposed Planter Project
Gathering your supplies is the first exciting step in bringing your tin can planter to life. The beauty of this project lies in its simplicity and the accessibility of its materials. Most items can be found in your kitchen, recycling bin, or a local craft store. Here’s a detailed list of what you’ll need to create your adorable repurposed planters:
- Large Tin Can: This will form the main body of your planter. Good examples include coffee cans, large soup cans, formula cans, or even industrial-sized food cans. Ensure it’s thoroughly cleaned and free of any sharp edges.
- Large Plastic Bottle: The bottom section of this bottle will serve as a stable base for your tin can and provide additional structural support. Larger soda bottles (2-liter) or water jugs work perfectly.
- Spray Paint: Choose your favorite color to set the primary tone for your planter. Opt for paints suitable for both metal and plastic for the best adhesion and durability, ensuring a long-lasting finish.
- Assorted Marker Pens: Permanent markers in various colors are ideal for drawing charming facial features and other decorative details that will give your planter personality and character.
- Rope: This is essential for both assembly and adding a rustic, decorative touch. Natural fibers like jute, hemp, or cotton rope work well and complement the eco-friendly theme.
- Scissors or Cutter: For meticulously removing labels, trimming excess materials, and precisely cutting the plastic bottle. A utility knife can be useful for thicker plastics (use with caution).
- Bottle Caps: Four bottle caps will be cleverly repurposed as decorative ‘feet’ or structural elements for securing the rope and adding stability to the base.
- Nail and Hammer: Indispensable tools for creating crucial drainage holes in the tin can and punching holes in the bottle caps for threading the rope.
- Tongs: Useful for safely holding small items like bottle caps while drilling or to handle the can during painting without touching the wet surface, ensuring an even finish.
- Zip Ties: These provide strong and reliable connections for securing different parts of the rope structure, offering extra stability where needed.
- Hot Glue Gun and Glue Sticks: Your best friend for quick and strong adhesion, ensuring all components are securely fastened together for a durable planter.
Step-by-Step Guide: Crafting Your Adorable Tin Can Planter
Step 1: Preparation, Personalization, and Practicality
The journey to your personalized planter begins with meticulous preparation of your tin can. Start by carefully removing any paper labels and adhesive residue. Warm soapy water and a gentle scrub pad are often effective. For stubborn glue, a little rubbing alcohol or a specialized adhesive remover can work wonders. Ensure the can’s surface is perfectly clean, completely dry, and smooth for optimal paint adhesion, which is crucial for a lasting and attractive finish.
Once impeccably clean, it’s time to add a splash of color! Work in a well-ventilated area, preferably outdoors. Apply your chosen spray paint, holding the can approximately 6-8 inches away from the tin can and using sweeping, even motions to avoid drips and ensure uniform coverage. Allow the first coat to dry completely – this can take a few hours, or even overnight, depending on the paint type and environmental humidity. If desired, apply a second coat for a more vibrant, opaque finish, always allowing ample drying time between coats. Patience during this process ensures a professional-looking and durable result.
With the base color dry, unleash your artistic flair! Using permanent marker pens, draw expressive brows, eyes, and a mouth on the can, as captivatingly demonstrated in the tutorial video. This is where your planter truly comes to life and gains its unique personality! Experiment with different facial expressions – a sleepy look, a wide-eyed wonder, a cheerful smile, or even a cheeky wink – to give each planter a distinct character. Fill in these features with various marker colors, making them pop and adding depth and charm to your design.
Finally, and critically for the health of your future plant, use a nail and hammer to create several drainage holes at the bottom of the tin can. Proper drainage is absolutely vital to prevent waterlogging, which can quickly lead to root rot and plant demise. Aim for 3-5 holes, evenly spaced, to ensure efficient water runoff. Additionally, take four bottle caps and, using the nail and hammer, carefully punch a hole in the exact center of each cap. These clever additions will serve an important structural and decorative role later in the assembly process, acting as feet or connection points.
Step 2: Assembling the Planter Structure and Planting Your Greenery
With your beautifully personalized can and prepared components, it’s time for the assembly phase. Take your chosen rope and thread each end through the holes of two separate bottle caps. These will cleverly act as the ‘hands’ or decorative elements of your planter’s arms, significantly adding to its charming and playful character. Ensure the caps are securely on the rope.
Next, prepare your large plastic bottle. Using sturdy scissors or a utility cutter (exercise caution), carefully cut off the bottom section of the bottle. This piece will form a stable, often wider, base for your tin can planter, preventing it from tipping over and providing a cohesive look. Ensure the cut edge is as smooth and even as possible. Then, using a punch or a small drill bit, create several holes evenly spaced around the bottom edges of this plastic base. These holes are crucial for securely attaching the rope structure and integrating the two main components.
Now, carefully place your decorated tin can centrally on top of the cut plastic bottle base. Carefully insert the rope ends (the ones already threaded through the bottle caps, forming the ‘arms’) through the corresponding holes you punched in the plastic bottle’s side and bottom. This forms a continuous loop or a hanging mechanism, depending on how you wish to display your planter. The rope should pass through the plastic base and come up around the can, making the entire structure cohesive and secure.
Once the rope is correctly positioned and the structure feels balanced and aligned, use a hot glue gun to secure the rope firmly in place. Apply glue generously where the rope passes through the plastic base and, if necessary, around the perimeter of the tin can to ensure everything is stable and holds together without shifting. This step is vital for the longevity and structural integrity of your planter.
To finalize the structure, insert additional rope through the very bottom of the entire planter system (if you’re creating a suspended or multi-tiered look, or simply want to reinforce the base). This rope will connect the ‘arm’ ropes, often forming a strong loop for hanging or providing additional stability at the base. Use zip ties to securely fasten this bottom rope to the ‘rope arms’ you previously created with the bottle caps. Double-check all connections to ensure they are tight and secure, guaranteeing your planter can safely hold soil and plants.
With the structure robustly assembled, your planter is now ready to host its green inhabitant! Fill the planter with high-quality potting soil suitable for your chosen plant, leaving about an inch of space from the top. Gently transplant your chosen plant or flower into its new, adorable home. Water thoroughly after planting to help the soil settle and give your plant a good start in its repurposed sanctuary.
Tips for Success and Creative Variations
To ensure your repurposed tin can planters thrive and bring you lasting enjoyment, consider these valuable tips. Additionally, don’t hesitate to unleash your creativity with different variations to make each planter truly unique:
- Choosing the Right Plants: Opt for plants that don’t require deep root systems and can adapt well to the size of a tin can. Succulents, small herbs (like basil, mint, or chives), small flowering annuals (such as petunias or impatiens), or even small trailing plants like string of pearls are excellent choices. Always ensure the plant’s mature size is suitable for the container.
- Emphasize Drainage: We’ve stressed this already, but it’s worth repeating: excellent drainage is paramount for plant health. If you’re concerned about soil washing out through the holes, place a small piece of mesh screen, a coffee filter, or a few small pebbles over the drainage holes before adding soil.
- Weatherproofing for Outdoors: If your delightful planters will live outdoors, especially in areas exposed to rain, humidity, or direct sun, consider applying a clear sealant or outdoor varnish over your spray paint and marker drawings. This will protect the finish from fading, peeling, and moisture damage, significantly extending the life and vibrancy of your adorable creations.
- Creative Customization Beyond Faces: Don’t limit yourself to just charming faces! Experiment with different patterns, geometric designs, polka dots, stripes, or ombre effects using various spray paint colors. You can also use stencils for intricate details or glue on buttons, beads, small fabric scraps, or even googly eyes for added texture and whimsical charm.
- Smart Placement Ideas: These charming planters are incredibly versatile and can brighten up almost any spot. Hang them on a balcony railing, line them up on a kitchen windowsill, adorn a garden shed, or use them as a cheerful centerpiece on an outdoor table. They also make fantastic, heartfelt, and personalized gifts for friends and family.
- Multi-Can Designs and Cascading Effects: Create a cluster of planters with different facial expressions or color schemes for an even more impactful and dynamic display. For an advanced project, you can even try to connect multiple cans with varying rope lengths for a beautiful cascading planter effect, perfect for vertical gardening.
- Involve the Family: This is a wonderful, inclusive project for all ages. Kids can help with cleaning cans, choosing colors, or even drawing faces (with adult supervision for sharp tools and spray paint). It’s a fun, hands-on way to teach about recycling, sustainability, and the joy of creative expression.
Embracing Sustainability in Your Garden
This DIY tin can planter project is more than just a craft; it’s a testament to the power of upcycling and a meaningful step towards sustainable living. In a world where consumption is high and resources are finite, finding creative ways to reuse materials not only benefits the environment by reducing waste but also fosters a deeper connection to the items we own and the spaces we inhabit. By turning discarded tins and plastic bottles into functional and beautiful objects, you’re actively participating in a circular economy, reducing your ecological footprint, and inspiring others to think twice before throwing things away.
Your garden, no matter how small, becomes a tangible symbol of conscious living and environmental responsibility. These repurposed planters are a daily reminder that beauty can be found in the unexpected and that a little ingenuity can go a long way in making a positive impact on our planet. Let your cheerful, repurposed tin can planters be a bright beacon of eco-friendly design, sustainable practices, and personal creativity in your home or garden, showing that green living can be both practical and aesthetically pleasing.
Conclusion: Cultivate Creativity and Green Living
Transforming simple household discards into captivating garden accents is an incredibly rewarding endeavor. This DIY repurposed tin can planter project offers a perfect blend of creativity, sustainability, and practicality. By following these easy-to-understand steps, inspired by the innovative minds at Balcony & Garden, you can craft unique planters that not only enhance your living space but also contribute to a greener planet.
So, gather your materials, unleash your inner artist, and get ready to enjoy the vibrant, personalized touch these charming planters will bring to your home or garden. It’s a project that delivers on multiple fronts: it’s budget-friendly, environmentally conscious, and deeply satisfying. Happy crafting and happy planting!
*These amazing images are all credited to Balcony & Garden via YouTube. Check their other content and follow for more inspiring DIY garden ideas!