
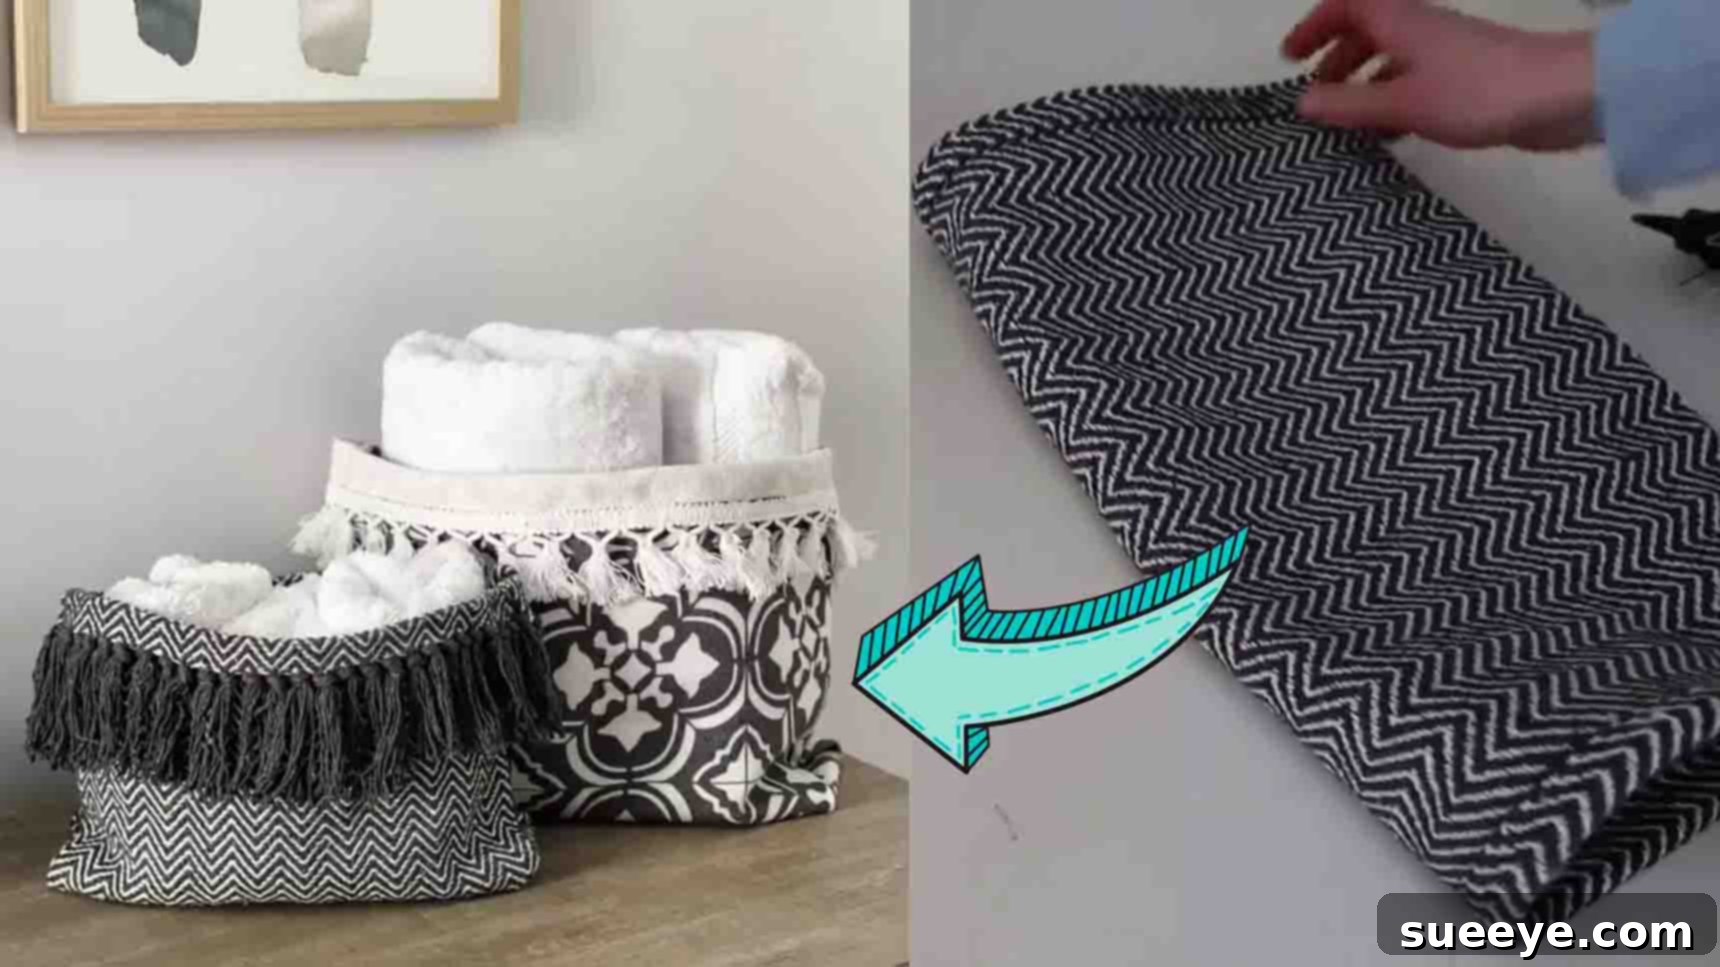
Transform Your Space on a Budget: Easy DIY Oversized Storage Totes from Dollar Tree
Are you constantly battling clutter, especially in high-traffic areas like your bathroom? Do you find yourself wishing for more organized storage solutions but dreading the thought of spending a fortune on stylish bins and baskets? You’re not alone! The quest for both functional and aesthetically pleasing storage can often lead to frustration, particularly when trying to stick to a tight budget. Thankfully, the world of DIY offers ingenious alternatives that prove you don’t need to break the bank to create beautiful, practical home organizers.
Today, we’re diving into an incredibly simple yet highly effective DIY project that will revolutionize your home organization. We’re talking about crafting oversized storage totes using just a couple of affordable items from your local Dollar Tree. Inspired by the brilliant creators at Do It On A Dime, this project transforms ordinary mini rugs into charming and spacious bins perfect for everything from toiletries to craft supplies.
Imagine having elegant, soft-textured bins that not only hide away your essentials but also add a touch of warmth and style to your decor. These DIY totes are not just functional; they’re genuinely cute, offering a versatile design that can complement various interior styles, from bohemian chic to minimalist modern. Best of all, they come with an unbeatable price tag, making them the ultimate budget-friendly storage hack. Forget about generic plastic containers; these handcrafted beauties bring character and order to any room. Let’s gather our minimal materials and embark on this rewarding journey to a more organized and stylish home!
Why Choose DIY Oversized Totes for Your Home Organization?
In a world saturated with mass-produced storage solutions, opting for DIY offers a unique blend of benefits that often go overlooked. Beyond the obvious cost savings, creating your own oversized totes provides an unparalleled sense of accomplishment and allows for a level of customization that store-bought items simply cannot match. When you craft these storage bins yourself, you’re not just making a container; you’re infusing a piece of your personality and effort into your living space.
Firstly, the financial advantage is undeniable. With materials sourced from Dollar Tree, the cost per tote is astonishingly low, making it possible to create multiple storage units for a fraction of what a single designer bin might cost. This allows you to tackle organization challenges across several rooms without straining your budget. Secondly, these totes are incredibly versatile. While initially envisioned for bathroom toiletries, their soft structure and appealing design make them suitable for a myriad of uses – from corralling toys in a child’s bedroom to neatly storing scarves and accessories in a closet, or even housing extra throw blankets in the living room. Their oversized nature means they can hold a substantial amount, helping to declutter quickly and efficiently.
Furthermore, the creative process itself is therapeutic and enjoyable. It’s a chance to step away from screens and engage in a hands-on activity that yields tangible, beautiful results. You gain control over the aesthetic, selecting rugs that align with your existing decor or using this as an opportunity to introduce new textures and colors. This project is also beginner-friendly, requiring no advanced crafting skills or specialized tools, making it accessible to anyone looking to enhance their home’s organization with a personal touch. Embrace the satisfaction of transforming simple, inexpensive materials into functional works of art that elevate your home’s appeal and tidiness.
The Magic of Dollar Tree: Your DIY Haven
Dollar Tree is often a hidden gem for savvy DIY enthusiasts, and this project truly showcases its potential. Where else can you find stylish materials for home decor and organization for just a dollar a piece? The beauty of sourcing from Dollar Tree isn’t just about the incredible affordability; it’s about the accessibility and the thrill of discovering unexpected treasures that can be repurposed into something extraordinary. Their ever-changing inventory means there’s always something new to inspire your next craft project.
For this particular DIY, the mini rugs are the star. They come in various patterns, textures, and even with charming tassels, offering a diverse palette to match any interior design preference. These rugs are typically designed for small entryways or bath mats, but their sturdy yet pliable fabric makes them ideal for transforming into structured storage. The hot glue, a DIY staple, is also readily available, completing your material list in one convenient stop. Shopping at Dollar Tree for your crafting needs turns an ordinary errand into a treasure hunt, proving that creativity doesn’t have to come with a hefty price tag.
Materials for Your DIY Oversized Totes:
Gathering your materials for this project is delightfully simple. You only need two key items, both easily found at Dollar Tree, making this one of the most budget-friendly and accessible DIYs you’ll encounter.
- Mini Rugs (with tassels): These are the foundation of your totes. Look for ones that are soft enough to fold but sturdy enough to hold their shape. The tassels add an adorable decorative touch, but plain ones work just as well if you prefer a simpler look. Consider the size of the rug, as this will determine the final size of your tote.
- Hot Glue Gun and Glue Sticks: Your essential adhesive for bonding the rug pieces together. Ensure your hot glue gun is in good working order and you have plenty of glue sticks on hand. Hot glue provides a strong, quick-drying bond, perfect for fabric projects like this.
That’s it! With these two simple items, you’re ready to create functional and stylish storage solutions that look far more expensive than they are.
Step-by-Step Directions to Create Your Oversized Totes:
Creating these oversized totes is surprisingly straightforward, even for beginner crafters. Follow these detailed steps to transform your mini rugs into practical and beautiful storage bins.
Step 1: Preparing the Base and Sides of Your Tote
Begin by laying your chosen mini rug flat on a clean, protected surface, ensuring the right side (the patterned or textured side you want facing out) is facing upwards. If your rug has tassels, now is the time to decide how you want them to feature. For a neat finish and to integrate the tassels into the design, take one short edge of the rug and fold it over itself by about an inch or two, just enough so the tassels lay neatly over the main body of the rug. This creates a finished top edge for your tote.
Once you’ve positioned the tassel edge, apply a line of hot glue along the very outer edge of the rug on this folded section. Press down firmly to secure the fold, allowing the glue to cool and set. This will be one of the finished top edges of your tote. Next, you’ll form the main body. Fold the rug over itself lengthwise, bringing the bottom short edge towards the newly finished top edge. You’ll want to fold it so that about two-thirds of the rug is now stacked, leaving approximately one-third of the rug unfolded at the top. This unfolded portion will become the opening of your tote.
With the rug folded, align the raw side edges precisely. Apply a generous bead of hot glue along both long outer edges of the folded rug, starting from the folded bottom and going up approximately two-thirds of the way. This creates the primary side seams of your tote. Press the edges together firmly and evenly, ensuring a strong bond. It’s crucial to leave the top one-third of these side seams unglued – this is where the opening of your tote will be. Allow the glue to cool completely before proceeding to ensure the structure is stable.
Step 2: Creating the Flat Bottom and Finishing Touches
Now that you have the basic pouch shape, it’s time to give your tote a proper, flat bottom so it can stand upright and hold items securely. Take the unglued top section of the side seams (the portion you left open in Step 1). Carefully open up one of these unglued “flaps” from the side. You’ll notice a triangular shape forming as you pull the fabric apart at the corner.
To create a crisp, flat bottom, you’ll need to “box out” the corners. For each corner of the tote’s bottom (there will be two on each side of the bag, making four points in total if you consider it unfolded), gently flatten the corner, aligning the side seam you just made with the fold at the bottom of the rug. This will create a triangular point. Measure about 1.5 to 2 inches from the tip of this triangle inward, and draw a straight line across. This line will determine the depth of your tote’s bottom.
Apply a strong line of hot glue along this drawn line on each corner, pressing the fabric together firmly to create a new seam. Repeat this process for all four corners (or two corners on each side if you are working with the bag still folded). This technique creates gussets, giving your tote a wider, flat base and distinct sides. Ensure all glued seams are robust and perfectly aligned for a professional finish. After the glue has thoroughly cooled and set on all new seams, carefully turn the entire bag right side out. This might require a bit of gentle manipulation, especially for the corners, but take your time to push them out neatly.
Once flipped, adjust the seams and corners from the inside to ensure everything is smooth and the tote has a defined, stable structure. Your Dollar Tree mini rug has now been transformed into an adorable and functional oversized storage tote!
Tips for Success with Your DIY Totes
To ensure your Dollar Tree oversized totes turn out perfectly and serve you well, consider these helpful tips:
- Practice Makes Perfect: If you’re new to hot gluing fabric, it might be a good idea to test a small seam on a scrap piece of fabric first to get a feel for how quickly the glue sets and how much to apply.
- Even Pressure: When pressing glued seams together, apply even and firm pressure for several seconds to ensure a strong, lasting bond.
- Safety First: Hot glue guns can get very hot. Always exercise caution to avoid burns, and keep glue sticks organized to prevent accidental drips.
- Clean Workspace: Work on a protected, flat surface. Hot glue can stick to surfaces, so a silicone mat or old newspaper can be very helpful.
- Strategic Rug Choice: While most Dollar Tree mini rugs will work, some might be thicker or more difficult to fold smoothly. Opt for rugs that have some flexibility.
- Patience is Key: Allow the hot glue to cool and fully set before putting stress on the seams or turning the bag right side out. Rushing this step can compromise the integrity of your tote.
Unleash Your Creativity: Customization Ideas
The beauty of DIY projects lies in the ability to personalize them. While these totes are charming on their own, here are a few ideas to make them uniquely yours:
- Fabric Paint or Stencils: Add patterns, monograms, or designs using fabric paint and stencils. This is a great way to match them perfectly to a room’s theme.
- Embellishments: Glue on decorative trim, pom-poms, buttons, or even iron-on patches to enhance their visual appeal.
- Handles: For easier carrying, you could sew or securely glue fabric straps or even rope handles to the top edges of the tote. Ensure these are reinforced if you plan to carry heavier items.
- Lining: For a more finished look and added durability, you could hot glue a simple fabric lining inside the tote. This also makes it easier to clean if you’re storing items that might leak or spill.
- Mixing Textures: If you find different types of mini rugs, consider combining them. For example, use one rug for the main body and another contrasting rug for a decorative band around the top.
Beyond the Bathroom: Versatile Uses for Your DIY Totes
While originally conceived for bathroom toiletries, these oversized totes are incredibly versatile and can be utilized in almost any room of your home:
- Bedroom: Perfect for storing extra throw blankets, pajamas, socks, scarves, or small accessories in closets or on dressers.
- Kids’ Rooms: An excellent solution for toy organization, keeping small blocks, dolls, or art supplies neatly contained. Their soft nature makes them safe for children’s spaces.
- Living Room: Use them to hold remote controls, magazines, small throw pillows, or even as decorative planters (with a waterproof liner, of course!).
- Craft Room/Office: Ideal for organizing yarn, fabric scraps, notions, stationery, or other craft supplies, keeping your creative space tidy and inspiring.
- Entryway: A stylish spot to drop keys, mail, or dog leashes as you come and go, helping to prevent entryway clutter.
Maintenance and Care for Your Handmade Totes
Since these totes are made with hot glue and fabric, gentle care is recommended to maintain their shape and integrity. Spot clean any spills or dirt with a damp cloth and mild soap. Avoid submerging them in water or putting them in a washing machine, as this could weaken the glue bonds. Allow them to air dry completely if they do get wet. With proper care, your DIY oversized totes will continue to provide stylish organization for a long time.
Dollar Tree DIY Oversized Totes for Storage Tutorial
In conclusion, this Dollar Tree DIY project is a testament to how simple materials and a little creativity can yield impressive results. Not only will you save money, but you’ll also gain beautifully crafted storage solutions that enhance your home’s aesthetic and functionality. Say goodbye to clutter and hello to an organized, stylish space, all thanks to a few mini rugs and a hot glue gun. So, what are you waiting for? Head to your nearest Dollar Tree, grab your supplies, and start creating these charming oversized totes today!
We hope this detailed guide empowers you to tackle this project with confidence. Happy crafting!