
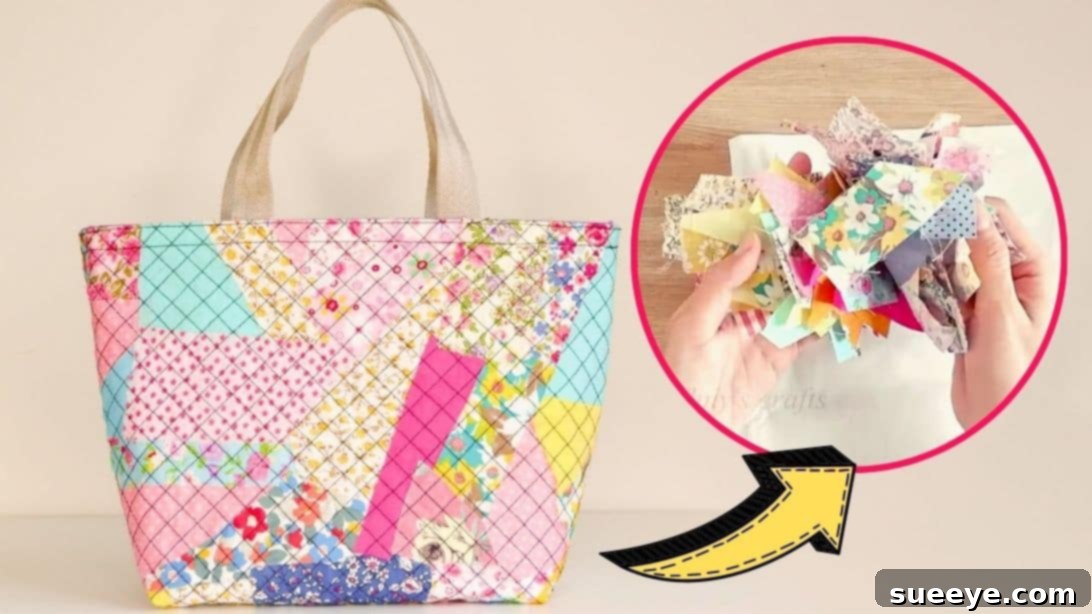
Transform Fabric Scraps into a Chic DIY Bag: A Complete Beginner’s Sewing Guide
Are you looking for an exciting new sewing project that’s both eco-friendly and stylish? Discover how to create a beautiful, functional bag using nothing but leftover fabric scraps! This beginner-friendly DIY bag tutorial, inspired by the talented Thuy craft on YouTube, is perfect for anyone wanting to put their sewing skills into practice, even if you’re just starting out. Imagine transforming those small pieces of fabric you’ve been saving into a unique accessory. Not only is this project incredibly rewarding, but it also helps reduce textile waste by giving new life to forgotten materials. Get ready to embark on a creative journey this weekend and unveil a stunning, personalized bag that will turn heads!
Why Choose This Fabric Scraps Bag Project?
Beyond its undeniable charm, crafting this DIY bag offers numerous benefits. Firstly, it’s an incredibly sustainable choice, promoting upcycling and minimizing waste. Instead of discarding small fabric remnants, you can repurpose them into something practical and fashionable. Secondly, it’s a fantastic entry point for aspiring sewers. The techniques involved are straightforward, providing a solid foundation for more complex projects down the line. You’ll gain confidence in basic sewing machine operation, pressing, and assembly. Thirdly, the creative possibilities are endless! Each bag becomes a unique reflection of your personal style, depending on the fabric scraps you choose. Mix and match patterns, textures, and colors to design a truly one-of-a-kind accessory. Finally, it’s a budget-friendly craft. By utilizing materials you already have, you eliminate the need to purchase new fabric, making this an economical and enjoyable hobby.
Essential Materials for Your Upcycled Bag
Gathering your materials is the first step towards bringing your beautiful bag to life. Most of these items are common sewing supplies, making this an accessible project for many. Here’s what you’ll need:
- Interfacing: One piece measuring approximately 11.8 by 19.7 inches (30 x 50 cm). This will provide structure and stability to your bag. Choose a fusible type for easy application.
- Lining Fabric: One piece, also 11.8 by 19.7 inches (30 x 50 cm). This will create a neat interior for your bag.
- Assorted Fabric Scraps: A collection of various fabric pieces in different colors, patterns, and textures. This is where your creativity truly shines!
- Sharp Scissors: Essential for precise fabric cutting.
- Fabric Marking Pen or Pencil: For drawing lines and markings on your fabric.
- Ruler: To ensure accurate measurements and straight lines.
- Needle and Thread: For any hand-sewing adjustments or basting, if preferred.
- Iron and Ironing Board: Crucial for pressing seams and fusing interfacing, ensuring a professional finish.
- Sewing Machine: Your primary tool for stitching the bag together efficiently.
- Pins and Fabric Clips: To hold fabric layers in place securely during sewing.
Step-by-Step Guide to Sewing Your Fabric Scraps Bag
Step 1: Preparing Your Fabric Base and Quilting
Begin by laying your interfacing flat with the glue-coated side facing up. This is the foundation for your fabric scrap collage. Carefully arrange your chosen fabric scraps on top of the interfacing, ensuring that every bit of the interfacing is covered and no white spaces are visible. This mosaic-like arrangement is your opportunity to express your unique style. Once satisfied with your layout, use a hot iron to press and fuse the fabric scraps securely to the interfacing. Take your time with this step, applying even heat and pressure to ensure a strong bond. Flip the entire piece over and give the back a thorough press as well; this helps to solidify the bond and create a smooth surface. After the fusing is complete, trim any excess fabric hanging over the edges of the interfacing, resulting in a clean, rectangular piece.
Now, flip your newly fused fabric piece so that the “right side” (the side with your fabric scraps) is facing up. It’s time to add some decorative quilting! Using your fabric marking pen or pencil and a ruler, draw diagonal lines across the fabric. Start from the lower-left corner and extend them towards the upper-right corner. Aim for lines that are approximately 0.4 inches (1 cm) apart. Precision here will lead to a beautiful, uniform quilted effect. Next, draw a second set of diagonal lines in the opposite direction, creating a small criss-cross or grid pattern. These intersecting lines will form your quilting guidelines. Using your sewing machine, carefully sew precisely along all these drawn lines. This quilting not only adds a lovely textural detail but also further secures your fabric scraps to the interfacing and provides extra durability to your bag.
With your main fabric piece quilted, prepare the top edges. Lay the quilted fabric right side down. Take one of the shorter edges and fold it over by 0.8 inches (2 cm) towards the wrong side. Press this fold neatly with your iron to create a crisp crease. Repeat this exact folding and pressing process for one of the short edges of your separate lining fabric piece. These folded edges will form the top opening of your bag, providing a clean, finished look.
Next, fold both the quilted fabric and the lining fabric pieces in half, ensuring their right sides are facing inward. For the quilted piece, fold it so the quilted exterior is inside. For the lining, fold it so the “good” side of the lining fabric is inside. Carefully align their raw side edges, matching them perfectly. Use pins or fabric clips to secure these side edges together, ensuring everything stays in place for sewing. Now, focus on the bottom corners. To create a boxed bottom for your bag – which gives it shape and capacity – we’ll mark and cut. With the fabric still folded and clipped, measure 1.6 inches (4 cm) tall and 2 inches (5 cm) wide from each bottom corner. Draw a square or rectangle in these corners that you will later cut out. Finally, draw a 0.4-inch (1 cm) seam allowance along the remaining raw sides (the long side edges and the marked bottom edges) of both the quilted and lining pieces. This ensures consistent stitching.
Step 2: Assembling the Bag Body and Adding Handles
With your pieces prepared and marked, it’s time to sew! Stitch along the drawn 0.4-inch (1 cm) seam allowance on the sides and the marked bottom edges of both the quilted exterior piece and the lining piece. Remove your pins or clips as you sew. Once stitched, carefully cut out the boxed corners you marked earlier. This will create the crucial flat bottom for your bag.
Now, let’s form the boxed bottom. Gently spread open the bottom of each fabric piece (exterior and lining separately). Pull the raw edges of the cut-out box sideways until the seams you just sewed align perfectly. This transforms the flat cut into a three-dimensional corner. Pin these aligned seams in place, then sew across them with a ¼-inch (approx. 0.6 cm) seam allowance. Repeat this precise process for both the exterior bag and the lining bag. Once both are sewn, you will have two distinct bag-like shapes – one for the exterior and one for the lining, each with a flat bottom.
Turn the exterior bag right side out, gently poking out the corners to ensure they are crisp and well-defined. Leave the lining bag wrong side out. Now, insert the exterior bag into the lining bag, making sure their right sides are facing each other. Align the top openings, carefully matching the side seams. The goal is for them to fit together neatly. Pull the opening of the bags sideways to ensure the seams match perfectly and the top edges lie flat. Use clips to secure the top raw edges of both the exterior and lining together. From each side seam, measure inward 1.6 inches (4 cm) and mark these points. These marks will indicate where your bag handles will be inserted.
For the bag handles, cut two pieces of fabric, each measuring approximately 0.8 by 11.8 inches (2 x 30 cm). These can be made from a contrasting fabric or more of your scraps for a cohesive look. Mark a line about 0.8 inches (2 cm) from the edge on each handle piece; this will be your sewing guide. Open the bag at the top, ensuring the right side of the exterior is facing out, and the lining is tucked neatly inside. Carefully insert each end of your prepared handles between the top raw edges of the lining and the main exterior fabric, aligning the handle markings with the 1.6-inch marks you made on the bag opening. Pin them securely in place, ensuring the handles are not twisted.
Finally, to secure everything and give your bag a polished finish, topstitch all around the entire opening of the bag. This stitching will not only enclose the raw edges but also firmly sew the handles in place. Make sure to backstitch at the beginning and end of your stitching for added durability. Take your time, maintain a consistent seam allowance, and admire your handiwork. Your upcycled fabric scrap bag is now complete!
Tips for Sewing Success
Even for a beginner-friendly project like this, a few extra tips can make your sewing experience even smoother and your final product more professional. Always press your seams as you go; this is a golden rule in sewing that makes a huge difference in the finished appearance of your garment or accessory. Use a walking foot on your sewing machine if you find your fabric layers are shifting, especially when quilting over the interfacing and multiple fabric scraps. Don’t rush; take your time with cutting, marking, and sewing. Precision in these early stages prevents frustration later on. When dealing with fabric scraps, consider their weight and type – mixing very thick with very thin fabrics can be challenging. For your first project, stick to similar fabric types like cottons or lightweight linens. Finally, don’t be afraid to experiment with different scrap combinations; that’s where the true joy of this project lies!
Caring for Your Handmade Fabric Bag
To ensure your beautiful, upcycled fabric scrap bag lasts for years to come, proper care is essential. Generally, a gentle hand wash with mild detergent in cool water is recommended. Avoid harsh scrubbing that could damage the fabric collage or quilting stitches. If your bag is made entirely of sturdy cottons, a delicate machine wash cycle might be an option, but always air dry it flat to maintain its shape. Tumble drying could distort the interfacing or cause shrinkage. If necessary, iron on a low setting, perhaps with a pressing cloth, to smooth out any wrinkles. Remember, each bag is unique, and its care may depend on the specific types of fabric scraps you’ve incorporated.
Unleash Your Creativity: Customizing Your Scrap Fabric Bag
While this tutorial provides a fantastic foundation, don’t hesitate to personalize your bag even further! Consider adding a small magnetic snap or a zipper to the top opening for extra security. You could also sew on decorative buttons, beads, or even small embroidered patches to enhance its unique charm. Experiment with different handle styles – perhaps longer straps to wear over your shoulder, or a contrasting fabric for a bolder look. The beauty of working with fabric scraps is the endless potential for customization, making each bag truly one-of-a-kind. Let your imagination guide you and create an accessory that perfectly reflects your style and creativity.
Conclusion: Your Unique, Handmade Masterpiece Awaits!
Crafting this DIY bag from fabric scraps is more than just a sewing project; it’s an act of creativity, sustainability, and personal expression. From carefully arranging your fabric mosaic to the final topstitch, each step brings you closer to a beautiful, functional accessory that’s truly yours. Whether you’re a seasoned seamstress or just beginning your sewing journey, this tutorial offers a rewarding experience and a stunning end product. We extend our sincere gratitude to Thuy craft via YouTube for sharing such an inspiring and accessible tutorial. Now, gather your scraps, fire up your machine, and enjoy the process of creating your very own eco-chic fabric bag!
*All images for this tutorial are credited to Thuy craft via YouTube. Be sure to visit her channel and subscribe for more amazing DIY inspiration and sewing projects!