
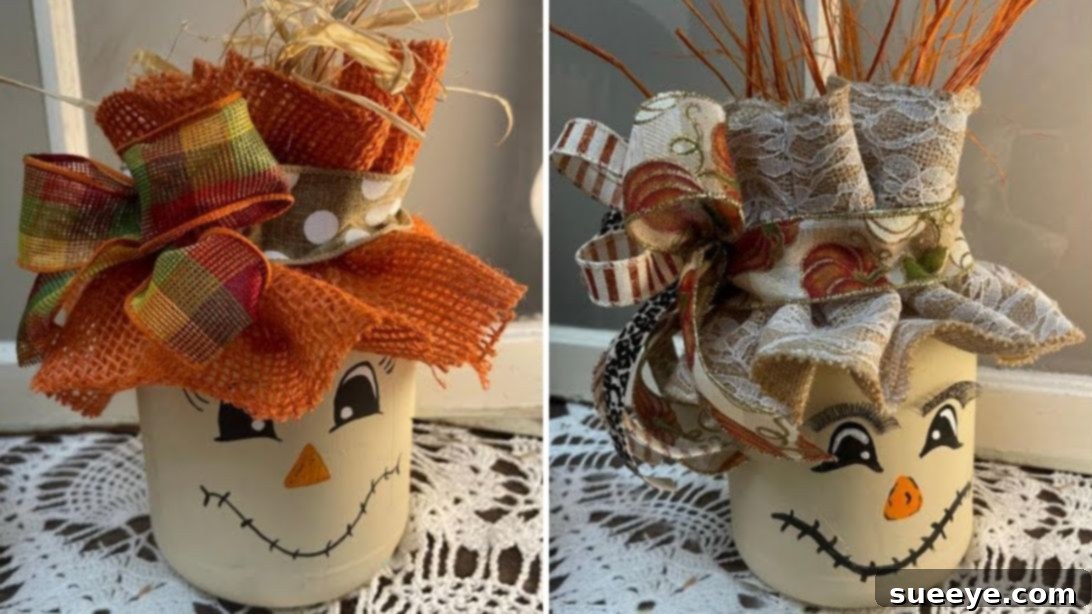
Craft Your Own Charming Repurposed Mason Jar Scarecrow for Fall
As autumn leaves begin to paint the landscape with their vibrant hues, the cozy season of fall beckons us to infuse our homes with warmth and charm. Scarecrows, with their friendly smiles and rustic appeal, stand as quintessential symbols of this beautiful season. While grand outdoor scarecrow displays are delightful, sometimes a smaller, more intimate touch is desired for indoor spaces. This is where the magic of repurposing truly shines!
Instead of embarking on a large-scale project, why not try crafting a delightful mini scarecrow using an everyday item you likely already have? This engaging and incredibly simple DIY project, inspired by the creative minds at Rachel’s Unique Crafts on YouTube, transforms ordinary large pickle or mason jars into an adorable piece of fall decor. It’s not just quick and easy, requiring only a handful of common materials, but it’s also a fantastic way to give new life to old containers. Beyond adorning your own home, these charming jar scarecrows make for thoughtful, handmade gifts that friends and family will cherish.
Dive into the world of sustainable crafting and discover how effortlessly you can create a unique, personalized autumn decoration. This guide will walk you through each step, ensuring your scarecrow not only looks fantastic but also carries the heartwarming touch of a handmade creation.
Gather Your Supplies: Crafting Your Scarecrow Companion
One of the beauties of this craft is its simplicity and reliance on accessible materials. Before you begin, gather the following items. Many of these can be found around your home or at any local craft store, making this a truly budget-friendly fall decor project.
- Large Pickle or Mason Jar: The star of our project! An empty, clean jar provides the perfect canvas. Opt for a size that will make a noticeable but not overwhelming decorative piece.
- Waverly Chalk Paint (or similar): Chalk paint adheres wonderfully to glass and offers a beautiful matte finish, ideal for our scarecrow’s “skin.” A neutral base color like white, cream, or light beige works best.
- Paintbrush: A good quality brush will ensure smooth, even coverage for your chalk paint and precise details for the face.
- Black and Orange Acrylic Paint: Essential for bringing your scarecrow’s face to life. Black for the eyes and mouth, and a vibrant orange for the nose.
- False Eyelashes: These add a whimsical, charming touch to your scarecrow’s expression, giving it an unexpectedly cute personality.
- Burlap: A rustic, earthy fabric that’s perfect for creating the scarecrow’s iconic hat. You won’t need a large piece, so scraps are often sufficient.
- Raffia: This natural fiber will simulate the scarecrow’s straw “hair,” adding texture and an authentic touch.
- Hot Glue Gun and Glue Sticks: Your primary tool for assembling and securing all the decorative elements quickly and effectively.
- Scissors: For cutting burlap, raffia, and ribbons with ease.
- Thick and Thin Ribbon: These will be used to decorate the hat. Choose fall-inspired colors and textures to complement your scarecrow, perhaps plaids, stripes, or solid autumn tones.
Having all your materials organized before you start will make the crafting process much smoother and more enjoyable. Let’s get ready to transform that humble jar!
Step-by-Step Guide: Bringing Your Scarecrow to Life
Creating this repurposed mason jar scarecrow is a delightful process suitable for crafters of all skill levels. Follow these detailed steps to achieve a charming result.
Step 1: Preparing the Jar and Crafting the Face
The foundation of your scarecrow begins with a clean, well-prepared jar and a carefully painted face.
First, thoroughly clean your large pickle or mason jar. Remove any existing labels completely. If labels are stubborn, try soaking the jar in warm soapy water or using a sticky residue remover for a pristine surface. Ensure the jar is completely dry before proceeding, as any moisture can prevent paint from adhering properly.
Once your jar is spotless and dry, it’s time to apply the chalk paint. Using your paintbrush, apply a thin, even first coat of Waverly chalk paint to the entire exterior of the jar. Chalk paint is known for its excellent coverage, but two thin coats are always better than one thick coat, as it prevents drips and ensures a smooth, professional finish. Allow the first coat to dry completely, which usually takes about 15-30 minutes, before applying the second coat. This crucial drying time ensures proper adhesion and a uniform color. After the second coat, let the jar dry for at least an hour, or until it’s dry to the touch.
Now comes the fun part: giving your scarecrow its personality! Using black acrylic paint and a fine-tipped brush, carefully draw the eyes and mouth. You can opt for simple dots for eyes or create more expressive shapes like half-circles or ovals. For the mouth, a simple stitched line or a happy curve works wonderfully. Then, switch to orange acrylic paint to create the scarecrow’s nose, typically a triangular shape or a small orange circle, as shown in the original video demonstration. If you’re nervous about painting directly on the jar, practice your design on a piece of paper first. Allow the acrylic paint to dry completely – this usually takes less time than chalk paint but ensure it’s dry before proceeding to avoid smudges.
To add an extra touch of cuteness, carefully dab a small amount of hot glue onto the base of the false eyelashes. Position and attach them precisely above the painted eyes of the scarecrow. Hold them gently in place for a few seconds until the glue sets. This small detail instantly elevates the scarecrow’s charm and gives it a distinctly whimsical look.
Step 2: Designing the Scarecrow Hat and Hair
The hat and “hair” are crucial for giving your scarecrow its signature rustic appeal and completing its transformation.
Begin by preparing your burlap. You’ll want a piece wide enough to drape over the jar’s lid area and long enough to gather comfortably around the neck. A square piece of about 10-12 inches (25-30 cm) per side usually works well for standard large jars, but adjust based on your jar’s size. Dab a line of hot glue around the neck of the jar, just below the rim. Take one end of your burlap piece and firmly adhere it to the glued area. Crucially, position the burlap so that its middle part gently overlaps down the face of the scarecrow, creating the iconic floppy hat brim effect. Continue dabbing hot glue around the neck and gathering the burlap as you adhere it, creating natural folds and wrinkles that mimic a straw hat. The gathering technique adds volume and texture, making the hat look more authentic and less stiff.
Once the burlap hat is securely attached, select your thick ribbon. Wrap it neatly around the middle part of the burlap hat, effectively creating a hatband. Secure the ends of the ribbon with a dab of hot glue, ensuring it’s snug but not too tight. Next, take your combination of ribbons (perhaps a thick one and a thinner contrasting one) and create a decorative bow. If you’re new to bow-making, there are many simple tutorials online. Once you’re happy with your bow, use hot glue to attach it securely to the side of the hatband, adding a pop of color and charm.
Finally, it’s time for the raffia “hair.” Cut several pieces of raffia into varying lengths, ensuring they are long enough to peek out from under the hat and give a shaggy, natural look. Dab hot glue inside the gathered burlap hat, near the jar’s neck, and carefully tuck and adhere the raffia pieces. Distribute them evenly around the “inside” of the hat, letting some strands playfully extend down the sides of the scarecrow’s face. You can also adhere a few pieces at the very center of the burlap on top to give the impression of hair bursting from the crown. And just like that, your adorable repurposed mason jar scarecrow is complete!
This project is not only easy but also incredibly rewarding, offering a unique piece of fall decor that you can proudly display. The combination of recycled materials and handmade charm makes it a perfect addition to any autumn home.
Creative Customization: Personalize Your Scarecrow
While the basic design is charming, don’t hesitate to infuse your scarecrow with your own unique style. Here are some ideas to customize your repurposed jar scarecrow:
- Vary Jar Sizes: Create a family of scarecrows using jars of different shapes and sizes for a dynamic display.
- Facial Expressions: Experiment with different eye shapes, mouth styles, or even add rosy cheeks with a dab of pink paint or blush. Give your scarecrow a mischievous wink, a wide grin, or a surprised look.
- Hat Embellishments: In addition to ribbons, consider hot gluing small artificial autumn leaves, miniature plastic pumpkins, acorns, or tiny fabric patches onto the burlap hat for extra texture and charm.
- Hair Alternatives: If raffia isn’t available, try using strands of natural-colored yarn, thin twine, or even dried grasses for the scarecrow’s hair.
- Body Accents: While the original design focuses on the face and hat, you could add small buttons glued onto the jar’s “body” or wrap twine around the base for an added rustic touch.
- Functional Decor: Once complete, your scarecrow jar isn’t just for show. Fill it with LED fairy lights for a warm glow, use it as a candy jar for fall treats, or even as a unique vase for dried flowers or wheat stalks.
- Themed Variations: Adapt the colors and accessories for other holidays. For example, a ghostly white jar with black features and spiderweb burlap could be a Halloween ghost!
The possibilities are endless when it comes to personalizing your scarecrow. Let your imagination guide you and create a piece that perfectly reflects your fall aesthetic.
The Joy of Sustainable Crafting: Why Repurpose?
Beyond the aesthetic appeal, this project embodies the spirit of sustainable living through repurposing. Giving new life to old jars offers several benefits:
- Environmental Impact: By reusing jars, you reduce waste destined for landfills and decrease the demand for new manufactured goods, lessening your carbon footprint.
- Cost-Effectiveness: Utilizing items you already own or can easily source for free significantly lowers the cost of your crafting projects, making fall decor accessible to everyone.
- Uniqueness: Handmade, repurposed items often possess a unique character and charm that mass-produced decorations lack. Your scarecrow will be truly one-of-a-kind.
- Resourcefulness: Repurposing encourages creativity and problem-solving, teaching you to see potential in everyday objects.
- Sense of Accomplishment: There’s immense satisfaction in transforming something ordinary into something beautiful and functional with your own hands.
Embracing repurposing in your crafting endeavors is a wonderful way to contribute to a more sustainable lifestyle while creating beautiful, meaningful decor for your home.
We hope this detailed guide inspires you to create your own adorable repurposed mason jar scarecrow. It’s an ideal project for a cozy autumn afternoon, a fun activity with children, or a charming gift for someone special. Enjoy the process of bringing this little character to life and adding a touch of handmade warmth to your fall decorations.
*These amazing images and the original craft inspiration are all credited to Rachel’s Unique Crafts via YouTube. Be sure to check out her other creative content and follow for more inspiring DIY projects!