
Transforming ordinary items into extraordinary pieces doesn’t have to be complicated or time-consuming. Have you ever found yourself admiring a simple accessory, perhaps a plain hat or a basic handbag, and wished it had a unique touch of personality? That was precisely my situation recently. I had just created a lovely hat and a matching bag, both beautiful in their simplicity, yet I felt they could benefit from an added design element to elevate their charm and make them truly stand out. My initial thoughts drifted towards elaborate beadwork or quirky patches. However, bead embellishments, while stunning, often demand a significant time investment, which I wasn’t prepared for. Patches, on the other hand, tend to lend a playful aesthetic, which wasn’t quite the sophisticated style I envisioned for my new accessories.
Determined to find the perfect adornment, I embarked on a search for creative, yet simple, DIY ideas. It was during this exploration that I stumbled upon a truly captivating and easy ribbon flower DIY tutorial by the talented Quicky Crafts. Though I hadn’t originally considered flowers, the moment I saw her exquisite creation, I knew instantly that this was the ideal design to complement both my hat and bag. The elegance, simplicity, and versatility of these ribbon flowers were exactly what I needed. What’s more, they were incredibly straightforward to make, allowing me to craft a generous supply in an array of beautiful colors. I’m absolutely confident that these delightful ribbon flowers will add a touch of handmade charm and elegance to your projects as well, whether you’re looking to personalize clothing, home decor, or other accessories. Dive into this guide to learn how to create your own beautiful ribbon flowers and elevate your crafting game!
Why Choose Ribbon Flowers for Your Projects?
Ribbon flowers offer a multitude of advantages that make them a favorite among crafters. Firstly, their creation is remarkably quick, meaning you can whip up several in a short amount of time, perfect for last-minute embellishments or large projects. Secondly, they are incredibly cost-effective, typically requiring only a small amount of ribbon, thread, and an optional bead. This makes them an accessible option for anyone looking to add a touch of beauty without breaking the bank. Furthermore, the versatility of ribbon flowers is unmatched. You can choose from an endless palette of ribbon colors, experiment with different ribbon widths and textures (though satin is ideal for this particular design), and even vary the size of your flowers to suit different applications. Unlike some other embellishments, these flowers strike a perfect balance between intricate beauty and effortless grace, making them suitable for a wide range of styles, from vintage chic to modern minimalist. They provide a beautiful three-dimensional element that can instantly transform a flat surface into something dynamic and visually appealing, offering a bespoke feel to any item they adorn.
Materials You’ll Need
Gathering your materials before starting any DIY project ensures a smooth and enjoyable crafting experience. For these charming ribbon flowers, you’ll need just a few basic items, most of which you might already have in your craft kit. The quality of your materials can significantly impact the final look and feel of your ribbon flowers, so choose wisely.
- 1.6 inches wide Satin Ribbons: The width is crucial for achieving the desired fullness and shape of this particular flower design. Satin ribbon is preferred for its beautiful sheen and smooth texture, which drapes elegantly and creates soft, appealing gathers. While other ribbons like grosgrain or organza can be used for different effects, satin offers a luxurious finish that is perfect for this project. Feel free to experiment with various colors to match your projects or create vibrant contrasts.
- Sharp Scissors: A good pair of fabric scissors will ensure clean, precise cuts, which are essential for preventing fraying and maintaining the integrity of your ribbon edges.
- Thread and Needle: Choose a strong, coordinating thread that blends well with your ribbon color or a neutral shade like white or cream. A sharp needle is necessary to glide smoothly through the satin fabric without snagging.
- Ruler or Measuring Tape: Accuracy in measuring your ribbon length is key to creating uniform flowers, especially if you plan on making several.
- Lighter or Candle: This tool is vital for heat-sealing the ribbon edges, a crucial step to prevent fraying and ensure your flowers remain durable over time. Always exercise caution when working with open flames.
- Decorative Beads: A single bead will serve as the attractive center of your ribbon flower, adding a final touch of sparkle and sophistication. You can choose any bead that appeals to you – pearls, clear glass beads, or even small metallic beads – to customize the look of your flower.
Step-by-Step Guide to Crafting Your Ribbon Flowers
Creating these beautiful ribbon flowers is a gratifying process, even for beginner crafters. Follow these detailed steps carefully, and you’ll soon have a collection of lovely embellishments ready for your projects.
Step 1: Prepare Your Ribbon
Begin by carefully measuring 23 inches (approximately 58 cm) from your chosen satin ribbon using your ruler or measuring tape. Precision here ensures consistent flower sizes. Once measured, cut the ribbon neatly with your sharp scissors. After cutting, it’s crucial to seal the raw edges of your ribbon to prevent them from fraying, which can quickly ruin the appearance of your finished flower. Gently pass each cut edge of the ribbon over the flame of a lighter or candle for a second or two. The heat will slightly melt and seal the synthetic fibers of the satin, creating a clean, durable edge. Be careful not to hold the ribbon in the flame for too long, as it can burn or discolor the fabric. Practice on a scrap piece first if you’re new to this technique.
Step 2: Create a Central Crease
Next, take your prepared ribbon and fold it precisely in half lengthwise. Run your fingers firmly along the folded edge to create a clear, defined crease down the center of the ribbon. This crease will serve as your guiding line for the subsequent stitching, ensuring that your gathers are even and symmetrical. A well-defined crease is essential for the flower’s structure, allowing it to take shape beautifully when gathered. You can press it with an iron on a low setting if you want a sharper crease, especially for thicker ribbons, but for satin, a finger press is usually sufficient.
Step 3: Begin Basting Stitching
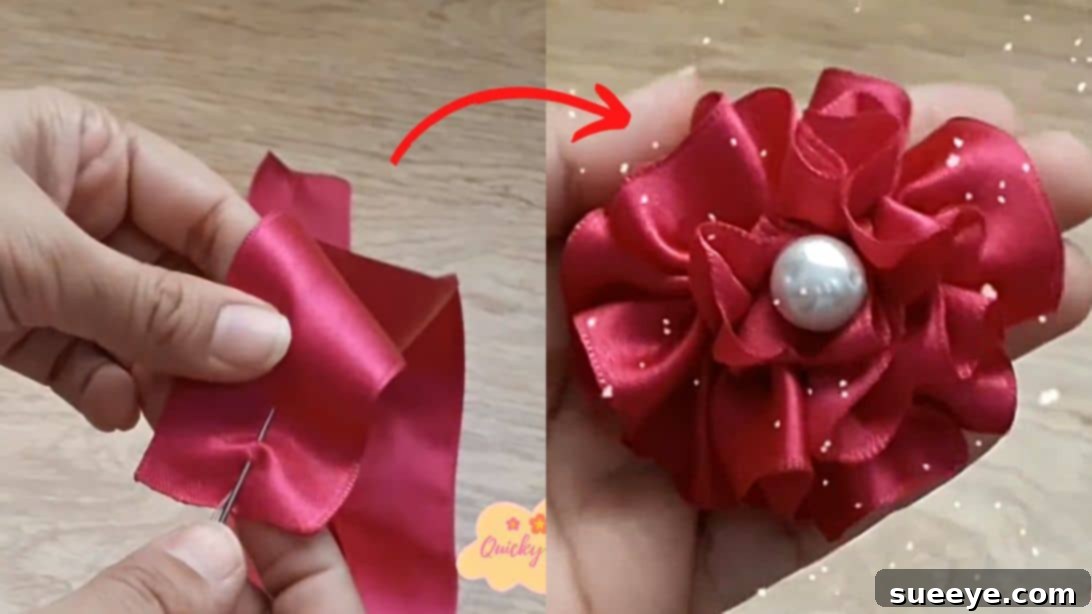
Thread your needle with a strong, coordinating thread. You can double the thread for extra durability if desired, and tie a knot at the end. Starting from one end of the folded ribbon, begin to make a simple basting stitch (a running stitch with evenly spaced long stitches and short spaces) directly along the central crease you just created. The basting stitch should go through both layers of the folded ribbon. Aim for consistent stitch length to ensure an even gather. Continue stitching all the way from one end of the ribbon to the other. This foundational stitch is what will allow you to gather the ribbon and form the petals of your flower.
Step 4: Form the Flower Shape
Once you’ve completed the basting stitch across the entire length of the ribbon, it’s time to transform your flat strip into a lovely flower. Gently but firmly pull the thread from both ends simultaneously. As you pull, the ribbon will begin to gather along the stitched line, naturally curling and forming the distinct, layered shape of a flower. Distribute the gathers evenly around the center to create a balanced and aesthetically pleasing bloom. Once you are satisfied with the shape and fullness of your ribbon flower, bring the two ends of the thread together and tie them tightly with a secure double or triple knot. This knot will hold the flower’s shape permanently. Trim any excess thread close to the knot. You’ll be amazed at how quickly a simple piece of ribbon can turn into a beautiful floral embellishment.
Step 5: Add a Decorative Center Bead
To give your ribbon flower a polished and professional finish, you’ll add a beautiful bead to its center. Take a fresh piece of thread and insert it into your needle. Pass the needle from the back of the flower, through its gathered center, and out the front. Thread your chosen bead onto the needle, positioning it neatly in the middle of the flower. Then, pass the needle back down through the center of the flower, securing the bead in place. Pull the thread firmly but gently to ensure the bead is snug. On the back of the flower, tie the ends of the thread tightly with a secure knot, just as you did when forming the flower shape. Trim any excess thread. This central bead not only adds a touch of sparkle but also helps to hold the flower’s shape and conceal the gathered center, completing its elegant appearance.
Creative Ways to Use Your Ribbon Flowers
The beauty of these easy ribbon flowers lies in their incredible versatility. Once you’ve mastered the technique, you’ll find countless ways to incorporate them into your crafting projects, adding a personalized and elegant touch. Here are just a few ideas to spark your inspiration:
- Fashion Accessories: Embellish hats, headbands, hair clips, brooches, or even shoes for a unique, customized look. They can transform a simple handbag or clutch into a statement piece.
- Apparel Decoration: Sew them onto clothing items like blouses, dresses, jackets, or skirts. They work wonderfully on cuffs, collars, or as decorative accents on pockets.
- Home Decor: Attach them to throw pillows, curtains, lampshades, or picture frames to infuse your living space with handmade charm. They can also be used to create beautiful wreaths or garlands.
- Gift Wrapping & Packaging: Elevate your gift presentations by adding a handmade ribbon flower instead of a traditional bow. They also make lovely additions to gift tags or handmade cards.
- Event Decor: Perfect for weddings, baby showers, or parties, these flowers can adorn centerpieces, favors, invitations, or even bridal sashes.
- Scrapbooking & Journaling: Add a delightful three-dimensional element to your scrapbook layouts, memory albums, or journal covers, bringing your pages to life.
Tips for Success and Variations
To help you get the most out of this DIY and encourage further creativity, here are some expert tips and ideas for variations:
- Experiment with Ribbon Types and Widths: While satin offers a luxurious feel, try experimenting with other materials like organza for a sheer, delicate look, or grosgrain for a more structured flower. Different ribbon widths will result in varying flower sizes and fullness – a wider ribbon will yield a larger, fuller flower, while a narrower one will create a daintier bloom.
- Combine Colors: Don’t limit yourself to a single color! Create multi-toned flowers by layering two different colored ribbons together before basting, or simply by making individual flowers in complementary shades and arranging them together.
- Alternative Centers: Instead of a bead, consider using a decorative button, a small rhinestone, a cluster of smaller beads, or even a tiny fabric embellishment for the center of your flower. This is a great way to match the flower to the specific aesthetic of your project.
- Add Leaves: Enhance the realism of your flowers by adding small fabric or felt leaves behind them. You can cut these freehand or use a template.
- Troubleshooting Fraying: If your ribbon continues to fray despite heat-sealing, a tiny dab of fabric glue on the sealed edges can offer extra protection.
- Consistent Stitching: Aim for consistent stitch length during basting. Uneven stitches can lead to lopsided gathers. If your first attempt isn’t perfect, don’t worry! Practice makes perfect.
- Safety First: When using a lighter or candle for heat-sealing, always work in a well-ventilated area, keep flammable materials away, and have a safe surface beneath you. Supervise children closely if they are involved in the crafting process.
Create Your Own Beautiful Ribbon Flowers Today!
Crafting these easy ribbon flowers is a delightful journey from a simple strip of fabric to a charming, three-dimensional embellishment. It’s a testament to how a few basic materials and a touch of creativity can transform ordinary items into something truly special. Whether you’re enhancing an article of clothing, personalizing a gift, or simply adding a decorative flourish to your home, these handmade flowers offer an elegant and cost-effective solution. The satisfaction of creating something beautiful with your own hands is immense, and these ribbon flowers are sure to bring joy to both the maker and the admirer.
I encourage you to gather your materials, follow these simple instructions, and start crafting your own collection of beautiful ribbon flowers. Don’t hesitate to experiment with colors, sizes, and centers to make each flower uniquely yours. For even more fantastic and inspiring DIY projects, remember to visit and subscribe to Quicky Crafts on Youtube. Her channel is a treasure trove of amazing tutorials that will undoubtedly fuel your passion for crafting. Happy crafting!