
Master the Disappearing Hourglass Quilt Block: Your Guide to Creative Quilting
There’s a unique satisfaction that comes with quilting, a blend of precision, creativity, and the joy of watching fabric transform into art. Among the myriad of quilt blocks, the Disappearing Hourglass Quilt Block stands out as a true gem. It’s a block that brings immense happiness and a sense of accomplishment, not just because of its stunning visual appeal, but also due to the surprisingly simple and incredibly relaxing process of its creation. What makes this block particularly captivating is its remarkable versatility. From just a few initial cuts, an array of design possibilities unfolds, allowing you to truly play with patterns, colors, and arrangements. Whether you prefer a clean, minimalist look or a vibrant, bustling design, this block adapts beautifully to your creative vision. There are genuinely no restrictions; it’s a canvas for your personal exploration in the world of quilting. If you’re ready to dive into this delightful quilting adventure and create something truly unique, join us as we explore the steps, inspired by the fantastic video tutorial by Teresa DownUnder on YouTube.
The Disappearing Hourglass block is more than just a technique; it’s an invitation to experiment. Imagine taking simple fabric squares and, through a series of strategic cuts and rearrangements, transforming them into a complex-looking pattern that belies its straightforward origin. This “disappearing” effect is what gives the block its magical charm, making it a favorite for both novice and experienced quilters alike. It’s an excellent project for honing your precision cutting and sewing skills, while simultaneously encouraging you to think outside the box when it comes to design. Let’s gather our tools and embark on this exciting journey to create a quilt block that promises both enjoyment and a beautiful outcome.
Essential Materials for Your Disappearing Hourglass Quilt Block
Having the right tools is paramount for a smooth and enjoyable quilting experience. Here’s a list of what you’ll need to create your magnificent Disappearing Hourglass quilt block:
- Layer Cakes or Pre-cut 10-inch Fabric Squares: These pre-cut squares are a fantastic time-saver, ensuring consistency in your starting material. Opt for contrasting colors or prints to maximize the “disappearing” effect and highlight the intricate design when the block is complete. If you don’t have layer cakes, you can easily cut your own 10-inch squares from yardage for greater control over fabric choices.
- Ruler: A clear, sturdy quilting ruler (preferably at least 12 inches long) is essential for accurate measurements and precise cuts, which are crucial for this block’s success.
- Fabric Pins: Pins help secure your fabric layers, preventing shifting while sewing and ensuring your seams align perfectly.
- Scissors or Rotary Cutter and a Cutting Mat: While sharp fabric scissors can work, a rotary cutter with a self-healing cutting mat offers unparalleled speed and precision, making clean, straight cuts much easier. Ensure your rotary blade is sharp for effortless cutting.
- Needle and Thread: Choose a good quality, all-purpose polyester or cotton thread that complements your fabric colors. A sturdy needle suitable for quilting will prevent skipped stitches and ensures durability.
- Iron and Ironing Board: An iron is not just for flattening; it’s a vital tool for pressing seams correctly. Proper pressing ensures your blocks lie flat and square, contributing significantly to the overall quality of your quilt.
- Sewing Machine: A reliable sewing machine is your best friend for piecing quilt blocks efficiently. Ensure it’s threaded correctly and that you have a fresh needle.
Step-by-Step Guide to Crafting Your Disappearing Hourglass Block
Follow these detailed steps carefully to achieve a beautifully intricate Disappearing Hourglass Quilt Block. Precision at each stage will ensure a stunning final product.
Step 1: Preparing Your Fabric and Initial Cuts
Begin by selecting two different fabric squares – ideally, one light and one dark, or two contrasting patterns – to create a striking visual effect. Place these two fabric squares together, ensuring their right sides are facing each other. This is crucial for creating clean seams and a professional finish. Carefully pin the edges to prevent any shifting during sewing. Using a standard ¼-inch seam allowance, sew around all four sides of the pinned squares. This creates a secure, closed square. Once sewn, lay your combined fabric square flat. Now, take your quilting ruler and position it diagonally across the square, from one corner to the opposite corner. With your rotary cutter, carefully cut the fabric in half along this diagonal line. Lift the ruler, rotate it, and then place it diagonally the opposite way, from the remaining two corners. Cut the fabric through in half once more. You should now have four triangular pieces of fabric.
This initial step lays the groundwork for the hourglass shape. The precision of your ¼-inch seam allowance and your diagonal cuts will directly impact the accuracy and beauty of your final block. Take your time, ensure your fabric is flat, and your cuts are clean. Safety first when using your rotary cutter!
Step 2: Transforming Triangles into Hourglass Units
Now, take each of your four triangular pieces. Carefully open them up. The next critical step is pressing your seams. It’s generally recommended to press the seams towards the darker side of the fabric. This technique helps to reduce bulk, prevents the seam allowance from showing through lighter fabrics (often referred to as “shadowing”), and creates a crisper finish. After pressing, you will notice that each of these pieces now forms a half-square triangle (HST) unit. You should have four of these HSTs. The next vital step is to trim each half-square triangle unit into a perfect 6½-inch square. This trimming process, often called “squaring up,” ensures all your units are consistent in size, which is absolutely essential for a quilt block that lies flat and aligns perfectly. Use your quilting ruler and cutting mat to achieve precise 6½-inch measurements for each HST. Once squared up, you will assemble these four 6½-inch HSTs together to form a larger, cohesive block, resembling the initial Hourglass design. Arrange them as shown in the video tutorial, ensuring that your points align as closely as possible, then sew them together with your ¼-inch seam allowance.
After assembling this central block, you’ll perform a clever trick to minimize bulk. Gently unpick the stitching along the center ¼-inch seam, just enough to release the seam allowances. This small adjustment allows the seam to lie flatter when pressed, improving the overall integrity and appearance of your finished quilt. Then, press this center seam nice and flat, and give the entire assembled block a good pressing all around. This careful attention to pressing will make a significant difference in the final appearance and feel of your quilt.
Step 3: The Magic of Disappearing – Cutting and Rearranging Your Block
This is where the “disappearing” magic truly happens! Take your perfectly pressed Hourglass block. Now, you’ll need to make precise cuts to transform it. Measure your block and mark lines approximately every 4 and 1/8 inches from each edge, or simply divide the total width of your block by three to find your cutting lines. These markings will guide your cuts. First, cut the fabric vertically along your marked lines, resulting in three strips. Then, rotate your block 90 degrees and cut it horizontally along the remaining marked lines. If done correctly, you should now have nine smaller, individual squares. These nine squares are the key to the dynamic and surprising “disappearing” effect.
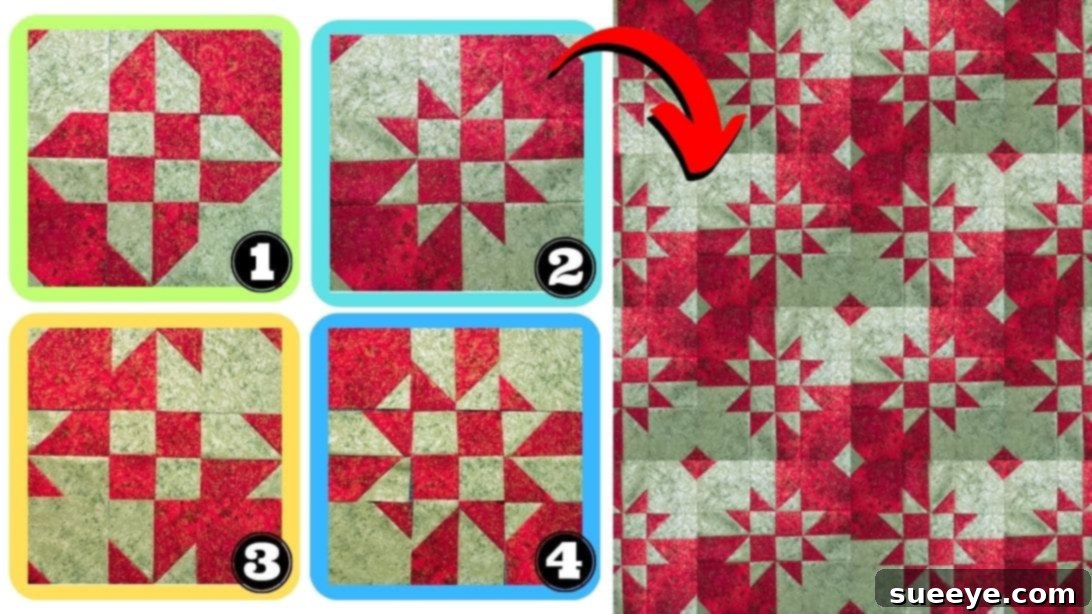
Now comes the most exciting part: rearranging these nine squares! This is your opportunity to unleash your creativity. Switch the positions of the squares around, experimenting with different layouts until you discover a pattern that truly speaks to you. You can rotate individual squares, swap corner pieces with center pieces, or follow specific patterns like the one demonstrated in the video tutorial by Teresa DownUnder. The beauty of this block lies in its incredible versatility; even subtle changes in arrangement can create vastly different visual effects. Once you’ve settled on your desired pattern, carefully sew the squares back together, piece by piece, row by row, ensuring your ¼-inch seam allowance is consistent. Press your seams again as you go to maintain flatness and accuracy. And just like that, your unique Disappearing Hourglass Quilt Block is complete!
Unlock Endless Design Possibilities with Your Disappearing Hourglass Blocks
The true charm of the Disappearing Hourglass quilt block extends far beyond just making a single unit. Once you’ve mastered the technique, you’ll realize the incredible potential it holds for creating breathtaking quilts. Consider how varying your fabric choices can drastically alter the final aesthetic. Using highly contrasting solids can yield a modern, graphic look, while combining various prints can create a more traditional or whimsical feel. Experiment with light and dark values; the “disappearing” effect is often most pronounced when there’s a clear distinction between the fabrics in your initial square. Don’t be afraid to mix and match; some of the most stunning quilts come from unexpected fabric pairings.
Beyond individual block design, imagine arranging multiple Disappearing Hourglass blocks into a larger quilt. You could create a dynamic checkerboard pattern, rotate adjacent blocks for an illusion of movement, or combine them with solid sashing to give each block space to shine. The creative options are limitless, allowing you to tell a unique story with every quilt you make. This block is not just a pattern; it’s a foundation for boundless textile artistry.
Tips for Success When Making Disappearing Hourglass Quilt Blocks
- Precision is Key: While quilting is a creative art, accuracy in cutting and a consistent ¼-inch seam allowance are fundamental to ensuring your blocks lay flat and square. Invest time in precise measurements and consider using a clearly marked quilting ruler.
- Pressing Matters: Don’t underestimate the power of a good press. Pressing seams correctly, often towards the darker fabric, not only makes your block neater but also helps minimize bulk and keeps your quilt top smooth, which is essential for successful quilting and binding later on.
- Sharp Tools: A sharp rotary cutter blade makes clean, effortless cuts, reducing fabric distortion. Likewise, a good quality sewing machine needle will prevent skipped stitches and snags, ensuring a smooth sewing experience.
- Embrace Experimentation: The “disappearing” step is where you can truly let your imagination soar. Try different rearrangements of the nine smaller squares before sewing them back together. Take photos of various layouts to compare and choose your favorite. There are no wrong answers in creativity!
- Watch the Tutorial: While these written instructions are comprehensive, seeing the process in action can be incredibly helpful. The Teresa DownUnder video offers excellent visual guidance and tips that can clarify any uncertainties.
Embrace the Joy of Quilting with the Disappearing Hourglass Block
The Disappearing Hourglass Quilt Block is a testament to the magic that can be created with fabric, thread, and a little ingenuity. It’s a journey from simple squares to a complex-looking design, offering a deeply satisfying experience for quilters of all skill levels. The blend of precision in its initial steps and the freedom in its final rearrangement makes it an ideal project for expanding your quilting repertoire. Whether you’re crafting a cozy throw, a decorative wall hanging, or a full-sized bed quilt, this block will add a unique touch of handmade beauty.
We highly encourage you to try making this enchanting quilt block. It’s a rewarding project that promises both a relaxing creative process and a stunning finished product. For a visual guide and additional insights, be sure to watch the full tutorial by the talented Teresa DownUnder on YouTube. Follow her channel for more inspiring quilting content and to further explore the vast and wonderful world of fabric artistry!
*All image credit belongs to Teresa DownUnder via YouTube. Follow and subscribe to her channel for more!