
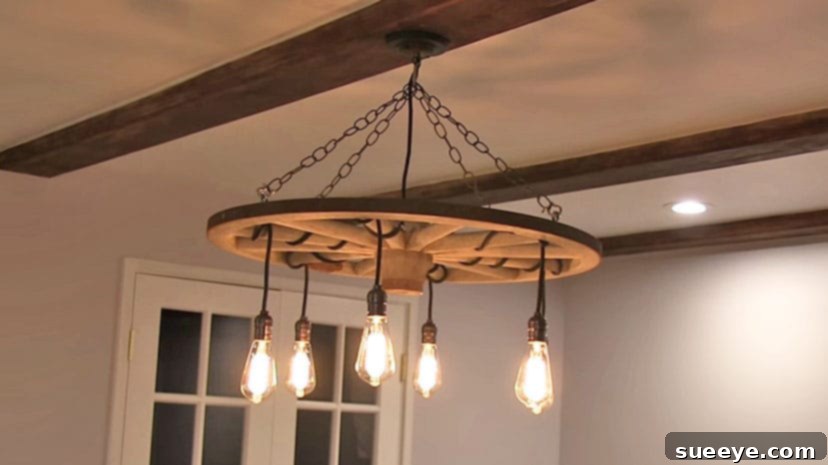
Transform Your Home: The Ultimate DIY Wagon Wheel Chandelier Guide
Wagon wheels have long been cherished as iconic symbols of rustic charm, history, and craftsmanship. Their timeless appeal makes them popular decorative elements in gardens, kitchens, and as standalone pieces in country-inspired homes. But what if you could take this rustic aesthetic to an entirely new level, transforming a simple wagon wheel into a breathtaking focal point? Imagine a truly unique lighting fixture that doesn’t just illuminate your space but tells a story, a masterpiece crafted by your own hands. This is precisely the magic of a DIY wagon wheel chandelier.
The concept of repurposing a wagon wheel into a functional and stunning chandelier might seem unconventional, yet the results are nothing short of spectacular. This project offers an incredible opportunity to infuse your home with unparalleled character, blending vintage allure with practical elegance. Whether your decor leans towards farmhouse, rustic, country, or even an industrial-chic aesthetic, a thoughtfully designed wagon wheel chandelier can become the crown jewel of your interior.
Why Choose a DIY Wagon Wheel Chandelier?
Beyond its striking visual appeal, a homemade wagon wheel chandelier brings a multitude of benefits to your living space:
- Unrivaled Uniqueness: Unlike mass-produced fixtures, your DIY chandelier will be a one-of-a-kind creation, reflecting your personal style and ingenuity. It’s a guaranteed conversation starter.
- Rustic Charm & Farmhouse Elegance: Wagon wheels inherently carry an aura of history and simpler times. When repurposed into a chandelier, they bring an authentic, warm, and inviting ambiance that perfectly complements rustic, farmhouse, or country-style decor.
- Sustainable Decor: Repurposing an old wagon wheel is an excellent example of upcycling. You’re giving new life to a discarded or antique item, contributing to sustainable living while creating something beautiful.
- Cost-Effective Customization: While custom lighting can be expensive, building your own allows you to control costs and tailor every aspect – from the finish of the wheel to the type of bulbs – to match your vision and budget.
- DIY Satisfaction: There’s immense pride and satisfaction in creating something substantial and beautiful with your own hands. This project is a rewarding endeavor that will leave you with a tangible piece of functional art.
Planning Your Wagon Wheel Chandelier Project
Before you dive into the hands-on creation, careful planning is essential to ensure a successful and safe project. Consider these key aspects:
1. Sourcing Your Wagon Wheel
The foundation of your chandelier is, of course, the wagon wheel itself. These can be found in various places:
- Antique Stores & Flea Markets: Often a treasure trove for authentic, aged wheels.
- Architectural Salvage Yards: Great for finding unique and often well-preserved pieces.
- Online Marketplaces: Websites like eBay, Etsy, or local classifieds frequently list vintage wagon wheels.
- Farm Estates & Barns: If you know someone with an old farm, you might find a forgotten gem.
Consider the wheel’s condition – is it solid wood, or is it a metal-rimmed wooden wheel? How much cleaning or restoration will it require? The size of the wheel should also be proportionate to the room where it will hang.
2. Essential Materials and Tools
To bring your vision to life, you’ll need a selection of electrical components and basic tools:
- Electrical Components:
- Lamp wire (UL-listed, appropriate gauge)
- Light sockets (Edison screw base, candelabra, etc. – quantity depends on desired lights)
- Bulbs (Edison, LED, vintage, Mason jar, etc.)
- Ceiling canopy kit (including mounting bracket, crossbar, wire nuts, grounding screw)
- Decorative chain (for hanging)
- Electrical tape
- Strain relief connectors (to secure wires to sockets/wheel)
- Optional: Dimmer switch (for adjustable ambiance)
- Hardware:
- Eye bolts or hooks (for attaching chains to the wheel)
- Screws or bolts (if attaching a central support)
- Tools:
- Drill with various bits (for mounting and wire holes)
- Wire strippers/cutters
- Screwdrivers (Phillips and flathead)
- Pliers
- Multimeter (for testing connections – highly recommended)
- Safety glasses and gloves
- Finishing Supplies:
- Sandpaper, wood filler (if needed for the wheel)
- Wood stain, paint, or sealant (to protect and beautify the wheel)
- Cleaning supplies
A Glimpse into the Construction Process
While every DIY project has its nuances, here’s a general overview of the steps involved in constructing a wagon wheel chandelier. For a detailed, visual guide, we highly recommend checking out Aaron Massey’s tutorial, shared below.
1. Prepare the Wagon Wheel: Begin by thoroughly cleaning the wagon wheel. Remove any dirt, loose paint, or rust. Sand down rough spots and apply your chosen finish – a rich wood stain, a distressed paint look, or a protective sealant to preserve its natural character.
2. Plan Your Lighting Layout: Decide where each light socket will be positioned on the wheel. Consider the overall symmetry and desired illumination. Mark these spots clearly.
3. Drill Holes (if necessary): If your wheel doesn’t have existing openings, carefully drill holes for running the lamp wire and mounting the sockets. Ensure holes are large enough for the wire but not so large that the socket is unstable.
4. Wire the Sockets: This is the most critical step requiring precision and adherence to electrical safety standards. Connect the lamp wire to each socket, ensuring proper polarity (hot wire to the center tab, neutral to the outer shell). Twist and secure connections, typically using wire nuts for multiple connections to a single main line.
5. Assemble the Wiring Harness: Route all individual lamp wires to a central point on the top of the wheel. Here, they will be combined and connected to the main power lead that will run up to your ceiling canopy. Proper grounding is essential – ensure all metal components are grounded.
6. Attach Hanging Hardware: Securely install eye bolts or sturdy hooks to the top of the wheel. These will be used to attach the decorative chain that supports the chandelier from the ceiling.
7. Test the Wiring: BEFORE final installation, it is absolutely crucial to test your chandelier. Using a temporary power source or a multimeter, verify that all connections are correct and all lights illuminate properly. This step helps prevent potential hazards later.
Safety First: Electrical Codes and Professional Guidance
As Aaron Massey wisely points out in his tutorial, while this project is incredibly rewarding, it involves working with electricity. It is paramount to prioritize safety and adhere to local electrical codes. Electrical work, if done improperly, can pose serious risks, including fire hazards and electrical shock.
- Consult Local Codes: Always check with your local building department for specific electrical code requirements in your area. What is permissible in one region might not be in another.
- When in Doubt, Hire a Professional: If you are not entirely confident in your electrical wiring skills, or if your local code requires professional installation for permanent fixtures, do not hesitate to hire a licensed electrician. They can ensure that your beautiful creation is also safe and compliant.
- UL-Listed Components: Always use UL-listed (Underwriters Laboratories) electrical components. This certification indicates that the products meet stringent safety standards.
- Proper Grounding: Ensure all metal parts of your chandelier are properly grounded. This is a critical safety measure to prevent electrical shock.
Customization: Making It Uniquely Yours
The beauty of a DIY project lies in its endless possibilities for customization. Your wagon wheel chandelier can be tailored to perfectly match your home’s aesthetic:
- Bulb Choices:
- Edison Bulbs: For a true vintage-industrial look, these exposed filament bulbs offer a warm, amber glow.
- Mason Jar Bulbs: Encase standard bulbs in clear or frosted Mason jars for a charming, rustic-chic effect.
- LED Bulbs: Energy-efficient and long-lasting, modern LEDs can mimic various styles, including vintage Edison or brighter, cleaner light.
- Colored or Themed Bulbs: For seasonal decor or a playful touch, experiment with different colors or specialty bulbs.
- Wheel Finish: Beyond natural wood, consider a distressed white wash for a shabby chic look, a dark stain for a more refined rustic feel, or even painting it a bold color to make a statement. For metal components, a polished finish or a deliberate rust patina can enhance its character.
- Additional Embellishments: Hang small crystals, beads, or even faux greenery from the spokes for added elegance. Wrap decorative twine or rope around parts of the wheel for extra texture.
Where to Showcase Your Masterpiece
A wagon wheel chandelier is versatile enough to enhance various spaces within your home:
- Kitchen: Over a large kitchen island or breakfast bar, it becomes an inviting central feature.
- Dining Room: Above your dining table, it sets a cozy and elegant tone for meals and gatherings.
- Living Room: As a focal point, it can anchor the room’s design and provide ambient lighting.
- Entryway/Foyer: Welcome guests with a grand statement piece that hints at the character of your home.
- Covered Outdoor Spaces: On a covered porch or patio, it extends your rustic decor to the outdoors (ensure all components are outdoor-rated).
- Commercial Spaces: Restaurants, cafes, or boutiques seeking a rustic or country theme can greatly benefit from such a unique fixture.
Maintaining Your Chandelier
Once installed, your wagon wheel chandelier will require minimal maintenance. Regular dusting will keep it looking its best. Periodically check the wiring and connections, especially if it’s in a high-traffic area or subject to temperature changes. Replace bulbs as needed, and enjoy the enduring charm it brings to your home.
Get Inspired and Create!
The journey of transforming an old wagon wheel into a stunning chandelier is a testament to the power of creativity and repurposing. It’s an opportunity to inject personality, history, and a touch of DIY pride into your living space. The results are not just a light fixture, but a handcrafted art piece that will be admired for years to come.
Ready to embark on this incredible project? We encourage you to watch the detailed tutorial by Aaron Massey with Mr. Fix It. He breaks down the process, offering valuable insights and practical tips to guide you every step of the way. Gather your materials, prepare your workspace, and get ready to illuminate your home with a truly remarkable, self-made masterpiece. Don’t forget to share your amazing creations with friends and inspire others to embrace the spirit of DIY!