
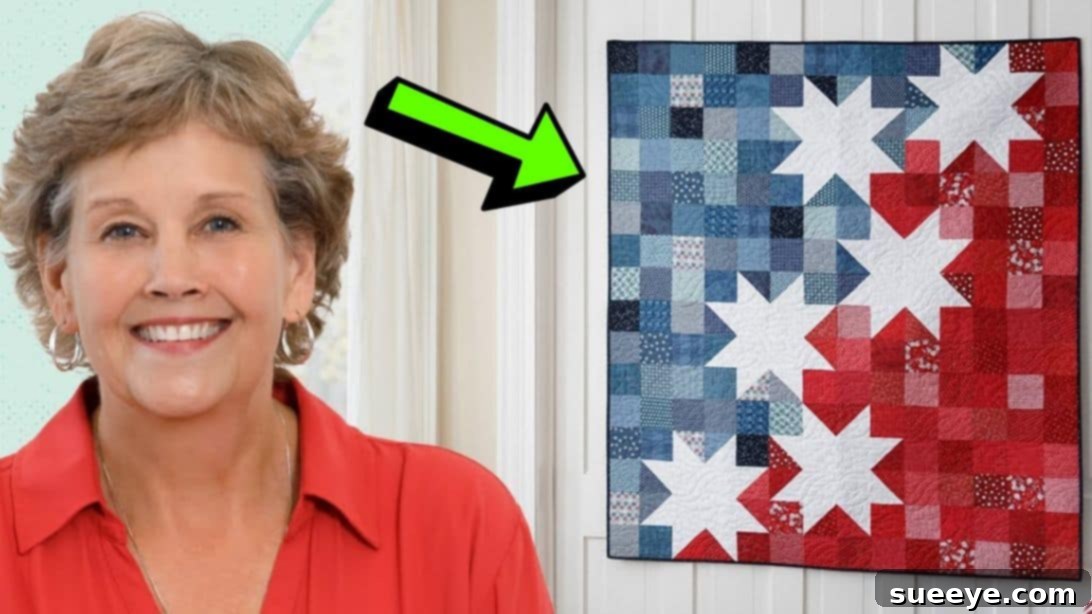
Embark on a delightful quilting adventure with the Star-Spangled Variation Quilt, a design that beautifully marries classic charm with modern simplicity. Originally conceived by Trisha Perry Designs, this stunning pattern received an extraordinary uplift through a brilliant adaptation by Missouri Star on YouTube, transforming it into an even more captivating and accessible project. This isn’t just a quilt; it’s a vibrant display of skill and passion, perfectly sized to become a cherished wall hanging or a heartfelt gift that will be treasured for years to come.
At first glance, the intricate star patterns and geometric precision might suggest a complex undertaking. However, you’ll be pleasantly surprised by the straightforward nature of its construction. The Star-Spangled Variation Quilt is remarkably easy to create, making it an ideal project for quilters of all experience levels. Even if you’re a complete beginner holding a rotary cutter for the first time, you can confidently achieve stunning results on your initial attempt. Furthermore, this design offers a fantastic opportunity to breathe new life into your fabric stash, as it lends itself wonderfully to using up leftover scraps and remnants, making each quilt truly unique and sustainable.
The beauty of this quilt lies in its versatility and visual impact. The “star-spangled” motif evokes a sense of tradition and patriotism, but its design allows for endless color variations, enabling you to personalize it to suit any decor or recipient. Whether you choose the classic red, white, and blue, or opt for a vibrant rainbow of colors, the underlying structure of this quilt ensures a striking finish every time. Let’s delve into how you can bring this beautiful creation to life, step by step, with detailed guidance to ensure your quilting journey is as smooth and enjoyable as possible.
Why Choose the Star-Spangled Variation Quilt?
The Star-Spangled Variation Quilt stands out for several compelling reasons. Its design, while seemingly complex, is built upon the fundamental technique of half-square triangles (HSTs), making it an excellent learning project for novices and a quick, satisfying make for seasoned quilters. The brilliance of Missouri Star’s variation lies in simplifying the cutting and assembly process, ensuring that the beautiful star motifs emerge effortlessly.
This quilt isn’t just about aesthetics; it’s about the joy of creation. Imagine the satisfaction of transforming a stack of fabric into a masterpiece that tells a story. The repetitive nature of creating HSTs can be incredibly meditative, allowing you to unwind and focus on the rhythmic hum of your sewing machine. Beyond personal enjoyment, this quilt makes an exceptional gift, conveying warmth, comfort, and the undeniable effort of a handmade item. It’s perfect for birthdays, holidays, housewarmings, or as a thoughtful gesture to show someone you care. Its generous size also makes it an impressive display piece, ideal for adorning a bed, a sofa, or even serving as a captivating wall hanging to showcase your quilting prowess.
Essential Materials for Your Star-Spangled Variation Quilt:
Before you begin, gathering the right materials and tools is crucial for a smooth and enjoyable quilting experience. The Star-Spangled Variation Quilt utilizes common quilting supplies, many of which you might already have on hand. Precision in cutting and sewing is key to achieving a professional-looking finish, so invest in quality tools where possible.
- Two Layer Cakes (Red and Blue recommended): Layer cakes are pre-cut fabric bundles consisting of 42 squares, each measuring 10×10 inches. The original design often uses one red and one blue layer cake to achieve the classic star-spangled look. These pre-cuts save a significant amount of cutting time and ensure color coordination. However, feel free to explore other color combinations that resonate with your personal style or match your intended decor.
- Charm Packs or 1.5 Yards of Background Fabric: Charm packs are bundles of 42 pre-cut 5×5 inch squares. If using charm packs, select colors that will contrast beautifully with your layer cakes to make the star points pop. Alternatively, 1.5 yards of a solid or tone-on-tone background fabric (such as white, cream, or light grey) will provide a clean canvas for your stars. The choice between charm packs and yardage depends on your preference for pre-cuts versus continuous fabric.
- Backing Fabric: This is the fabric that forms the back of your quilt. The amount needed will depend on the final size of your quilt top. For a typical large throw quilt, approximately 4 to 5 yards of standard 44-inch wide quilting cotton is a good estimate. Consider a fabric that complements the front but also feels soft against the skin.
- Binding Fabric: Binding is the strip of fabric that finishes the edges of your quilt, encasing the raw edges and giving it a polished look. You’ll need about 0.75 yards for a standard throw size. This can be a contrasting color, a coordinating print, or even a solid that matches your background.
- Quilting Ruler: A transparent acrylic ruler (e.g., 6×24 inches or 8.5×24 inches) is indispensable for accurate cutting and trimming, especially for squaring up your half-square triangles.
- Marking Pen, Pencil, or Chalk: Essential for drawing diagonal lines on your fabric squares, which will serve as your sewing guide for half-square triangles. Choose a tool that is easily visible on your chosen fabric colors and can be removed or disappears after use.
- Scissors or Rotary Cutter and a Cutting Mat: While sharp fabric scissors are useful, a rotary cutter combined with a self-healing cutting mat is highly recommended for precise and efficient cutting of fabric strips and squares. A 45mm rotary cutter is a versatile choice.
- Needle and Thread: High-quality cotton thread (e.g., 50wt) in a neutral color (like white, cream, or light grey) is perfect for piecing your quilt blocks. Ensure your sewing machine needle is sharp and appropriate for quilting.
- Iron and Ironing Board (for pressing): Proper pressing is just as important as accurate sewing in quilting. An iron helps flatten seams, ensures blocks lay flat, and contributes significantly to the overall professional appearance of your finished quilt.
- Sewing Machine: Any basic sewing machine capable of a straight stitch will work. Make sure it’s well-maintained and you’re comfortable with its quarter-inch seam allowance.
- Pattern: The full, detailed pattern from Missouri Star Quilt Co. is essential for understanding the precise cutting measurements, block assembly diagrams, and overall layout. Click here to download the pattern directly from their website.
How to Sew a Star-Spangled Variation Quilt: A Detailed Guide
Creating the Star-Spangled Variation Quilt is a journey of precision and patience, culminating in a beautiful and rewarding finished product. Follow these steps carefully, paying close attention to detail, and you’ll soon have a quilt to be proud of.
Step 1: Preparation and Initial Fabric Cutting
Begin by downloading and printing the detailed pattern from Missouri Star. Familiarize yourself with the overall layout and cutting instructions. Accuracy at this stage is paramount. Take your chosen layer cakes (e.g., red and blue) and stack them neatly. Using your quilting ruler and rotary cutter, carefully cut each 10-inch square in half in both directions. This will yield four smaller squares from each original layer cake square. This method is incredibly efficient and forms the foundation for your half-square triangles.
Next, take your background fabric squares (either from a charm pack or cut from your yardage). On the wrong side of each background square, use your marking pen or chalk to draw a diagonal line precisely from one corner to the opposite corner. This line will serve as your guide for stitching, ensuring perfectly formed half-square triangles.
Step 2: Mastering Half-Square Triangles (HSTs)
Half-Square Triangles (HSTs) are the building blocks of many traditional and modern quilt patterns, and they are central to the Star-Spangled Variation Quilt. To make an HST, take one of your cut print squares (from the layer cakes) and one of your marked background squares. Lay them right sides together, ensuring all edges are aligned perfectly. You should be able to see your drawn diagonal line on the top (background) fabric.
Now, using your sewing machine, stitch a line on both sides of the drawn diagonal line. Maintain a consistent ¼ inch seam allowance from the marked line. This precision is vital for your HSTs to come out accurately. Once you’ve stitched both lines, use your rotary cutter or scissors to cut the unit apart directly along the marked diagonal line. You will now have two raw HST units. Carefully press the seams. You can press them open to reduce bulk or press them towards the darker fabric to “nest” seams later. Consistency in pressing direction across all HSTs can help with assembly.
The final crucial step for each HST is trimming. According to the pattern, your finished HSTs should measure 5 inches square. Place your quilting ruler over each HST, aligning the 45-degree line of your ruler with the diagonal seam of the HST. Trim away any excess fabric from all four sides to achieve a perfect 5-inch square. This trimming step is non-negotiable for ensuring your quilt blocks fit together without distortion and result in a flat, beautiful quilt top. Repeat this process for all your fabric squares until you have the required number of HSTs as indicated in your pattern.
Step 3: Assembling Quilt Blocks and Rows
With all your half-square triangles meticulously trimmed, it’s time for the most visually rewarding part: assembly. This stage brings your quilt to life, revealing the stunning star pattern. Lay out your individual HST units on a design wall, a large table, or even the floor, following the diagram provided in your Missouri Star pattern. The diagram is your blueprint for the proper orientation of each HST, ensuring the star pattern forms correctly.
Once you are satisfied with your layout, begin stitching the HST units together row by row. Start by sewing individual units within each row, one by one, using a consistent ¼ inch seam allowance. Chain piecing can be a great time-saver here, where you feed units continuously through your machine without cutting threads between them, then snip them apart later. As you complete each small section or seam, take it to your ironing board and give it a good press. Pressing as you go helps to keep your seams flat and your blocks accurate, making it easier to match points and achieve a smooth quilt top. Pay close attention to how your seams nest together when joining pieces; pressing seams in opposite directions in adjacent blocks can help reduce bulk and create perfectly matched points.
After you have sewn all the units together to form complete rows, you will then join these rows together. Again, carefully match your seams and points, pinning if necessary, before stitching the rows together with a ¼ inch seam allowance. Press these long seams thoroughly. Continue this process until your entire quilt top is assembled, forming the beautiful Star-Spangled Variation design. The care taken in pressing and matching at every stage will be evident in the crisp lines and flat surface of your finished quilt top.
Bringing Your Quilt to Life: Finishing Steps
Once your beautiful quilt top is complete, the journey isn’t over! The next essential steps involve quilting and binding, which transform your pieced top into a functional, durable, and cozy quilt.
Quilting: This involves layering your quilt top, a layer of batting (the fluffy middle layer that provides warmth and dimension), and your backing fabric. These three layers are then secured together with stitches, either by hand or machine, creating a design that complements your piecing. You can choose simple straight-line quilting, stitch in the ditch (along the seams), or more elaborate free-motion designs. The quilting process adds texture, stability, and longevity to your project.
Binding: The final touch is adding the binding. This is a strip of fabric sewn around the entire perimeter of the quilt, neatly encasing all the raw edges of the three layers. Binding not only protects the edges from fraying but also provides a beautiful frame for your quilt, giving it a professional and finished appearance. It’s often sewn on by machine and then hand-stitched to the back for a clean finish, though machine-only binding options are also popular.
Don’t forget to add a label to your finished quilt! Include details such as your name, the date, and the recipient’s name if it’s a gift. This personal touch turns your quilt into a cherished heirloom.
Tips for a Successful Quilting Journey
- Precision is Key: In quilting, accuracy in cutting and a consistent ¼ inch seam allowance are paramount. Take your time with these steps.
- Pressing Matters: Never underestimate the power of a good press. Pressing seams flat and in the correct direction can make a huge difference in how your blocks fit together.
- Use Good Tools: Sharp rotary blades, a good cutting mat, and a reliable sewing machine will make your quilting experience much more enjoyable and your results more professional.
- Take Breaks: Quilting can be intense! Step away if you feel frustrated, and come back with fresh eyes.
- Embrace Imperfection: Especially as a beginner, remember that handmade items have character. Don’t strive for absolute perfection, but rather for continuous improvement and enjoyment.
- Experiment with Fabrics: While the classic red and blue are beautiful, don’t be afraid to experiment with different color palettes and fabric prints to make the Star-Spangled Variation Quilt truly your own.
*All image credit belongs to Missouri Star via YouTube. Follow and subscribe to their channel for more inspiring quilting tutorials and projects! Your quilting adventure awaits!