
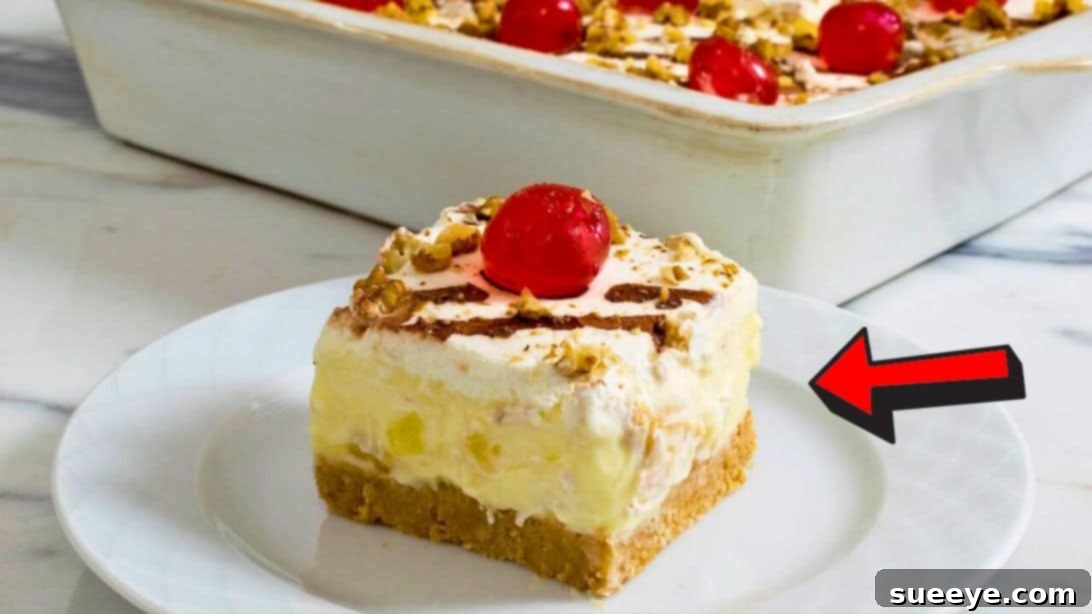
Easy No-Bake Banana Split Cake: A Delectable Dessert for Any Occasion
Are you searching for a dessert that perfectly blends creamy indulgence with refreshing fruitiness, all without the need for an oven? Look no further! This spectacular no-bake banana split cake, inspired by the creative culinary minds at Baking Fusion, is an absolute game-changer. It takes the beloved flavors of a classic banana split and transforms them into an effortlessly elegant layered cake that’s guaranteed to impress. Each bite delivers a symphony of textures and tastes: a delightful cookie-coconut crust, a rich and tangy cream cheese vanilla filling, slices of sweet, fresh bananas, a cloud of fluffy whipped cream, and finally, a vibrant scattering of cherries and chopped nuts with a drizzle of chocolate. It’s a dessert that truly melts in your mouth and offers a wonderfully refreshing experience, making it impossible for anyone to resist a second slice of this creamy, dreamy treat.
This dessert has quickly become a personal favorite and a staple at my own gatherings and parties. Without fail, guests are captivated by its vibrant appearance and exquisite taste, often asking for the recipe before the evening is through. That’s the ultimate testament to a dish’s success – when people are eager to recreate the magic in their own kitchens! The harmonious combination of cherries, bananas, and pineapple in a single, simple recipe makes this an absolute must-try. If you’re keen to explore more delightful banana-centric creations, you might also enjoy this Easy No-Bake Banana Upside Down Cake or perhaps even a rich Salted Caramel Banana Cake, perfect for those who love a touch of caramel decadence.
Why Choose a No-Bake Banana Split Cake?
In today’s fast-paced world, convenience and simplicity are highly valued, especially when it comes to entertaining. A no-bake dessert offers numerous advantages that make it an ideal choice for busy hosts and home bakers alike:
- Effortless Preparation: Say goodbye to preheating ovens and monitoring baking times. This cake requires no baking whatsoever, making the process incredibly straightforward and stress-free.
- Perfect for Warm Weather: When the temperatures rise, the last thing you want to do is turn on your oven. No-bake desserts are perfect for summer, keeping your kitchen cool while still delivering a satisfying treat.
- Beginner-Friendly: With clear, step-by-step instructions, even novice bakers can achieve spectacular results. There’s no complex technique involved, just simple mixing and layering.
- Time-Saving: While it requires chilling time, the active preparation time for this cake is surprisingly minimal, freeing you up to focus on other tasks or simply relax.
- Crowd-Pleasing Flavors: The classic banana split profile is universally loved. This cake takes those familiar flavors and elevates them into a sophisticated, shareable dessert.
This recipe is designed for maximum flavor with minimal fuss, ensuring you can enjoy a delicious homemade dessert without the typical demands of traditional baking.
Essential Ingredients for Your No-Bake Banana Split Cake
Crafting this incredible dessert begins with selecting the right ingredients. Each component plays a vital role in creating the layers of flavor and texture that make this cake so special. Here’s a detailed list of what you’ll need:
- For the Creamy Vanilla Filling:
- 3 oz (approx. 85g) of instant vanilla pudding powder (ensure it’s instant for best results)
- 6 tablespoons of granulated sugar
- 1/2 cup + 1/3 cup (6.76 fl oz / 200ml) of cold milk, divided for pudding preparation
- 2 1/2 cups (20.3 fl oz / 600ml) of additional cold milk for the pudding base
- 4.5 oz (approx. 128g) of unsalted butter, softened to room temperature for smooth incorporation
- 10.5 oz (approx. 300g) of full-fat cream cheese, also at room temperature, for a rich and tangy base
- 6 oz (approx. 170g) of powdered sugar (confectioners’ sugar), sifted to prevent lumps
- For the Flavorful Crust:
- 14.5 oz (approx. 410g) of digestive biscuits or graham crackers, finely crushed to create the base
- 2.5 oz (approx. 70g) of unsweetened shredded coconut, adding a tropical hint
- 4 fl oz (approx. 120ml) of pineapple juice, essential for binding the crust and adding moisture
- For the Fruity Layers & Toppings:
- 20 oz (approx. 567g) can of crushed pineapple, thoroughly drained to avoid a soggy cake
- 2 to 3 ripe bananas, sliced just before layering to maintain freshness
- 13.5 oz (approx. 400ml) heavy cream (whipping cream), chilled, for the airy topping
- Maraschino cherries, for a classic banana split garnish and pop of color
- Chopped walnuts, for texture and a nutty flavor
- Chocolate syrup, for drizzling and a touch of indulgence
Gathering all your ingredients before you begin will make the process seamless and enjoyable.
Crafting Your No-Bake Banana Split Cake: A Step-by-Step Guide
Creating this stunning no-bake dessert is a surprisingly simple process, primarily involving mixing and layering. Follow these steps to assemble your masterpiece:
Step 1: Prepare the Initial Pudding Base
In a medium-sized mixing bowl, combine the 3 oz of vanilla pudding powder with 6 tablespoons of granulated sugar. Pour in 6.76 fl oz (200ml) of cold milk. Whisk these ingredients together vigorously until the pudding powder and sugar are completely dissolved and well incorporated. This ensures a smooth consistency from the start.
Step 2: Heat the Milk for the Pudding
Transfer the remaining 20.3 fl oz (600ml) of cold milk into a medium saucepan or pot. Place it over medium-high heat and bring the milk to a rolling boil. Keep an eye on it to prevent scorching.
Step 3: Combine and Thicken the Pudding
Once the milk reaches a boil, gradually add the pudding mixture from Step 1 into the hot milk while stirring constantly with a whisk. Continue to cook for approximately 2 minutes, maintaining constant stirring to prevent lumps from forming and to ensure the pudding thickens evenly. The mixture should become noticeably rich and smooth.
Step 4: Cool the Pudding
After the pudding has thickened to the desired consistency, remove the pot from the heat. Allow it to cool for a few minutes. Then, transfer the warm pudding into a clean bowl. Cover the surface directly with cling wrap (plastic film) to prevent a skin from forming as it cools. Set it aside to cool completely to room temperature, or even chill it slightly in the refrigerator for quicker cooling.
Step 5: Incorporate Butter into Cooled Pudding
In a separate clean bowl, gently whisk the softened room-temperature butter until it’s light and creamy. Once the pudding from Step 4 has cooled, gradually add it to the whisked butter, continuing to whisk until the two are fully combined and the mixture is smooth and velvety. Crucially, set aside 4 tablespoons of this rich pudding mixture; this portion will be used later for the crust.
Step 6: Prepare the Cream Cheese Filling
In yet another bowl, combine the room-temperature cream cheese and the sifted powdered sugar. Whisk these ingredients together thoroughly until the mixture is light, airy, and completely smooth with no lumps. Next, gently fold in the remaining pudding mixture (the portion you didn’t set aside in Step 5). Mix until everything is perfectly combined, creating a luxurious and creamy filling.
Step 7: Add Crushed Pineapple to the Filling
Carefully add the well-drained crushed pineapple to the cream cheese and pudding mixture. Using a spatula, gently fold the pineapple into the creamy base until it’s evenly distributed. Ensure the pineapple is very well drained to prevent excess moisture from compromising the filling’s texture.
Step 8: Prepare the Delightful Crust
In a large bowl, combine the finely crushed digestive biscuits (or graham crackers) with the unsweetened shredded coconut. Pour in the pineapple juice and the 4 tablespoons of pudding mixture that you reserved earlier. Mix all these ingredients together thoroughly until a moist, crumbly mixture forms. This blend will create a sturdy yet flavorful base for your cake.
Step 9: Form the Cake Base
Transfer the crumbly crust mixture to the bottom of your chosen serving container or dish (a 9×13 inch pan works well). Using the back of a spoon or your clean hands, press the mixture down firmly and evenly to create a compact, flat base. This ensures your crust holds together beautifully when sliced.
Step 10: Layer the Bananas and Creamy Filling
Arrange a single, even layer of freshly sliced bananas over the prepared crust. Quickly spread the cream cheese and pineapple pudding mixture evenly over the bananas. Ensure the layer is smooth and extends to the edges of the crust.
Step 11: Top with Whipped Cream
In a chilled mixing bowl, whip the heavy cream until stiff peaks form. Be careful not to over-whip, which can turn it grainy. Gently spread this light and airy whipped cream evenly over the pudding mixture, creating a beautiful, fluffy top layer.
Step 12: Garnish and Decorate
Now for the fun part – decorating! Arrange the maraschino cherries artfully over the whipped cream. Sprinkle the chopped walnuts generously over the entire surface. Finish by drizzling chocolate syrup in an appealing pattern over the top. This adds both visual appeal and a final burst of classic banana split flavor.
Step 13: Chill and Serve
Cover the cake carefully with plastic wrap or an airtight lid. Refrigerate the no-bake banana split cake for a minimum of 4 hours. This crucial chilling time allows all the layers to set properly, the flavors to meld beautifully, and the cake to firm up for clean slicing. For best results, overnight chilling is highly recommended. Once thoroughly chilled, slice, serve, and enjoy!
Expert Tips for the Perfect No-Bake Banana Split Cake
To ensure your no-bake banana split cake turns out absolutely perfect every time, consider these helpful tips:
- Quality Ingredients Matter: Use fresh, ripe (but not overripe) bananas. Ensure your cream cheese is full-fat for the best richness and texture in the filling.
- Proper Chilling is Key: Do not skimp on the refrigeration time. The 4-hour minimum is essential for the layers to set and the flavors to fully develop and meld. An overnight chill will yield even better results.
- Prevent Banana Browning: To keep your banana slices looking fresh, you can toss them lightly in a small amount of lemon juice or pineapple juice before layering. However, if serving immediately after the chilling period, this step isn’t strictly necessary as the pudding layer will cover them.
- Drain Pineapple Thoroughly: Excess moisture from the crushed pineapple can make your filling watery. Press it firmly in a fine-mesh sieve or paper towels to remove as much liquid as possible.
- Room Temperature Dairy: Ensure your butter and cream cheese are at proper room temperature. This allows them to cream together smoothly without lumps, creating a silky-textured filling.
- Whip Cream Cold: Use very cold heavy cream and a chilled bowl and whisk attachments for the best whipped cream results. This helps it whip up faster and achieve firm peaks.
- Even Layers: Take your time to spread each layer evenly. This not only makes the cake visually appealing but also ensures a balanced taste in every bite.
Creative Variations and Customizations
While the classic no-bake banana split cake is divine as is, feel free to get creative and personalize it to your taste:
- Different Fruits: Add or swap out fruits. Sliced strawberries, kiwi, or mandarins can add new dimensions of flavor and color.
- Nut Alternatives: If walnuts aren’t your preference, consider chopped pecans, almonds, or even roasted peanuts for a different nutty crunch.
- Sauce Swaps: Instead of chocolate syrup, try a drizzle of warm caramel sauce, strawberry sauce, or even a mixed berry coulis.
- Crust Variations: Experiment with different crushed cookies for the crust, such as vanilla wafers, shortbread, or even chocolate cookies for a darker base.
- Added Texture: For extra crunch, sprinkle a layer of mini chocolate chips or toasted coconut flakes between the layers or on top.
- Boozy Twist: For an adult-friendly version, a touch of rum extract or a tablespoon of rum can be added to the pudding or cream cheese layer.
Your New Favorite No-Bake Banana Split Cake
This easy no-bake banana split cake is more than just a dessert; it’s an experience. It brings together the joyous flavors of a classic treat with the convenience of a no-bake recipe, making it perfect for any occasion – from casual family dinners to festive celebrations. Its creamy layers, fruity bursts, and satisfying crunch make it an irresistible crowd-pleaser that will have everyone asking for your secret recipe. So, gather your ingredients, follow these simple steps, and prepare to delight your taste buds and impress your guests with this truly remarkable, effortlessly delicious banana split cake. Enjoy every refreshing, melt-in-your-mouth bite!