
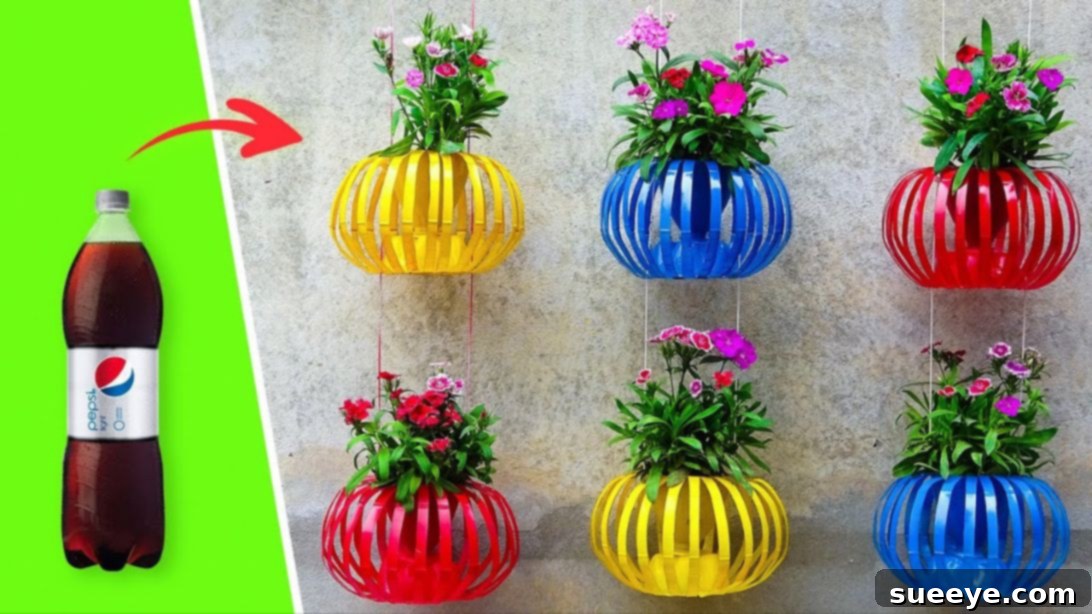
Transforming ordinary plastic bottles into dazzling hanging lantern flower pots is a remarkably fun, eco-friendly, and rewarding project perfect for breathing new life into your garden this spring. This ingenious idea, inspired by the creative minds at No1 Garden on YouTube, offers a simple yet impactful way to upcycle common household waste into beautiful decorative elements. Not only does it allow you to contribute positively to environmental sustainability by reducing plastic waste, but it also gives you the chance to craft unique, vibrant pieces that will undoubtedly make your outdoor space feel more alive and inviting. Imagine dozens of these colorful, illuminated pots swaying gently in the breeze, showcasing your favorite small plants or glowing softly as night falls. They are incredibly easy to create, making them an ideal DIY activity for crafters of all skill levels. With just a few basic materials and a touch of creativity, you can produce a multitude of these charming decorations, each in a different color to suit your aesthetic, and hang them strategically around your garden, patio, or balcony. Let’s delve into the full instructions and discover how you can bring this captivating project to life.
Why Upcycle Plastic Bottles for Your Garden Decor?
Embracing upcycling projects like these plastic bottle lantern flower pots offers a multitude of benefits, both for your home and the planet. Firstly, it’s a powerful step towards reducing waste. Millions of plastic bottles end up in landfills each year, taking hundreds of years to decompose. By repurposing them, you actively divert waste from these sites, contributing to a healthier environment. Secondly, upcycling is incredibly budget-friendly. Instead of purchasing expensive garden decorations, you can create stunning pieces using materials you already have, saving money while still achieving a beautiful outdoor aesthetic. Thirdly, it fosters creativity and provides a sense of accomplishment. Each finished lantern pot is a testament to your ingenuity and hands-on effort, allowing you to personalize your garden in a way that mass-produced items simply cannot. Plastic, being inherently durable and weather-resistant, is also an excellent material for outdoor use, ensuring your creations will withstand the elements and bring joy for seasons to come. This project isn’t just about making a craft; it’s about embracing sustainable living and adding a personal, eco-conscious touch to your sanctuary.
Materials You’ll Need: Gathering Your Tools for Transformation
Before you embark on this exciting upcycling adventure, ensure you have all the necessary materials neatly organized. Most of these items are readily available around the house or at any local craft or hardware store. Selecting the right tools and materials is key to a smooth and successful crafting experience.
- Plastic Bottles: Aim for various sizes, such as 1.5L or 2L soda bottles, as their sturdy construction works best. Ensure they are thoroughly cleaned and dry.
- Cutter or Utility Knife: A sharp utility knife or a craft knife is essential for precise cutting. Always exercise extreme caution when handling sharp tools.
- Marker: A permanent marker works best for drawing clear lines on the plastic, preferably one that can be easily wiped off later.
- Ruler: Crucial for ensuring straight lines and uniform spacing, which contributes significantly to the aesthetic appeal of your finished lantern.
- Cloth: A damp cloth or rubbing alcohol will be needed to wipe away any marker lines after cutting, ensuring a clean finish.
- Driller with Small Bit: A hand drill or power drill with a small bit (suitable for plastic and creating holes for wire/cord) will be necessary.
- Wire: A medium-gauge crafting wire, preferably galvanized or rust-resistant, will be used for holding the pot during painting and potentially for structural support.
- Spray Paint: Choose outdoor-friendly, weather-resistant spray paints in your preferred colors. Vibrant hues will make your lanterns pop, especially when illuminated.
- Cord or Twine: Strong decorative cord, twine, or thin rope (like nylon or jute) for hanging your finished flower pots. Ensure it’s durable enough to hold the weight of the pot and plant.
Step-by-Step Guide to Crafting Your Hanging Lantern Flower Pots
Step 1: Preparing Your Bottles and Marking for Precision
Begin by thoroughly cleaning your plastic bottles and carefully removing all labels, adhesive residue, and any other external markings. A clean surface is crucial for both marking and painting. Once clean and dry, take one bottle and use your ruler and marker to draw a circumferential line approximately one-third of the way down from the top. This will serve as your initial cutting guide. Next, draw another line just above the sturdy ‘feet’ or base of the bottle. Now, using your ruler, draw a series of parallel straight lines connecting these two horizontal guide lines, running vertically around the bottle. Ensure these vertical lines are spaced approximately 1/2-inch apart. Uniform spacing is key to achieving a neat and aesthetically pleasing lantern effect. These lines will define the strips that you will later twist and shape.
Step 2: Precision Cutting and Cleaning
With your lines clearly marked, it’s time for the cutting phase. **Safety first:** Always use a sharp blade or sturdy craft scissors with extreme caution. If using a utility knife, place the bottle on a stable, non-slip surface and cut away from your body. Carefully follow the lines you’ve drawn, cutting along all the vertical strips and then along the two horizontal guide lines to detach the main body section from the top and bottom remnants. This should leave you with a series of plastic strips connected at the top. Once all cuts are complete, use a damp cloth or a cloth dampened with rubbing alcohol to gently wipe away any visible marker lines from the plastic. This ensures a clean and professional finish for your lantern, preventing any unsightly ink from showing through your paint.
Step 3: Creating the Base Opening
Now, focus on the bottom section of the plastic bottle that you previously cut. You need to create an opening in the center of this base piece. The size of this hole is crucial: it should be large enough to accommodate the neck of the bottle, but not so large that the bottle cap won’t securely hold it in place. Carefully use your utility knife or a drill to cut or drill a clean, circular hole in the exact center of the bottle’s base. Precision here ensures a snug fit and a stable structure for your lantern flower pot. This hole will be essential for assembling the main body of the lantern in the subsequent steps.
Step 4: The Art of Twisting – Forming the Lantern Shape
This step is where the magic begins, transforming the cut strips into the elegant lantern shape. Take the top part of the bottle, which still has the neck and cap attached, along with the connected strips. Gently fold the entire top section downwards, towards the center of the cut strips. Hold this folded top firmly with one hand. With your other hand, begin carefully twisting each individual strip forward. As you twist each strip, it will naturally begin to coil and curve, pulling the top section further down and inverting its orientation. Continue twisting all the strips until the original top opening of the bottle (where the cap is) is now facing downwards, towards the bottom cut piece you prepared in Step 3. This twisting motion creates the distinctive lantern-like structure, giving volume and form to your creation.
Step 5: Securing the Structure – Assembly and Cap Preparation
Now that your lantern body is taking shape, it’s time to secure it. Carefully insert the inverted bottle neck (with the cap) through the hole you made in the separate bottom piece in Step 3. Push it through until the cap is snug against the base. Then, tightly close the bottle with its original cap, effectively locking the entire structure together. The cap now serves as the anchor point for the lantern body. With the cap securely in place, drill a small hole directly in the center of the cap. This hole will be used later for the hanging mechanism. Repeat this entire process with a second plastic bottle to create another identical piece, ensuring you have a pair of these beautiful structures ready for the next stages of transformation.
Step 6: Adding Color – Spray Painting Your Creations
This is where your lantern flower pots truly come to life with a splash of color! To make painting easier and ensure full coverage, insert a piece of wire through the small hole you drilled in the center of the cap in Step 5. This wire acts as a handle, allowing you to hold and rotate the pot without touching the wet paint. Take your preferred spray paint color – remember, weather-resistant paint is best for outdoor use – and begin applying thin, even coats to the entire surface of the plastic bottle structure. Spray in a well-ventilated area, preferably outdoors, and wear appropriate protective gear. Apply several thin coats rather than one thick coat to prevent drips and ensure a smooth, professional finish. Once painted, hang the pieces by their wires in a dry, dust-free area and allow them to dry completely according to the paint manufacturer’s instructions. Patience during this drying phase is crucial for a durable and beautiful result.
Step 7: Final Assembly – Adding Hanging Cords and Drainage
Once your painted lantern pots are completely dry, it’s time for the final touches. Using your drill, make two small holes on opposite sides of the inner rim of the top section of each lantern. These holes should be large enough to thread your chosen cord or twine through. Take two lengths of your decorative cord or twine. For each length, tie a secure knot at one end. Thread the unknotted end of each cord through one of the newly drilled holes from the outside in, so the knot sits snugly against the inner wall of the plastic, preventing the cord from pulling through. Now, measure approximately 10.6 inches (or your desired hanging length) from the knot, and tie another secure knot at this point. Repeat this for the second cord, ensuring both cords are of equal length for balanced hanging. Finally, take the second lantern piece you created and thread the unknotted ends of the cords from the first piece through its corresponding holes. This creates a multi-tiered hanging system. If you plan to use these as actual flower pots, consider drilling a few small drainage holes in the very bottom of the inverted cap to prevent waterlogging. Your stunning, upcycled hanging lantern flower pots are now complete and ready to adorn your garden with their unique charm and vibrant colors!
Customization Ideas for Unique Garden Art
While the basic design is beautiful on its own, there are countless ways to personalize your hanging lantern flower pots to perfectly match your garden’s aesthetic or express your unique style. Consider experimenting with different painting techniques; perhaps an ombre effect using two complementary colors, or stenciling intricate patterns onto the plastic for a more refined look. You could also add embellishments like beads, sequins, or small charms glued to the plastic strips for extra sparkle, especially when light catches them. Incorporate LED fairy lights or small battery-operated tea lights inside the lanterns, especially during evening gatherings, to transform them into true luminous features, casting a warm glow on your outdoor space. Play with different sizes and shapes of plastic bottles – larger soda bottles can create more substantial lanterns, while smaller water bottles might be perfect for a delicate display. When choosing plants, opt for compact varieties like succulents, small herbs, or trailing annuals that won’t outgrow their new homes too quickly. You can also mix and match cord materials, using colorful ribbons, rustic jute, or sleek nylon cords to add another layer of texture and visual interest. These customization options ensure that each lantern flower pot you create is a one-of-a-kind piece of art, perfectly tailored to your vision.
Tips for Maintaining Your DIY Lantern Flower Pots
To ensure your beautiful upcycled lantern flower pots continue to adorn your garden for a long time, a little maintenance goes a long way. Since they are exposed to the elements, periodic cleaning will keep them looking fresh. A gentle wipe-down with a damp cloth can remove dust and dirt buildup. If you used weather-resistant spray paint, it should hold up well against sun and rain, but extremely harsh conditions or prolonged direct sunlight might cause some fading over several seasons. In such cases, a light re-spray can rejuvenate their appearance. For the plants housed within, remember to choose varieties that thrive in containers and are suitable for your local climate. Ensure adequate drainage (if you added holes in Step 7) to prevent root rot. Depending on the plant, regular watering and occasional feeding might be necessary. During severe winter weather, you might consider bringing more delicate plants and their pots indoors to protect them from frost and extend their lifespan. By providing a little care, your eco-friendly garden decor will remain a vibrant and charming feature of your outdoor sanctuary.
Environmental Impact and the Joy of Upcycling
This project goes beyond merely crafting; it’s a testament to the power of upcycling and its significant environmental benefits. Every plastic bottle transformed into a hanging lantern flower pot is one less bottle contributing to landfill overflow or polluting our oceans. By choosing to reuse, you reduce the demand for new plastic production, which in turn conserves energy, water, and raw materials. It’s a small but meaningful step towards a more circular economy and a more sustainable lifestyle. The joy of upcycling also lies in the creative challenge it presents. It encourages us to look at discarded items not as waste, but as resources brimming with potential. Sharing your creations and the story behind them can also inspire others in your community to embrace similar eco-conscious practices, creating a ripple effect of positive change. So, as you hang your vibrant, handmade lantern flower pots, take pride in knowing that you’ve not only beautified your home but also made a tangible contribution to protecting our planet, one plastic bottle at a time. It’s a wonderful reminder that sustainability and beauty can go hand in hand.
Recycling Plastic Bottles into Hanging Lantern Flower Pots: Your Next Creative Endeavor
We hope this detailed guide empowers you to embark on this delightful journey of transforming everyday plastic bottles into captivating hanging lantern flower pots. Inspired by the ingenuity of No1 Garden, this project is a perfect blend of creativity, sustainability, and garden aesthetics. Whether you’re looking to add a whimsical touch to your patio, create a vibrant display for your balcony, or simply find a fulfilling DIY craft, these upcycled creations are an excellent choice. Gather your materials, follow the steps carefully, and don’t hesitate to infuse your unique style into each piece. Once completed, these vibrant and eco-friendly decorations will undoubtedly become conversation starters and cherished additions to your outdoor living space. Get ready to illuminate your garden with your very own handmade masterpieces!