
DIY 5-Gallon Bucket Deer Feeder: An Easy & Effective Guide
For many property owners, especially those living in areas rich with wildlife like the picturesque Texas Hill Country, the sight of deer gracefully roaming through the landscape is a common and cherished experience. However, these beautiful creatures often necessitate a thoughtful approach to wildlife management, whether it’s to draw them closer for observation, provide supplemental nutrition, or divert them from prized garden plants. Commercial deer feeders can be expensive and complex, but what if there was a simple, highly effective, and incredibly affordable solution?
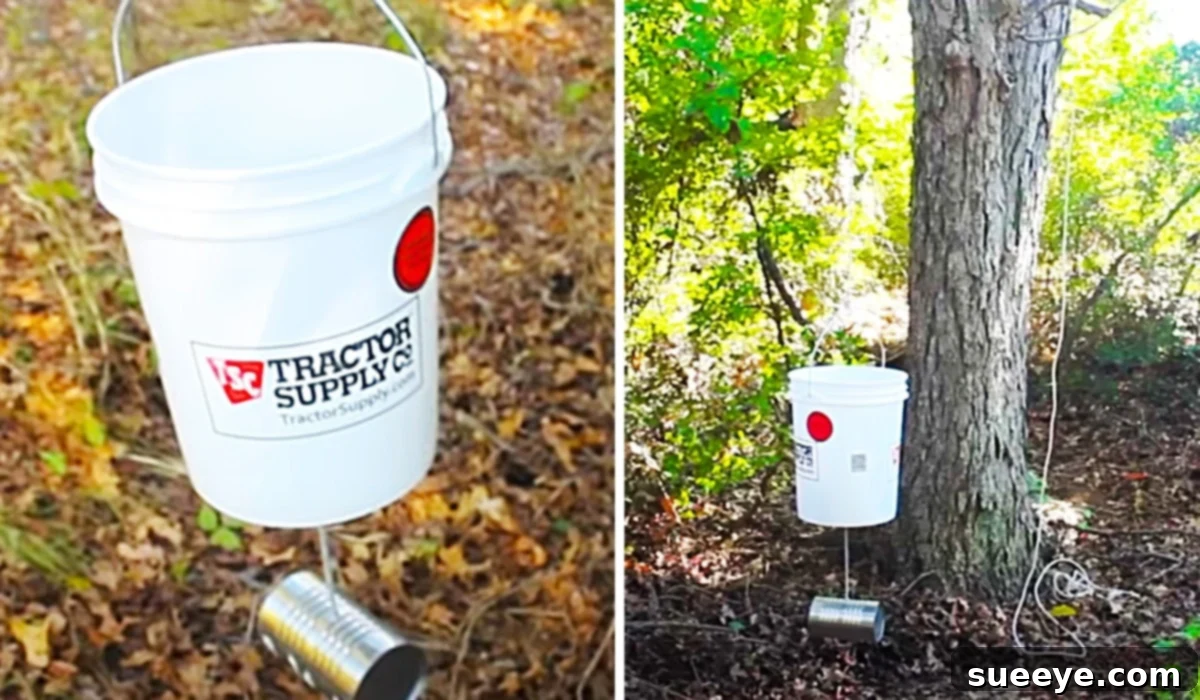
That’s exactly what we discovered with the ingenious 5-gallon bucket deer feeder concept popularized by Cooters Garage on YouTube. This brilliant DIY project transforms readily available materials into a functional and reliable feed dispenser that deer quickly learn to operate. The simplicity of Cooter’s design is its greatest strength, making it accessible for anyone to build, regardless of their DIY experience. It’s a gravity-fed system that dispenses deer corn as animals nudge a can, ensuring they get their treat while minimizing waste and spoilage. Before diving into the construction, you simply must watch Cooter’s delightful explanation of his creation – his enthusiasm is infectious!
Why Choose a DIY 5-Gallon Bucket Deer Feeder?
The decision to build your own deer feeder, especially one as straightforward as the 5-gallon bucket design, comes with a multitude of benefits:
- Cost-Effectiveness: Compared to store-bought feeders that can cost hundreds of dollars, this DIY project utilizes inexpensive and often recycled materials, making it incredibly budget-friendly.
- Simplicity of Construction: With minimal tools and basic steps, even a novice can assemble this feeder in a short amount of time.
- Durability and Customization: While simple, the design is robust. You can also customize its placement, height, and even reinforce it for added longevity.
- Engagement with Wildlife: A well-placed feeder allows for easier observation of deer, offering a closer look at their behavior and contributing to a richer understanding of local ecosystems.
- Supplemental Feeding: During harsh winter months or periods of drought when natural forage is scarce, supplemental feeding can help deer maintain their health and vitality.
- Diverting Deer: Strategically placed feeders can sometimes help draw deer away from sensitive areas like gardens or young tree saplings, protecting your landscaping.
- Educational Project: Building this feeder can be a fantastic educational activity for families, teaching practical skills and fostering an appreciation for nature.
Essential Materials for Your Deer Feeder Project
Gathering the right materials is the first step towards a successful DIY project. For this efficient 5-gallon bucket deer feeder, you’ll need a few common items:
- A Sturdy 5-Gallon Bucket: The foundation of your feeder. Choose a clean, food-grade bucket if possible, as it will hold the deer feed. Ensure it has a strong handle if you plan to hang it by that.
- A Length of Durable Rope: Approximately 10-15 feet of strong, weather-resistant rope (nylon, polypropylene, or similar) will be needed for hanging and securing the feeder.
- A Tin Can (Standard Size): This will serve as the dispensing mechanism. An empty food can (e.g., vegetable, soup can) works perfectly. Ensure it’s clean and free of sharp edges.
- A Drill: Essential for creating the feed dispensing hole in the bucket and attachment holes for the wood. A power drill with various bit sizes will be ideal.
- A Piece of Wood (Approx. 1×4 inch, 6-8 inches long): This piece of wood acts as an internal baffle, guiding the feed towards the dispensing hole. Treated wood or a naturally rot-resistant species is recommended for outdoor use.
- Two Weather-Resistant Screws (approx. 1.5-2 inches long): To securely attach the piece of wood to the bottom of the bucket. Stainless steel or galvanized screws will prevent rust.
- Plenty of Deer Corn: The primary feed for your dispenser. Ensure you have enough to fill your feeder and attract your first visitors!
Optional Materials for Enhanced Performance:
- Sealant/Caulk: To seal around the drilled hole if you’re concerned about moisture.
- Spray Paint (Camouflage or Earth Tones): To help the feeder blend into its natural surroundings.
- Bungee Cords or Extra Rope: For additional securing of the feeder to a tree or post.
- Heavy-Duty Eye Bolt: If you prefer a more permanent hanging solution for the bucket.
Step-by-Step Directions: Building Your 5-Gallon Bucket Deer Feeder
The beauty of this feeder lies in its simplicity. Follow these easy steps to construct your own:
Step 1: Prepare the Bucket for Feed Dispensing
Carefully turn your 5-gallon bucket upside down. Using your drill, create a circular hole in the exact center of the bucket’s bottom. The size of this hole is crucial: it should be large enough for deer corn to pass through easily but not so large that it floods out all at once. A good starting point is a 1.5 to 2-inch diameter hole. You may need to experiment slightly based on the size of your corn. Ensure the edges are smooth to prevent any snagging or injury to deer.
Step 2: Attach the Wood Baffle
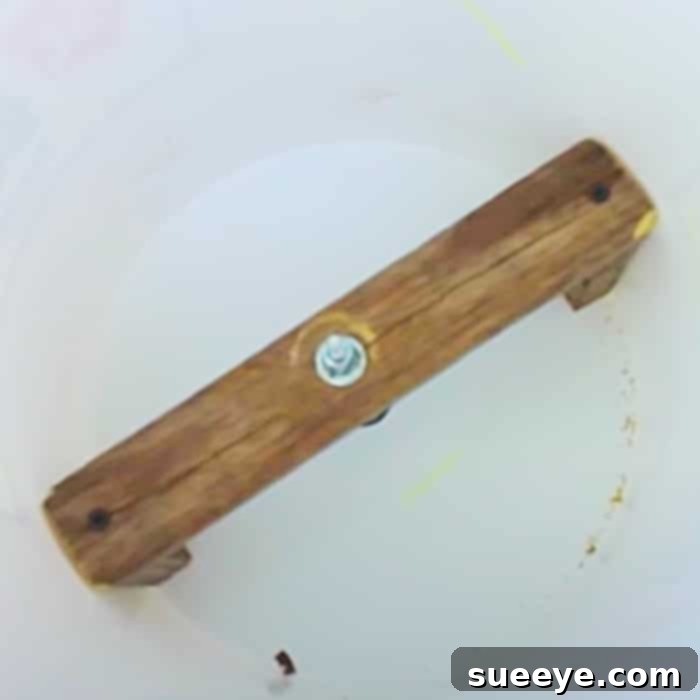
Take your piece of wood (approximately 1×4 inches, 6-8 inches long). Center it over the hole you just drilled on the inside of the bucket. This piece of wood will act as a baffle, directing the corn flow and providing a surface for the deer to nudge. Using your drill and the two weather-resistant screws, securely attach the wood to the bottom of the bucket, ensuring it’s firmly in place. The wood should bridge the hole, leaving a gap on either side for the corn to flow through. The gap should be just enough for the corn to trickle out when the feeder is agitated.
Step 3: Secure the Tin Can
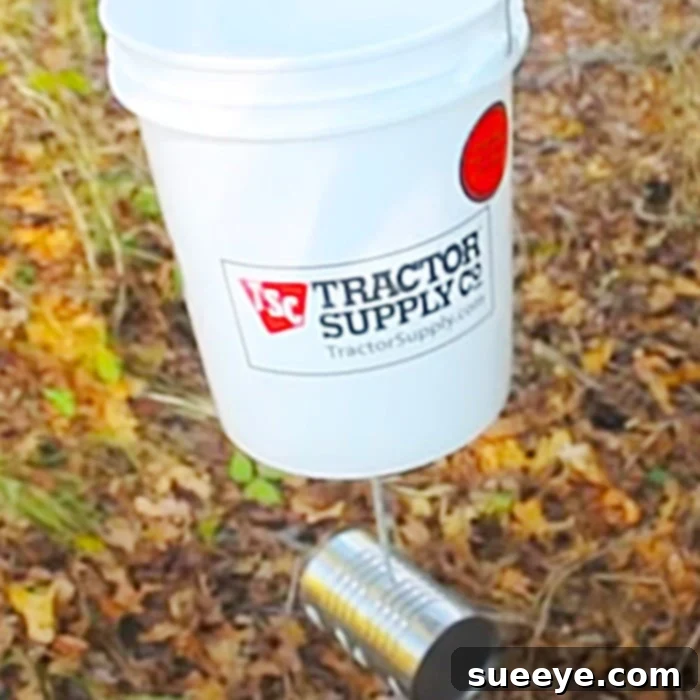
The tin can is the interactive element of this feeder. It needs to be attached to the very bottom of the bucket, positioned directly beneath the dispensing hole and the wooden baffle. The idea is that when a deer nudges or licks the can, it will lightly rattle the bucket, causing a small amount of corn to fall out. You can attach the can using small screws, strong adhesive, or even by drilling small holes in the can and wiring it to the bucket (ensure no sharp points are exposed). The can should hang freely enough to be moved by a deer’s snout.
Step 4: Prepare for Hanging
Now, prepare your feeder for deployment. If your bucket has a sturdy metal handle, you can use that for hanging. Alternatively, you can drill two small holes near the rim of the bucket on opposite sides and thread your rope through them, tying secure knots. The rope will be used to suspend the feeder from a tree branch or a suitable support structure.
Installation and Optimal Placement Tips
The success of your 5-gallon bucket deer feeder isn’t just in its construction, but also in its strategic placement. Consider these factors for optimal results:
- Choose the Right Location: Look for areas where deer naturally travel, such as near game trails, wooded edges, or transitional zones between forests and open fields. A secluded spot will make deer feel safer approaching the feeder.
- Select a Sturdy Branch: Find a strong, horizontal tree branch capable of supporting the full weight of the feeder (a 5-gallon bucket of corn can be heavy!).
- Height is Key: Hang the feeder at a height that allows deer easy access to the tin can, typically 3-4 feet off the ground. This also helps deter smaller critters like raccoons, though determined ones might still find a way.
- Secure the Feeder: Once hung, use additional rope or bungee cords to secure the bucket to the branch or tree trunk to prevent it from swinging excessively in the wind or being dislodged by animals.
- Consider Shade and Drainage: Placing the feeder in a shaded area can help keep the corn dry and fresh for longer. Ensure the immediate ground area allows for good drainage to prevent mud buildup.
- Proximity to Water: Deer need water, so placing the feeder relatively close to a natural water source can increase its attractiveness.
Choosing the Right Feed for Your Deer
While this feeder works with various types of feed, deer corn is the most common and cost-effective choice. Here are some considerations:
- Whole vs. Cracked Corn: Whole corn is generally preferred as it is less prone to spoilage and clumping. Cracked corn can be used but might attract more birds and small rodents.
- Protein Pellets: For enhanced nutrition, especially during fawning season or harsh winters, you might consider mixing in specialized deer protein pellets. Ensure they are suitable for gravity feeders.
- Mineral Supplements: While not directly for the feeder, placing a mineral block nearby can provide essential nutrients.
- Avoid Human Foods: Never feed deer human food items like bread, pastries, or processed snacks, as these can be detrimental to their digestive systems and overall health.
Maintenance and Ethical Considerations
Maintaining your feeder and adhering to ethical wildlife feeding practices are crucial for the health of the deer and your local ecosystem:
- Regular Cleaning: Periodically empty and clean your bucket to prevent mold growth, insect infestations, and spoilage of corn.
- Inspect for Damage: Check the rope, bucket, and wood for wear and tear, replacing components as needed to ensure the feeder remains functional and safe.
- Monitor Feed Levels: Refill regularly to ensure a consistent food source.
- Local Regulations: Before setting up any deer feeder, familiarize yourself with local and state wildlife feeding regulations. Some areas have restrictions or prohibitions on feeding deer to prevent disease transmission or altered migration patterns.
- Disease Prevention: Avoid overcrowding. If you notice an unusually large number of deer congregating, it might be worth considering reducing feeding or spreading out multiple feeders to minimize the risk of disease transmission.
- Balance with Natural Foraging: Supplemental feeding should complement, not replace, natural foraging. The goal is to assist, not create dependency.
Troubleshooting Common Feeder Issues
Even with a simple design, you might encounter a few minor issues. Here’s how to troubleshoot them:
- Corn Not Dispensing:
- Hole Size: The dispensing hole might be too small. Carefully enlarge it a bit.
- Clumping: Moisture might be causing the corn to clump. Ensure your feeder is adequately protected from rain.
- Obstruction: Check if a larger piece of debris or a foreign object is blocking the flow.
- Other Animals Accessing the Feeder:
- Height Adjustment: Raising the feeder higher can deter raccoons and smaller animals, though deer will still need to reach the can.
- Feeder Guards: While this feeder is simple, you could consider adding a wider ‘umbrella’ or baffle above the bucket to deter climbing animals from reaching the feed from above.
- Timing: If local regulations allow, only fill the feeder during peak deer activity times, usually dawn and dusk.
- Feeder Falling or Swinging Too Much:
- Rope Security: Ensure all knots are tight and the rope itself is in good condition.
- Multiple Anchor Points: Use additional ropes to tie the feeder directly to the tree trunk to minimize swing.
Start Your DIY Deer Feeder Project Today!
Creating your own 5-gallon bucket deer feeder is a rewarding project that offers a unique connection to the natural world. It’s a testament to the power of simple innovation, turning common items into a functional tool for wildlife enthusiasts. Whether you’re in the Texas Hill Country or any other region, this easy-to-build feeder is a fantastic way to engage with the deer on your property, provide them with a little extra sustenance, and enjoy the beauty of nature right from your backyard.
So, gather your materials, watch Cooter’s inspiring video on Cooters Garage on YouTube, and get ready to welcome some new visitors to your outdoor space. Share your creations and experiences with us – happy feeding!