
Few experiences are as unsettling as having a ring stubbornly stuck on your finger. It’s a moment often accompanied by growing panic, frantic pulling, and the frustrating realization that every attempt only seems to make the situation worse, causing your finger to swell even further. If you’ve ever found yourself in this tight spot, you know the stress firsthand. But rest assured, you are not alone; countless individuals have faced this exact dilemma. The good news is that there’s a remarkably effective and surprisingly simple solution that works like magic, demonstrated by DaveHax on YouTube. This brilliant trick can help you safely remove a stuck ring from your finger in mere minutes, using common household items you likely already have on hand. Say goodbye to the fear of a trapped ring and hello to a clever, injury-free escape method that promises relief and peace of mind.
Understanding Why Rings Get Stuck: More Than Just a Tight Fit
Before diving into the solution, it’s helpful to understand why rings get stuck in the first place. This common predicament isn’t always about a ring being too small; often, it’s about changes in your body or environment that cause your finger to swell. Recognizing these factors can not only help you address the current situation but also prevent future occurrences. Common culprits include:
- Temperature Fluctuations: Hot weather, humidity, or even strenuous exercise can cause your fingers to swell as blood vessels expand. Conversely, very cold temperatures can make rings feel loose.
- Weight Changes: Significant weight gain, even a few pounds, can impact finger size and make rings feel uncomfortably tight.
- Injury or Trauma: A bump, bruise, sprain, or any other injury to the finger can lead to rapid swelling, trapping a ring.
- Fluid Retention: Certain medications, dietary habits (especially high sodium intake), hormonal changes (like during pregnancy or menstruation), and underlying health conditions can all contribute to fluid retention and swelling in the extremities.
- Allergic Reactions: Contact dermatitis from certain metals or chemicals can cause skin irritation and localized swelling.
- Arthritis or Joint Issues: Conditions like arthritis can cause knuckles to enlarge over time, making it difficult to remove rings that once fit perfectly.
- Ill-Fitting Rings: Sometimes, the simplest explanation is the right one: the ring was never properly sized, or your finger size has subtly changed over the years without you noticing.
The crucial point is that when your finger swells, pulling aggressively on the ring only exacerbates the problem. Forceful tugging can increase inflammation, further constricting blood flow and making the ring even harder to remove. This is precisely why gentle, clever methods are paramount for safe and effective ring removal.
The Ingenious Ribbon Method: Your Step-by-Step Guide to Freedom
This method, popularized by DIY experts, offers a simple yet highly effective way to slide a stuck ring over a swollen knuckle without pain or damage. It leverages basic principles of compression and lubrication to achieve what forceful pulling cannot. Here’s how you can replicate this “magic” at home and how to remove a stuck ring from your finger easily:
Materials You’ll Need:
- Thin Ribbon or String: A piece approximately 12-18 inches long. Dental floss (preferably waxed), a strong thread, or even a thin shoelace can work as excellent alternatives. The key is its thinness and strength.
- Toothpick or Small, Blunt Object: Essential for guiding the ribbon under the ring if it’s too tight to thread by hand.
- Dish Soap or Lubricant: Any liquid soap, petroleum jelly, lotion, or even cooking oil can serve this purpose. Dish soap is often ideal due to its slipperiness and ease of washing off.
Detailed Directions for Ring Removal:
Step 1: Stay Calm and Prepare Your Hand. The first and most crucial step is to remain calm. Panic can increase blood pressure and swelling. If possible, elevate your hand above your heart for a few minutes. This can sometimes help reduce swelling slightly due to gravity. Ensure your hand is clean and dry before you begin, as this will help the lubricant work more effectively.
Step 2: Thread the Ribbon Under the Ring. Take one end of your thin ribbon (or dental floss). Carefully slide it underneath the stuck ring. This can be the trickiest part, especially if the ring is very tight against your skin. If you’re struggling, use a toothpick, a small crochet hook, or the flat end of a bobby pin to gently push and guide the ribbon through. The goal is to get one end of the ribbon completely through the ring and pointing towards your palm, while the other longer end is pointing towards your fingertip.
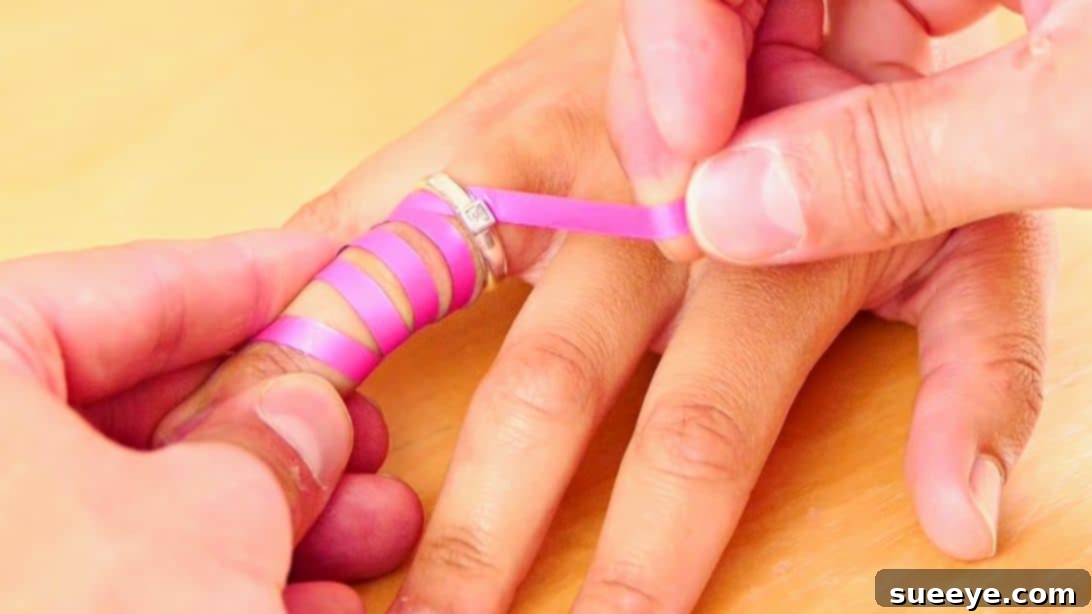
Step 3: The Strategic Wrapping. Once the ribbon is successfully threaded, take the longer end that is pointing towards your fingertip. Begin to wrap this ribbon tightly, but comfortably, around your finger, starting from just above the ring and continuing down past your knuckle. Each wrap should be snug, pressing the swollen flesh of your finger inward, effectively reducing its circumference. Ensure the wraps are close together, creating a smooth, compressed path for the ring to travel. Don’t wrap so tightly that it causes pain, numbness, or discoloration; the aim is compression, not constriction. Wrap down your finger for about an inch or two beyond the knuckle, providing a sufficient pathway for the ring to slide over.
Step 4: Lubricate for an Easier Slide. Now, take your dish soap or chosen lubricant and apply a generous amount over the wrapped ribbon and the ring itself. The lubricant will significantly reduce friction, allowing the ring to slide more smoothly over the compressed finger and wrapped ribbon. Don’t be shy with the soap; a good amount ensures maximum slipperiness. This step is key to facilitating the smooth movement of the ring, especially over the wider part of your knuckle.
Step 5: The Gentle Unwrapping and Release. Hold the short end of the ribbon (the one threaded under the ring and pointing towards your palm). Begin to slowly and steadily unwrap the ribbon from your finger, pulling it gently towards the tip of your finger. As you unwrap, the ring will be pushed along the compressed path created by the ribbon. The combination of the ribbon’s sustained pressure and the lubricant will help the ring glide over your knuckle and off your finger. Continue this motion until the ring is completely loose and can be removed. Patience is key here; a slow, controlled unwrapping is far more effective than a quick, jerky one, ensuring a smooth and pain-free removal. If it feels too difficult, re-lubricate and try again.
What if You Don’t Have Ribbon? The Dental Floss Alternative
If you don’t have a thin ribbon, dental floss is an excellent substitute, and many people find it even easier to work with due to its strength and thinness. Use a long piece of waxed dental floss (waxed slides much better than unwaxed). Follow the same steps: thread it under the ring, wrap it snugly around your finger from the base of the ring down past the knuckle, apply lubricant generously, and then gently unwrap it while pulling the short end towards the fingertip. For dental floss, wrapping it a few extra times might be beneficial to ensure good compression and a sturdy pathway for the ring to follow.
Important Safety Precautions: Prioritizing Your Well-being
While this method is generally safe and highly effective for how to remove a stuck ring from finger easily, it’s crucial to approach the situation with caution and prioritize your finger’s safety:
- Never Force It: If you feel extreme pain or the ring isn’t budging after several attempts, do not continue to force it. Excessive pressure can cause further injury, damage to the finger, or even restrict blood flow.
- Monitor for Distress: Pay close attention to your finger’s condition. If it turns blue or purple, becomes numb, tingles, or experiences increased pain, stop immediately. These are serious signs of compromised circulation and require immediate attention.
- Avoid Sharp Objects: Do not use knives, scissors, or other sharp tools near your finger or ring in an attempt to cut it off yourself. This poses a significant risk of injury to your hand and finger.
- Choose Safe Lubricants: Stick to skin-safe lubricants like dish soap, hand lotion, petroleum jelly, or vegetable oil. Avoid industrial lubricants, harsh chemicals, or anything that could irritate your skin or cause an allergic reaction.
When Professional Help is Necessary: Recognizing the Limits of DIY
While the ribbon method is incredibly successful for most cases of a stuck ring on finger, there are instances where professional intervention is required. It’s vital to know when to stop your attempts and seek expert help:
- Persistent Swelling and Pain: If your finger remains severely swollen, painful, or discolored after multiple attempts to remove the ring, it’s time to see a doctor.
- Signs of Infection or Injury: If there’s an open wound, signs of infection (redness, warmth, pus, fever), or you suspect a fracture or severe sprain underneath the ring, seek immediate medical attention.
- Numbness or Tingling: These symptoms indicate potential nerve compression or severe circulatory issues, requiring urgent medical assessment.
- After Trauma: If the ring became stuck after an injury (like a fall, crush, or impact), it’s always best to have a healthcare professional assess the situation to rule out underlying damage.
Emergency rooms, fire departments, and even professional jewelers are equipped with specialized ring cutters that can safely remove rings without harming your finger. Don’t hesitate to seek their assistance; it’s what they are there for, and their expertise can prevent serious complications.
Preventing Future Stuck Rings: A Proactive Approach
Once you’ve successfully managed to remove a stuck ring, consider adopting some proactive measures to prevent this stressful situation from recurring:
- Get Professionally Sized: Have your fingers measured by a reputable jeweler periodically, especially if your weight or lifestyle changes significantly. Remember that finger size can fluctuate throughout the day and with different temperatures.
- Remove Rings During Specific Activities:
- Exercise: Swelling is common during physical activity due to increased blood flow.
- Gardening or Manual Labor: To avoid dirt buildup under the ring, injury, or potential swelling.
- Showering/Bathing: While soap can make rings slippery, moisture and some soaps can cause irritation if trapped, or the ring could accidentally slip off and be lost.
- Sleeping: Some people experience mild swelling overnight, making rings feel tighter in the morning.
- Flying: Cabin pressure changes during flights can lead to fluid retention and swelling in the extremities.
- Stay Hydrated and Manage Diet: Proper hydration can help minimize fluid retention throughout your body, and reducing high-sodium foods can also contribute to preventing finger swelling.
- Listen to Your Body: If a ring feels unusually tight or uncomfortable, remove it promptly before it becomes a major problem. Don’t wait until it’s painfully stuck.
- Regular Cleaning: Keep your rings and fingers clean. Debris buildup under the ring can sometimes make removal more difficult and also irritate the skin.
*These amazing images are all credited to DaveHax via YouTube. Check his other content and follow for more clever tips and tricks!
How To Remove Stuck Ring From Finger Easily: A Final Word
Having a ring stuck on your finger can be a genuinely alarming experience, but with the right technique, it doesn’t have to lead to panic or injury. The ribbon or dental floss method, as elegantly demonstrated by DaveHax, stands out as a brilliant, accessible, and safe solution for retrieving your precious jewelry from a swollen finger. By understanding why rings get stuck, preparing properly, and executing the steps with patience and care, you can effectively tackle this common problem at home. Remember to prioritize safety above all else, and don’t hesitate to seek professional help if your efforts aren’t successful or if you experience any concerning symptoms. Armed with this knowledge, you can confidently navigate the challenges of a stuck ring and get back to wearing your jewelry comfortably, knowing you have a reliable method at your fingertips for how to remove a stuck ring from finger easily and safely.