
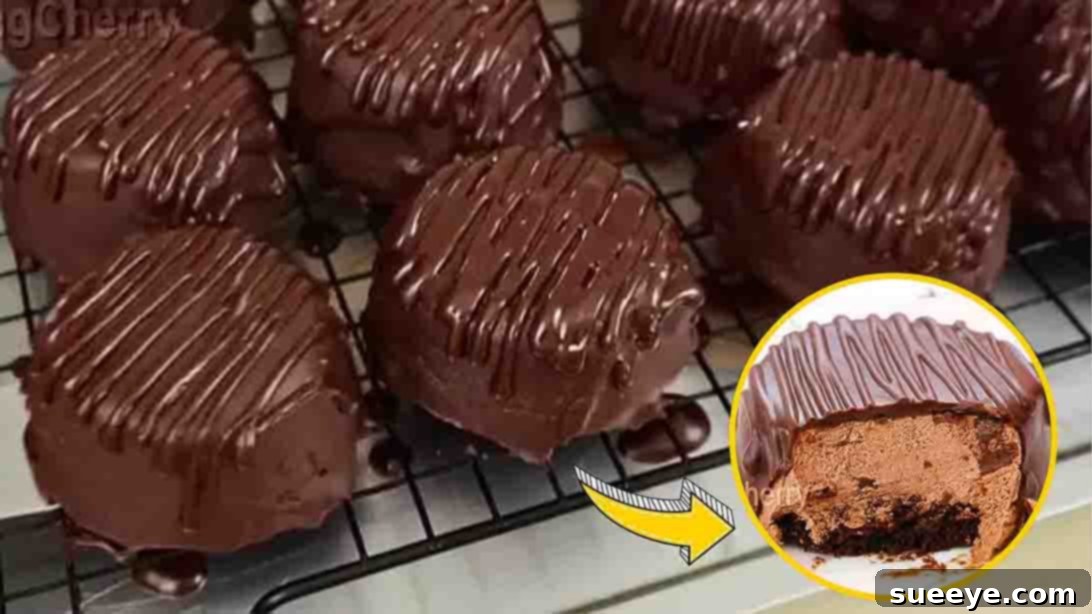
Are you on the hunt for the ultimate chocolate dessert that promises to captivate and delight? Look no further! This exquisite recipe for Mini Chocolate Mousse Cakes, elegantly presented by the creative minds at Baking Cherry, is an absolute showstopper. Imagine a symphony of chocolate in every bite: a tender, rich chocolate cake base crowned with a light and airy chocolate mousse, all enveloped in a luxurious chocolate ganache. These individual desserts are not just treats; they are miniature culinary experiences, perfect for elevating any occasion, from elegant dinner parties and festive gatherings to a cozy evening indulgence when only the finest chocolate will do. Prepare to create a dessert that will be remembered long after the last crumb is savored.
RELATED: No-Bake Easy Chocolate Mousse Cake
The allure of this recipe extends beyond its stunning appearance and decadent taste; it’s also remarkably accessible for home bakers of all skill levels. Despite their sophisticated presentation, these mini chocolate mousse cakes are surprisingly easy to prepare. Whether you’re a seasoned baker or taking your first steps into the world of dessert making, the clear, concise, and detailed instructions ensure a smooth and enjoyable process. You’ll be amazed at how effortlessly you can craft a dessert that rivals creations from professional patisseries. This recipe minimizes complexity while maximizing flavor and visual appeal, offering a truly rewarding baking experience. Get ready to impress your guests and satisfy your deepest chocolate cravings with these heavenly mini cakes.
To embark on this delightful journey of creating the perfect chocolate mousse cakes, you’ll need a selection of high-quality ingredients for each distinct layer. Paying attention to the quality of your chocolate and cocoa powder will significantly enhance the final taste and richness of your dessert. Ensure all perishable ingredients, especially eggs and heavy cream, are fresh and correctly tempered for optimal results.
Ingredients:
For the Moist Cake Base:
- 1 large egg, ideally at room temperature for better emulsion
- 1/4 cup brown sugar (or white granulated sugar), to add sweetness and moisture
- 1/4 cup vegetable oil, contributing to the cake’s tender crumb
- 1/4 cup all-purpose flour, the primary structure-builder for the cake
- 2 tbsp unsweetened cocoa powder, for a deep chocolate flavor in the base
- 1/4 tsp baking powder, to give the cake its light lift
- A pinch of salt, to enhance and balance the sweet chocolate flavors
For the Velvety Chocolate Mousse:
- 2/3 cup sweetened condensed milk, providing richness and sweetness without extra sugar
- 1/4 cup unsweetened cocoa powder, for intense chocolate flavor in the mousse
- 3 tbsp cold water, to hydrate the gelatin
- 2 tsp powdered gelatin, the key ingredient for setting the mousse
- 1 cup heavy cream, chilled, to be whipped into light and airy perfection
For the Decadent Chocolate Topping:
- 1 1/2 cups semi-sweet chocolate, ensuring a balanced sweet and bitter profile for the glaze
- 1/2 cup unsalted butter, softened at room temperature, for a smooth, glossy, and rich topping
Directions:
Step 1: Crafting the Tender Cake Base
Begin by preparing your cake base, which will serve as the perfect foundation for your mini mousse cakes. Crack one large egg into a spacious mixing bowl. It’s best if the egg is at room temperature, as this allows it to incorporate more smoothly with other ingredients, resulting in a more cohesive batter. To the egg, add 1/4 cup of brown sugar (white sugar can be substituted if preferred) and 1/4 cup of vegetable oil. Whisk these wet ingredients together vigorously for approximately one minute. This initial whisking helps to aerate the mixture and dissolve the sugar, creating a light and homogenous base.
Next, it’s time to incorporate the dry ingredients. Sift 1/4 cup of all-purpose flour, 2 tablespoons of unsweetened cocoa powder, 1/4 teaspoon of baking powder, and a pinch of salt directly over your wet mixture. Sifting is a crucial step as it removes any lumps and ensures the dry ingredients are evenly distributed, contributing to a smoother batter and a finer cake crumb. Gently stir all ingredients together until they are just combined. Be careful not to overmix, as overdeveloping the gluten in the flour can lead to a tough cake. The moment you see no dry streaks, stop mixing.
Prepare a standard muffin pan by greasing each cup thoroughly with a nonstick cooking spray or butter. This ensures your cake bases will release easily after baking. Scoop about one tablespoon of the prepared cake batter into the bottom of each muffin cup. Aim for even distribution to ensure uniform mini cakes. Place the muffin pan into a preheated oven set at 350 degrees F (175 degrees C) and bake for exactly ten minutes. Once baked, remove the pan from the oven and let the cake bases cool in the pan for about five minutes. This short cooling period allows them to firm up slightly, making them easier to handle. Then, using a small, thin spatula, carefully remove each mini cake from its mold and transfer them to a wire rack to cool completely. While your cake bases are cooling, you can efficiently move on to preparing the decadent chocolate mousse.
Step 2: Preparing the Silky Chocolate Mousse
Now, let’s create the star of the show: the rich and silky chocolate mousse. In a clean mixing bowl, combine 2/3 cup of sweetened condensed milk with 1/4 cup of unsweetened cocoa powder. Whisk these two ingredients thoroughly until the cocoa powder is completely dissolved and you achieve a smooth, uniform chocolate paste. This ensures there are no powdery lumps in your final mousse, resulting in a perfectly smooth texture.
In a separate, small heat-proof container, add 3 tablespoons of cold water. Sprinkle 2 teaspoons of powdered gelatin over the water. Do not stir it immediately. Allow the gelatin to sit undisturbed at room temperature for about five minutes. This critical step, known as “blooming,” allows the gelatin granules to fully absorb the water, ensuring they dissolve smoothly later without forming clumps. Once bloomed, microwave the gelatin mixture for about 15 seconds. Be careful not to overheat it, as excessive heat can reduce the gelatin’s setting power. It should be just warm enough to fully dissolve the granules into a clear liquid. Add this dissolved gelatin directly into your chocolate and condensed milk mixture. Stir continuously until the gelatin is fully incorporated and the mixture is smooth and glossy. Set this chocolate mixture aside for a moment.
In another clean, chilled bowl, beat 1 cup of cold heavy cream using a handheld electric mixer or a stand mixer fitted with a whisk attachment. Start on low speed and gradually increase to medium-high until the cream forms soft peaks. Cold cream whips best and achieves the desired volume and stability. Once you have soft peaks, carefully add about half of the whipped cream into your prepared chocolate-gelatin mixture. Gently fold the whipped cream into the chocolate mixture using a spatula. Use a cutting motion, lifting from the bottom of the bowl and folding it over, then turning the bowl. The goal is to incorporate the cream without deflating the air you’ve just whipped in, which is essential for a light and airy mousse.
Step 3: Assembling the Mini Mousse Cakes and Preparing the Topping
Once the first half of the whipped cream is smoothly incorporated into the chocolate mixture, it’s time to add the remaining whipped cream. Continue to fold it in gently, using the same technique, until the mixture is uniformly smooth and light. Be careful not to overmix, as this can cause the mousse to lose its airy texture. The final mousse should be consistently smooth and light, ready to be piped.
Take a clean muffin pan, or reuse the one from the cake bases after cleaning, and lightly grease each cup with cooking spray. This step is important to ensure your delicate mousse cakes can be easily removed once set. Carefully fill each muffin cup with the prepared chocolate mousse, aiming for about two-thirds full. This leaves sufficient space for the cake base and allows the mousse to settle nicely. Next, gently place one of your cooled mini cake bases on top of the mousse in each cup. Lightly press each cake base down until it creates a flat, even surface, nesting perfectly into the mousse. This helps to bond the two layers and provides a stable structure for your mini cakes.
After assembling the cakes in the muffin pan, cover the entire pan tightly with plastic wrap. This prevents the mousse from absorbing any odors from the refrigerator and helps maintain its moisture. Place the covered muffin pan in the refrigerator and chill for a minimum of three to four hours, or ideally, until the mousse is completely set and firm to the touch. This chilling time is crucial for the structural integrity and perfect texture of your mousse cakes. While the mousse cakes are setting, you can prepare the luscious chocolate topping.
In a microwave-safe mixing bowl, combine 1 1/2 cups of crushed semi-sweet chocolate (using crushed chocolate helps it melt more evenly and quickly) with 1/2 cup of softened unsalted butter. Microwave this mixture in 30-second intervals, stirring thoroughly after each interval, until the chocolate is fully melted and smooth. Be careful not to overheat the chocolate, as this can cause it to seize or burn. The butter will help create a glossy, pourable ganache. Once melted and perfectly smooth, set the chocolate topping aside at room temperature and allow it to cool slightly. It should still be pourable but not piping hot, as excessively hot topping can melt the mousse layer beneath.
Step 4: Finishing Touches and Serving
After your chocolate mousse cakes have chilled sufficiently and are firmly set, it’s time for the exciting final assembly. Carefully remove the chilled mousse cakes from the muffin pan. This can often be done by gently inverting the pan or using a small offset spatula to loosen the edges. Place each mini mousse cake onto a cooling rack, positioning parchment paper or a tray underneath to catch any excess chocolate drips. This ensures a clean finish and minimizes mess.
Now, take your cooled chocolate topping. If it has thickened too much, you can gently warm it for a few seconds in the microwave to restore its pourable consistency. Pour the melted chocolate topping generously over each mini mousse cake, ensuring an even and complete coating. The cooling rack allows the excess chocolate to drip away, leaving a perfectly glazed, smooth surface. For an extra touch of elegance and visual appeal, transfer any remaining chocolate topping into a piping bag. Drizzle this chocolate artfully on top of each cake. You can create intricate patterns, simple lines, or a decorative swirl – let your creativity guide you. This final flourish adds a professional and inviting look.
Allow the chocolate topping to set slightly at room temperature or for a few minutes in the refrigerator before serving. Once the topping has firmed up, your exquisite Mini Chocolate Mousse Cakes are ready to be presented and enjoyed! These decadent desserts are best served chilled, offering a delightful contrast between the firm cake base, the light mousse, and the rich, snappy chocolate shell. They are sure to be a sensational hit at any gathering or a wonderfully indulgent treat for yourself.
Pro Tips for Achieving Chocolate Mousse Cake Perfection:
- Quality Ingredients Matter: Always opt for high-quality cocoa powder and chocolate. The difference in flavor and richness will be noticeable in your final dessert.
- Temperature Control is Key: Ensure your egg is at room temperature for a better emulsification in the cake base. Conversely, always use very cold heavy cream for whipping to achieve maximum volume and stability for your mousse.
- Mindful Mixing: When preparing the cake batter, mix until just combined to avoid developing gluten, which can lead to a tough texture. For the mousse, gentle folding of the whipped cream is crucial to maintain its light and airy consistency.
- Patience with Gelatin: Allow gelatin to bloom fully and dissolve without overheating. Overheated gelatin loses its setting power, which can result in a runny mousse.
- Embrace Chilling Time: The recommended chilling time for the mousse is not optional. It is essential for the mousse to set properly, ensuring your mini cakes hold their shape perfectly and provide that delightful melt-in-your-mouth texture. Rushing this step can compromise the structural integrity.
- Uniform Portions: Use a small ice cream scoop or a consistent spoon measurement for both the cake batter and the mousse. This helps in creating mini cakes that are uniform in size and presentation.
- Smooth Release: When removing the set mousse cakes from the muffin pan, if they stick, you can briefly dip the bottom of the pan in warm water (being careful not to get water into the molds) or use a thin, flexible silicone spatula to gently pry them out.
Creative Variations & Elegant Serving Suggestions:
- Flavor Enhancements: Elevate the chocolate profile by adding a teaspoon of espresso powder to the cocoa mixture in the mousse for a deeper, more intense chocolate flavor. Alternatively, a hint of orange zest or a few drops of peppermint extract can introduce a refreshing twist.
- Chocolate Spectrum: Experiment with different types of chocolate for the topping. A darker chocolate (70% cocoa) will offer a more intense, less sweet glaze, while milk chocolate will create a sweeter, creamier finish.
- Textural Delights: For added texture, sprinkle finely chopped toasted nuts (like almonds, hazelnuts, or pecans) over the chocolate glaze before it sets, or mix them into the cake base batter. A layer of crushed cookies on the bottom of the mousse layer can also provide a pleasant crunch.
- Fruity Accents: Garnish your mini mousse cakes with fresh berries, such as raspberries, strawberries, or blueberries, for a burst of color and a tart counterpoint to the rich chocolate. A delicate dusting of cocoa powder or powdered sugar can also add visual appeal.
- Elegant Presentation: Serve these miniature marvels on individual dessert plates, perhaps accompanied by a small dollop of lightly sweetened whipped cream or a sprig of fresh mint. Their petite size makes them ideal for dessert buffets, afternoon tea parties, or as a sophisticated ending to any meal.
Storing Your Delicious Creations:
These exquisite Mini Chocolate Mousse Cakes are best enjoyed fresh, but they can be prepared in advance. Store them in an airtight container in the refrigerator for up to 3-4 days. To ensure the best texture and flavor, allow them to sit at room temperature for about 10-15 minutes before serving. This slight tempering allows the mousse to soften slightly and releases the full depth of their chocolate flavors.
With this comprehensive guide, you are now equipped to create truly spectacular Mini Chocolate Mousse Cakes that will undoubtedly impress everyone who tastes them. This recipe from Baking Cherry transforms simple ingredients into an extraordinary dessert, proving that gourmet treats are well within reach of any home baker. Perfect for celebrations, a special weeknight indulgence, or simply to refine your baking skills, these chocolate-covered mousse cakes are a testament to the timeless appeal of chocolate. So, gather your ingredients, follow these detailed steps, and prepare to delight your senses and those of your loved ones with these utterly divine, bite-sized wonders. Happy baking!