
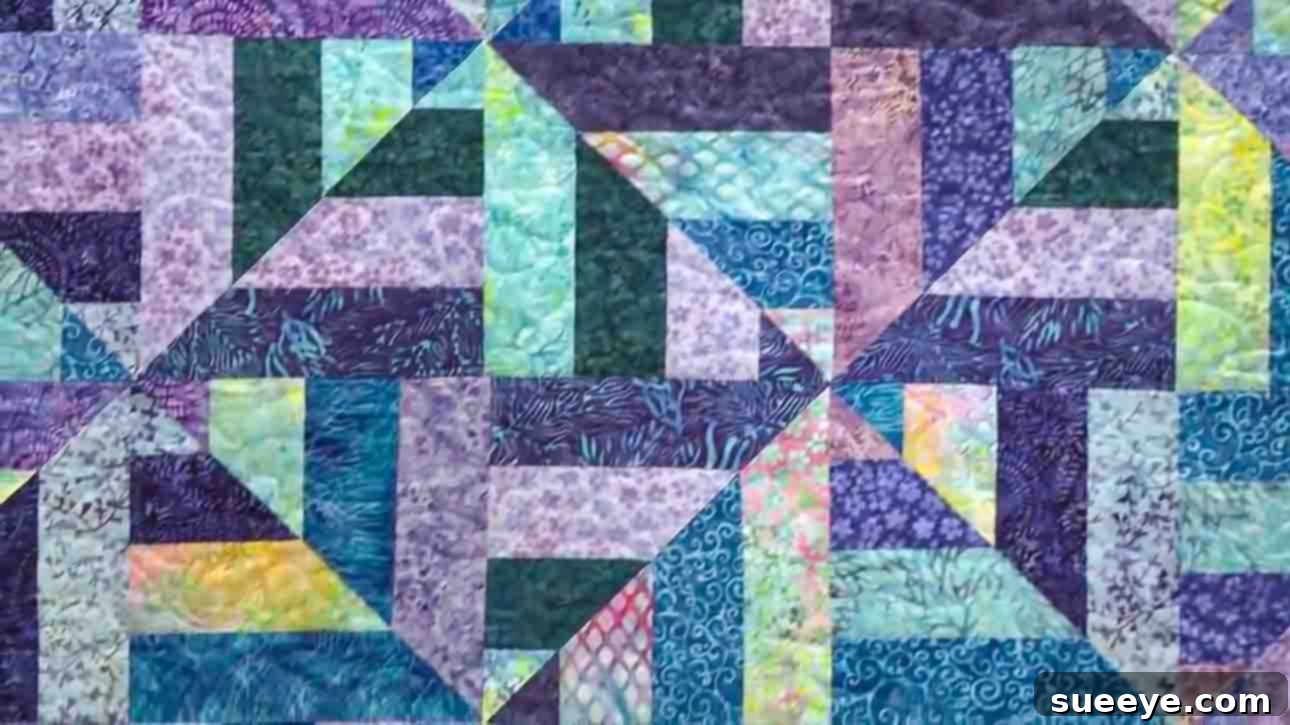
The Cool Water Quilt: An Easy Batik Quilt Pattern Perfect for Beginners
Are you searching for a quilting project that strikes the perfect balance between elegance and simplicity? Look no further! The enchanting Cool Water Quilt, brilliantly demonstrated by Fons & Porter’s Love of Quilting on YouTube, is an exceptional choice for quilters of all skill levels, especially those just beginning their creative journey. This stunning batik quilt promises a rewarding experience, guiding you through a captivating pattern that you’re sure to adore.
With its mesmerizing visual flow, reminiscent of calm, rippling water, this quilt is designed to be both achievable and breathtaking. The use of batik fabrics adds a unique depth and vibrancy, making each finished quilt a true work of art. Imagine transforming a collection of beautiful fabric strips into a functional and decorative masterpiece that you can cherish for years to come or gift to a loved one. This guide will walk you through the essential steps, ensuring a smooth and enjoyable quilting process. Prepare to embark on your next favorite weekend project by following our detailed instructions, complemented by the invaluable video tutorial.
Quilting is more than just sewing fabric; it’s a therapeutic craft that allows for personal expression and creativity. The Cool Water Quilt is an ideal starting point, offering a pattern that looks intricate but is surprisingly simple to construct. We’ll delve into material selection, precise cutting techniques, and effective assembly methods, all while maintaining a focus on clarity and ease for the novice quilter. Get ready to discover the joy of creating a beautiful quilt from start to finish!
Essential Materials for Your Cool Water Quilt
Before diving into the fun of cutting and sewing, gather your materials. Having everything prepared beforehand ensures a seamless and efficient quilting experience. For this project, a careful selection of fabrics and accurate cutting tools are key to achieving crisp, clean results.
- 40 pcs. 2 & 1/2″ Strips: These are often referred to as “jelly roll” strips. For the “Cool Water” effect, choosing a harmonious collection of batik fabrics with distinct light and dark variations will yield the most striking results. Batik fabrics are known for their vibrant colors and unique patterns, which add significant depth to the quilt.
- Rotary Cutter: An indispensable tool for quilters, a sharp rotary cutter ensures clean, precise cuts through multiple layers of fabric. Investing in a good quality cutter will make your work much easier and more accurate.
- Cutting Mat: Protect your work surface and prolong the life of your rotary cutter blades with a self-healing cutting mat. A large mat is recommended for handling longer fabric strips comfortably.
- Square Ruler (Quilting Ruler): A transparent acrylic quilting ruler with clear measurement markings is crucial for accurate measuring and cutting. A ruler that is at least 8.5 inches long will be particularly useful for this project’s specific cuts.
- Sewing Machine: A reliable sewing machine capable of a consistent 1/4-inch seam allowance.
- Thread: High-quality 100% cotton thread that complements your fabric colors.
- Iron and Ironing Board: Essential for pressing seams, which is critical for flat, accurate blocks.
- Pins or Fabric Clips: To hold fabric strips securely in place before sewing.
Choosing Your Fabrics: For the “Cool Water” effect, the contrast between your light and dark fabrics is paramount. Select twenty strips that read as “light” and twenty that read as “dark.” Batiks often have a subtle texture and color variation that can be beautiful in this pattern. Don’t be afraid to mix and match within your light and dark piles to create visual interest, ensuring they still maintain their distinct light or dark appearance.
Step-by-Step Directions for Crafting Your Cool Water Quilt
Accuracy is the cornerstone of successful quilting. Take your time with each step, paying close attention to measurements and seam allowances. A consistent 1/4-inch seam allowance is vital for blocks to fit together perfectly.
Step 1: Preparing Your Fabric Strips and Creating Strip Sets
Begin by organizing your 40 pre-cut 2 & 1/2-inch strips into two distinct piles: twenty strips designated as “light” fabrics and twenty designated as “dark” fabrics. This clear separation is crucial for achieving the visual depth and flowing design of the Cool Water Quilt.
Next, you will create what are known as “strip sets.” These are fundamental to efficient quilt block construction. Take two dark strips and two light strips. Arrange them alternately, for example, Dark, Light, Dark, Light. Carefully sew these four strips together along their long edges, using a precise 1/4-inch seam allowance. The goal here is uniformity, so maintaining a consistent seam width is vital for accurate block formation later on. After sewing each seam, press it towards the darker fabric. This technique, known as “pressing to the dark,” helps to prevent the lighter fabric from showing through, creating a cleaner, more professional finish.
Once you have created several of these four-strip sets, you will then stack them. Take two completed strip sets. Lay one strip set with its dark strips positioned at the top and light strips at the bottom. For the second strip set, align it with the first so that its dark strips are at the bottom and light strips are at the top. This opposing orientation is key to the design. Carefully align the top raw edges of both stacked strip sets, ensuring they are perfectly flush. This precise alignment is critical for accurate sub-cutting.
With your two strip sets meticulously stacked, use your rotary cutter and square ruler to cut 8 & 1/2-inch sections from these stacked sets. Work slowly and deliberately to ensure each section is perfectly square and exactly 8 & 1/2 inches. You may need to trim the initial raw edges of your strip sets to create a clean starting point for your cuts. This process allows you to cut multiple identical units simultaneously, boosting efficiency and consistency.
Step 2: Diagonal Cuts and Block Assembly
After successfully cutting your 8 & 1/2-inch rectangular sections, the next step transforms these units into dynamic components of your quilt blocks. Take one of these precisely cut 8 & 1/2-inch sections. Using a long quilting ruler, position it diagonally from one corner to the opposite corner. With your rotary cutter, make a single, clean cut along this diagonal line, effectively dividing your rectangular section into two mirrored triangular units. Repeat this process for all your 8 & 1/2-inch sections.
Now, take two of these newly cut triangular units. Place them right sides together, carefully aligning their raw edges. Sew them together along one of the diagonal edges, again maintaining that consistent 1/4-inch seam allowance. When you open them up, you’ll start to see a larger unit forming. The magic of the “Cool Water” design truly begins to unfold as these units are sewn. You will need to create four of these specific units to form one complete quilt block.
Once you have four of these pieced triangular units, lay them out according to the arrangement shown in the image below. This specific layout is crucial for creating the distinctive “Cool Water” flow. Experiment with rotating each unit until the desired pattern emerges. Once you are satisfied with the arrangement, join these four pieces together, sewing them into two rows, and then joining the two rows to complete your first full block. Press your seams carefully to ensure the block lies flat. You will need to make a total of twelve of these magnificent big blocks to complete the quilt top. Each block is a miniature masterpiece that contributes to the overall captivating design.
Assembling Your Quilt Top and Finishing Touches
Congratulations on completing your 12 unique Cool Water Quilt blocks! Now comes the exciting phase of bringing them all together to form the complete quilt top. This step involves careful arrangement and precise sewing to ensure your design flows beautifully.
Arranging Your Blocks: Lay out all twelve finished blocks on a large, flat surface—your floor or a design wall works perfectly. Take the time to arrange them in a way that maximizes the “cool water” effect. Rotate individual blocks as needed until the pattern creates a harmonious and visually appealing flow. This is a crucial creative step where you can truly personalize your quilt’s final look.
Joining Blocks into Rows: Once you are satisfied with your layout, begin sewing the blocks together into rows. For example, if you plan a 3×4 block layout, sew three blocks together to form one row. Repeat this process until you have four complete rows. Remember to maintain that consistent 1/4-inch seam allowance. Press seams carefully after each join; pressing them open or to one side (alternating directions for adjoining rows) can help reduce bulk and ensure your quilt top lies flat.
Joining Rows: With your rows assembled, it’s time to join them together to form the full quilt top. Pin your rows right sides together, carefully matching up the seams where the blocks meet. Precision here will prevent “point chopping” and ensure a smooth, professional finish. Sew your rows together, pressing the final seams. At this point, you’ll have a beautiful quilt top, showcasing your hard work and creativity.
Beyond the Quilt Top: Completing Your Project
While the video tutorial primarily focuses on creating the quilt top, a complete quilt involves a few more steps:
- Adding Borders (Optional): Many quilters choose to add one or more borders around their quilt top. Borders can frame your design, add extra size, and provide an opportunity to introduce complementary fabrics.
- The Quilt Sandwich: A quilt is typically made up of three layers: the quilt top you just created, a layer of batting (the fluffy middle layer that provides warmth and dimension), and a backing fabric. Carefully layer these three components, ensuring they are smooth and free of wrinkles.
- Quilting: This is the process of stitching through all three layers to hold them together and add texture. You can choose simple straight-line quilting, stitch-in-the-ditch (quilting along existing seam lines), or more intricate free-motion quilting. This is another opportunity to add your personal touch.
- Binding: The final step is to bind the edges of your quilt. This involves attaching strips of fabric around the perimeter of the quilt, encasing the raw edges and providing a neat, durable finish.
Essential Quilting Tips for Beginners
Starting a new craft can be daunting, but with a few foundational tips, your quilting journey can be incredibly rewarding. The Cool Water Quilt is an excellent project for honing these skills:
- Pre-wash Your Fabrics: While some quilters skip this step, pre-washing helps to prevent fabric shrinkage and dye bleeding after the quilt is finished. It also softens the fabric, making it easier to work with.
- Accurate Cutting is Key: In quilting, precision is everything. Take your time when cutting your strips and sections. Even a tiny deviation can compound over many pieces, leading to blocks that don’t fit together correctly. Use a sharp rotary blade and a non-slip ruler.
- Maintain a Consistent Seam Allowance: A perfect 1/4-inch seam allowance is the holy grail for quilters. Practice on scraps to ensure your machine is consistently sewing at this width. A quarter-inch foot for your sewing machine can be a great help.
- Press, Don’t Iron: When dealing with quilt blocks, “pressing” involves lifting and placing the iron down, rather than sliding it. This helps to prevent stretching and distortion of your fabric pieces. Always press seams toward the dark fabric or open, as instructed, to maintain block integrity.
- Take Breaks: Quilting, especially for a project like this that involves repetition, can be tiring. Step away from your machine if you feel frustrated or fatigued. A fresh perspective can work wonders.
- Embrace Imperfection: No quilt is absolutely perfect, especially your first few. Don’t let minor inconsistencies discourage you. Each stitch is a part of your learning journey and adds to the unique character of your handmade quilt.
- Watch the Video Tutorial: The visual guidance from Fons & Porter’s Love of Quilting is an invaluable resource. Watching the steps demonstrated can clarify any uncertainties you might have.
The Cool Water Quilt Tutorial
To see these instructions come to life and gain additional insights, be sure to watch the full tutorial from Fons & Porter’s Love of Quilting on YouTube. Their expert guidance will help you visualize each step and provide practical tips for a successful quilting experience.
The Cool Water Quilt is more than just a pattern; it’s an invitation to explore your creativity, develop new skills, and create something truly beautiful. Its beginner-friendly approach, combined with the stunning visual impact of batik fabrics, makes it an ideal project to undertake. Whether you’re making it for yourself or as a thoughtful gift, this quilt is sure to bring warmth and beauty into any home. Grab your fabrics, fire up your sewing machine, and prepare to be delighted by the captivating Cool Water Quilt!