
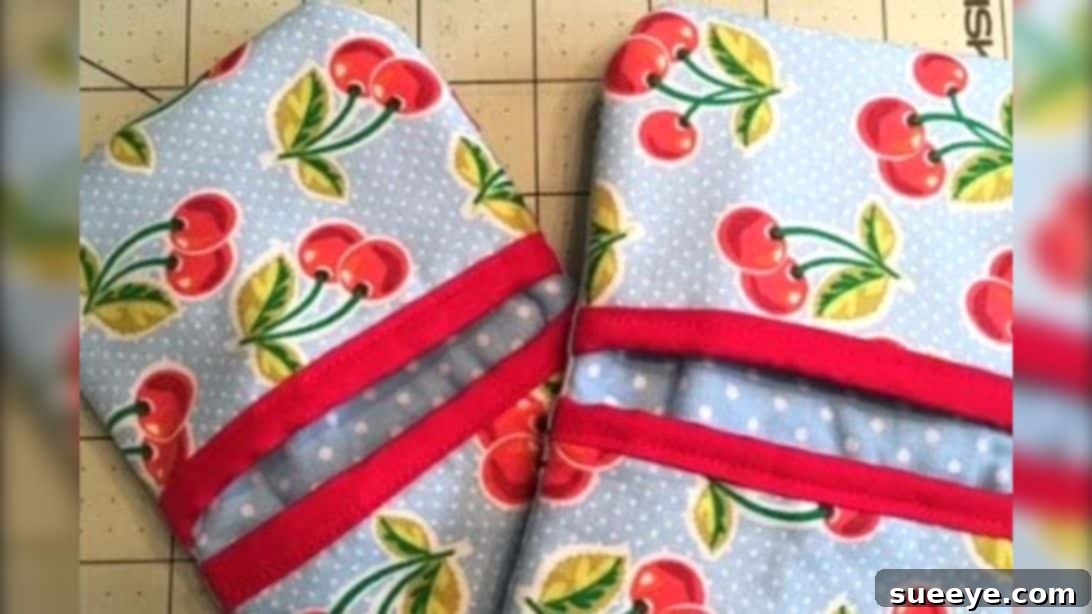
Craft Your Own Finger Pot Holder: The Ultimate Guide for Safe Canning and Kitchen Adventures
Handling hot items in the kitchen, especially during canning season or while baking, often calls for reliable protection. While traditional oven mitts and gloves serve their purpose, they can sometimes feel bulky and cumbersome, limiting dexterity. This is where the innovative finger pot holder by Craft Genie truly shines. Designed specifically for grasping hot canning jars and other small, high-temperature objects, this unique kitchen accessory offers a sleek, comfortable, and highly effective solution.
Forget fumbling with oversized gloves; this finger pot holder provides targeted protection for your fingertips, allowing for a secure grip and preventing accidental burns. It’s an exceptionally easy, quick, and fun sewing project that anyone can tackle at home, regardless of their sewing experience. Beyond its practicality for your own kitchen, these handmade pot holders make thoughtful and personal gifts for friends and family who love to cook, bake, or preserve food. Imagine the joy of gifting a stylish, handmade item that not only looks good but also keeps their fingers safe from scorching heat.
In this comprehensive guide, inspired by Craft Genie’s brilliant design, we’ll walk you through everything you need to know to create your own set of finger pot holders. From selecting the perfect fabrics and specialized batting to detailed, step-by-step sewing instructions, we’ve got you covered. Get ready to transform your kitchen safety and add a touch of handmade charm!
Why You Need a Finger Pot Holder: More Than Just a Pretty Accessory
The concept of a finger pot holder might seem simple, but its utility is profound. When you’re dealing with freshly sterilized canning jars straight from the canner, or transferring hot dishes from the microwave, precision and heat resistance are paramount. Traditional pot holders often require you to grab the entire item, which can be awkward for smaller containers or when you need a delicate touch. This design allows you to use your fingertips, offering superior control and dexterity.
- Enhanced Safety: Direct protection for the most vulnerable parts of your hand when gripping hot surfaces.
- Improved Grip: Allows for a firmer, more controlled hold on smooth glass jars or metal handles.
- Increased Dexterity: Unlike full gloves, your fingers remain mostly free for other tasks, improving efficiency.
- Compact and Convenient: Easy to store, grab, and use. No more wrestling with bulky mitts.
- Personalized Style: An opportunity to express your creativity through fabric choices and unique designs.
Whether you’re an avid canner, a passionate baker, or simply someone who appreciates functional and beautiful kitchen tools, this finger pot holder sewing project is a must-try. Let’s gather our materials and get started on this rewarding DIY journey!
Materials: Crafting Your Heat-Resistant Finger Pot Holder
Selecting the right materials is crucial for both the aesthetic appeal and the heat-protective functionality of your finger pot holder. For optimal safety and durability, we recommend using 100% cotton fabrics for their natural heat resistance and ease of sewing. The batting layers are especially important for insulation.
- 2 pieces of 7″ x 4-1/2″ rectangle fabric with slightly rounded corners (for the lining): This will form the inside layer of your main pot holder body. Choose a durable cotton fabric.
- 2 pieces of 7″ x 4-1/2″ rectangle printed fabric with slightly rounded corners (for the front): This is your main exterior fabric, where you can showcase your favorite prints or colors. Again, 100% cotton is ideal.
- 4 pieces 3-1/2″ x 4-1/2″ rectangle printed fabrics rounded on the bottoms (for the front pockets): These pieces will create the front finger pockets. Coordinate them with your main fabric or choose a complementary print for a layered look.
- 4 pieces of 3-1/2″ x 4-1/2″ rectangle fabrics rounded on the bottoms (for the pocket lining): These pieces form the inner lining of your finger pockets, making them comfortable and neat.
- Regular batting (2 pieces, same size of the pockets, approximately 3-1/2″ x 4-1/2″): This provides a basic layer of cushioning and insulation within the finger pockets. A high-loft cotton batting works well here.
- Batting with metal inside (Insul-Bright, 2 pieces, same size as the main backing, 7″ x 4-1/2″): This is the key heat-resistant component! Insul-Bright is a needle-punched insulated lining that contains metalized polyester film, effectively reflecting heat. Ensure you have two pieces for the main body of the pot holder where direct contact with heat is expected. Do *not* use this batting in a microwave.
- Small piece of bias tape (approx. 15-20 inches): Used for finishing the raw edges of your finger pockets, giving them a clean, professional look. Choose a color that complements your fabrics.
- Basic sewing supplies: Sewing machine, coordinating thread, pins or fabric clips, fabric scissors, rotary cutter and mat (optional but recommended), iron and ironing board, ruler, and a seam ripper (just in case!).
Pro Tip on Batting: For ultimate heat protection, always use Insul-Bright or similar heat-reflective batting when creating items intended for high heat. However, remember that materials like Insul-Bright contain metal, so they should never be used in a microwave oven.
Step-by-Step Instructions: Crafting Your Finger Pot Holder
Follow these detailed steps carefully to ensure a beautifully finished and highly functional finger pot holder. Precision in cutting and sewing will yield the best results.
Step 1: Preparing the Finger Pockets
This initial step focuses on constructing the individual finger pockets, which are critical for both comfort and heat protection. You will be working with four sets of pocket pieces.
- Take one piece of the 3-1/2″ x 4-1/2″ fabric designated for the pocket lining. Lay it flat on your work surface with the right side facing down.
- Next, place one piece of the regular batting directly on top of the lining fabric. Ensure all edges are aligned. This batting provides an initial layer of insulation.
- Finally, place one piece of the 3-1/2″ x 4-1/2″ printed fabric (the pocket topper) on top of the batting, with its right side facing up. You now have a three-layer “sandwich” for one pocket.
- Using pins or fabric clips, secure all three layers together.
- Take this secured pocket sandwich to your sewing machine. Baste all the way around the outer edge of the pocket using a very small seam allowance, approximately 1/8 inch. Basting simply holds the layers together temporarily and prevents shifting during subsequent steps.
- Once basted, it’s time to add the bias tape. Take your small piece of bias tape and sew it along the *top* edge of the basted pocket. Remember, the bottom edge is the rounded part; you want to finish the straight, square top end where your fingers will enter. Carefully fold the bias tape over the raw edge and stitch it down, encasing the raw edges for a clean, durable finish.
- Repeat this entire process for the remaining three sets of pocket pieces. At the end of this step, you should have four beautifully finished finger pockets, each with a neat top edge and a rounded bottom.
Step 2: Assembling the Main Pot Holder Body
Now that your finger pockets are ready, we will assemble the main body of the pot holder, incorporating the crucial heat-reflective batting. This step involves careful layering and pinning.
- Begin with one of the 7″ x 4-1/2″ printed fabric pieces (the front of your main pot holder). Lay it flat on your work surface with the right side facing up. This will be the visible exterior of your finished pot holder.
- Next, take two of your prepared finger pockets from Step 1. Place one pocket onto each end of the main front fabric, aligning their straight (finished) edges with the short 4-1/2″ ends of the main fabric. Ensure the right side of the pockets is facing down onto the right side of the main front fabric. The rounded bottoms of the pockets should be pointing towards the center of the main fabric. Pin these pockets securely in place along the edges where they meet the main fabric.
- Take one of the 7″ x 4-1/2″ lining fabrics. Lay this piece directly on top of the previous layers, with its right side facing down. Align all edges precisely. This will form the inner lining of your pot holder.
- Finally, place one piece of the 7″ x 4-1/2″ Insul-Bright (batting with metal inside) on top of all the layers. This layer should be the very top, acting as the outermost protective layer during sewing.
- Carefully pin all the layers together around the entire perimeter of the pot holder. Make sure your pins go through all layers to prevent any shifting during sewing. This layered sandwich now consists of: (Bottom) Main Printed Fabric (right side up) -> Two Pockets (right side down) -> Main Lining Fabric (right side down) -> Insul-Bright (Top).
Step 3: Sewing, Trimming, Turning, and Finishing
This final sewing stage brings all the components together, resulting in a neat and functional finger pot holder. Attention to detail here ensures a professional finish.
- With all layers securely pinned, take your pot holder sandwich to the sewing machine. Stitch around the entire perimeter using a 1/4 inch seam allowance. As you sew, be sure to leave an opening of about 2-3 inches along one of the longer straight sides. This opening is crucial for turning the pot holder right side out. Reinforce the stitches at the beginning and end of this opening with a backstitch.
- Once sewn, carefully trim off any excess batting and fabric, especially around the rounded corners. Clipping the curves (making small V-shaped cuts into the seam allowance without cutting through the stitching) will help the curves lay flat and smooth when turned right side out.
- Reach into the opening you left and carefully find the lining layer. Gently pull all the fabric through this opening, turning the entire pot holder right side out. Use a blunt tool (like a point turner or the dull end of a chopstick) to gently push out all the corners and curves, ensuring they are nicely shaped.
- At this point, you’ll notice the two finger pockets sewn onto the main pot holder. Take the bottom and top pocket, and carefully flip them inside out so that the printed fabric is now on the outside and the lining is inside. This creates the actual “pockets” for your fingers.
- Press the entire pot holder with an iron, paying special attention to the seams and the opening. The heat will help flatten the seams and give your pot holder a crisp, professional appearance.
- Now, locate the opening you used for turning. Carefully fold the raw edges of the opening inwards so they align with the sewn seam. Stitch this opening closed. You can do this by hand using an invisible ladder stitch for a seamless look, or by machine with a very close topstitch, which also adds a nice decorative element around the entire edge of the pot holder.
- Give your finished finger pot holder one last press, and trim any stray threads. Congratulations, you are done!
Tips for a Perfect Finger Pot Holder Every Time
Achieving a professional-looking and highly functional finger pot holder is easy with a few extra tips:
- Pre-Wash Your Fabrics: Always pre-wash and dry your cotton fabrics before cutting to prevent shrinkage after your project is complete.
- Accurate Cutting: Precision is key in sewing. Use a rotary cutter, mat, and ruler for perfectly straight and consistent fabric pieces. For rounded corners, a small template (like a coin or small cup) can help.
- Pressing is Your Friend: Press seams flat after each significant sewing step. This creates crisp, clean lines and helps your final product look much more professional.
- Thread Choice: Use a high-quality 100% cotton or polyester thread that matches or complements your fabric colors.
- Stitch Length: A standard stitch length (around 2.5mm) is generally good. For basting, a slightly longer stitch (3-4mm) can be used, as it’s temporary.
- Reinforce Corners: When sewing around the perimeter, consider slightly reinforcing the stitches at the rounded corners and where the pockets meet the main body for added durability.
- Loop for Hanging: If you wish, you can easily add a small fabric loop before the final sewing step (Step 3). Simply create a small loop from a scrap of fabric or ribbon, insert it folded into the seam allowance on one of the top corners before sewing the perimeter, ensuring the loop points inwards. It will then be securely stitched into the seam when you sew around the edge.
Beyond the Basics: Gifting, Variations & Care
Gifting Ideas
Handmade finger pot holders are gifts that combine thoughtfulness with practicality. Consider these ideas:
- Canning Starter Kit: Pair a set of pot holders with a canning cookbook, some fresh jars, and a few preserving spices.
- Baking Basket: Bundle them with baking mixes, cute cookie cutters, and a new kitchen towel.
- Housewarming Gift: A personalized set of pot holders in the recipient’s favorite colors or kitchen theme.
- Teacher Appreciation: A sweet and useful gift for teachers who might love to bake or cook.
Customization and Variations
Once you’ve mastered the basic design, feel free to get creative:
- Size Adjustments: Modify the dimensions to create larger or smaller pot holders for different hand sizes or specific types of dishes.
- Fabric Themes: Use holiday-themed fabrics for seasonal gifts, or match them to specific kitchen décor.
- Quilting: Before assembling, you can quilt the main fabric pieces to the Insul-Bright batting for added texture and insulation. Simple straight lines or a crosshatch pattern work beautifully.
- Embellishments: Add decorative topstitching, small embroidered designs, or even a personalized label.
Care and Maintenance
To ensure your finger pot holders last for years to come:
- Washing: Most cotton pot holders can be machine washed in cold water on a gentle cycle.
- Drying: Tumble dry on low or air dry to prevent excessive shrinkage and maintain fabric integrity.
- Ironing: If needed, iron on a cotton setting.
- IMPORTANT: Do NOT microwave pot holders made with Insul-Bright or other metalized batting. The metal can cause sparks and damage your microwave.
Frequently Asked Questions (FAQ)
Here are answers to some common questions about making and using finger pot holders:
- Q: Can I use regular cotton batting instead of Insul-Bright?
A: While you can use regular cotton batting for some insulation, it won’t offer the same level of heat reflection and protection as Insul-Bright. For handling very hot items like canning jars, Insul-Bright is highly recommended for safety. - Q: What kind of fabric is best for pot holders?
A: 100% cotton fabric is the best choice because it’s naturally heat-resistant and won’t melt under high temperatures, unlike synthetic fabrics. - Q: Is this project suitable for beginner sewers?
A: Absolutely! This project involves straight seams and simple layering, making it an excellent practice project for beginners to hone their basic sewing skills. - Q: How can I make my pot holders more durable?
A: Use strong, high-quality thread, reinforce stress points with backstitching, and consider adding a layer of quilting to your main fabric pieces before assembly. - Q: Can I make these in different sizes?
A: Yes! The beauty of DIY is customization. You can easily adjust the dimensions of the fabric pieces to make smaller or larger finger pot holders to suit your needs or different hand sizes.
Embrace the Joy of Handmade: Your New Favorite Kitchen Companion
There’s immense satisfaction in creating something useful and beautiful with your own hands. This finger pot holder project offers just that – a simple yet incredibly practical solution for everyday kitchen challenges. From safe canning to handling hot oven dishes, your handmade pot holder will quickly become an indispensable tool.
Inspired by the creativity of Craft Genie, this tutorial empowers you to add a personal touch to your kitchen essentials. So gather your fabrics, fire up your sewing machine, and embark on this delightful sewing adventure. You’ll not only protect your fingers but also enjoy the pride of using a unique, self-made item every day. Happy sewing, and happy cooking!
Finger Pot Holder