
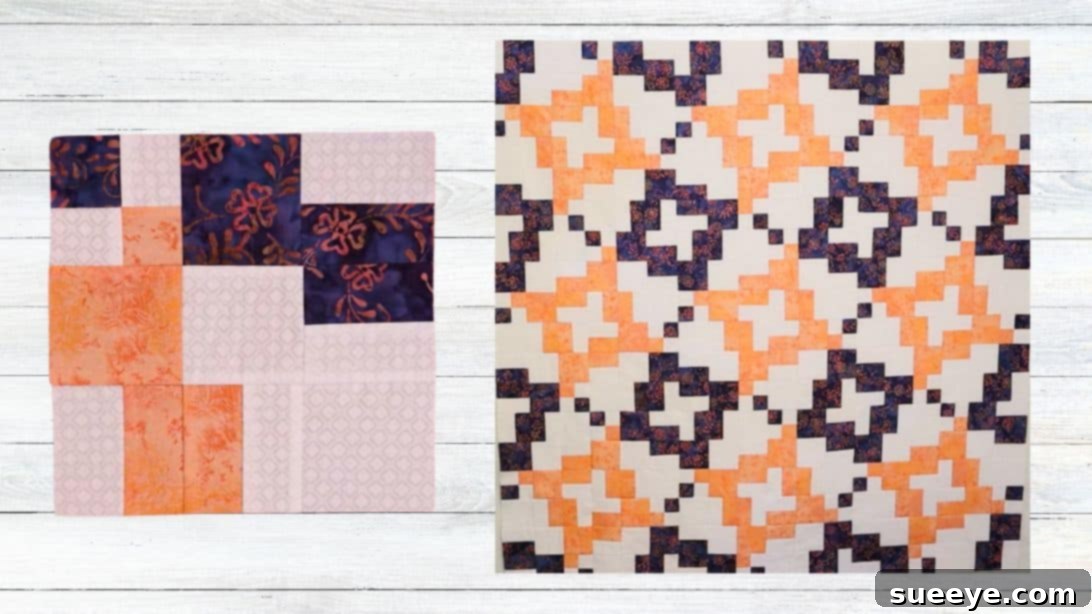
Embarking on a quilting adventure is a truly rewarding experience, transforming simple fabric pieces into intricate works of art. For those just beginning their journey, mastering fundamental blocks like the basic four-patch block is an essential first step. It lays the groundwork for understanding piecing, seam allowances, and pressing techniques. Once you’ve confidently navigated the basics and honed your skills on various traditional blocks, a whole new world of design awaits: the captivating realm of “disappearing” patterns.
Disappearing quilt patterns are a delightful illusion, offering the appearance of complex designs born from surprisingly simple cuts and rearrangements of initial blocks. They are a fantastic way to elevate your quilting repertoire without overwhelming difficulty. Among the many mesmerizing options available, the Disappearing 4-Patch Whirlygig Two-Step, expertly demonstrated by Brita Nelson, The Questioning Quilter, stands out as a personal favorite. This pattern instantly grabs attention with its dynamic, swirling aesthetic and hidden complexity, making it an ideal project for quilters looking to add a touch of magic to their creations.
RELATED: Discover the Disappearing Nine Square Quilt Block
The first glance at this pattern might suggest an advanced project, perhaps even a tedious one requiring hours of meticulous work. Don’t be deceived by its sophisticated appearance! This is where the true beauty of disappearing blocks shines. You’ll be genuinely surprised at how straightforward and quick it is to construct each block. With a little practice, you can complete a single Whirlygig block in just a matter of minutes, yet the final quilt top will undoubtedly leave everyone wondering if you spent countless hours on its intricate design. It’s the perfect blend of visual impact and approachable execution.
For those eager to explore more patterns that play with perception and simplicity, delve into these other engaging disappearing designs: Disappearing Pinwheel 5 Twist Quilt, Disappearing Four Patch Weave, and the Disappearing Hourglass 2 Quilt. Each offers its unique charm and a fresh perspective on transforming basic units into stunning quilt components.
Mastering the Disappearing 4-Patch Whirlygig Two-Step: A Comprehensive Guide
This tutorial will guide you through each step of creating the mesmerizing Disappearing 4-Patch Whirlygig Two-Step quilt block. We’ll break down the process, from selecting your fabrics to the final assembly, ensuring that even intermediate quilters can achieve beautiful results. Prepare to amaze yourself with how simple it is to craft such a visually compelling block!
Why Choose Disappearing Quilt Blocks?
Disappearing quilt blocks are a fantastic category within quilting because they offer the best of both worlds: they start with familiar, easy-to-construct basic units, but through strategic cuts and repositioning, they transform into something entirely new and often surprisingly complex-looking. This method builds confidence by beginning with what you know, then introduces an exciting element of design and discovery. The “whirlygig” effect in this particular pattern is a prime example of this magic, creating dynamic motion and depth from a simple four-patch foundation.
Easy Disappearing 4-Patch Whirlygig Two Step Materials
Precision in cutting is paramount for any quilting project, especially for disappearing blocks where the exactness of your initial cuts directly impacts the final design. For this delightful Whirlygig block, you will need the following:
- Four (4) pieces of 4 4/3-inch squares (which simplifies to 5 1/3-inch squares). You’ll need two (2) light-colored squares and two (2) dark-colored squares. The contrast between your light and dark fabrics is crucial for the “disappearing” effect to truly pop and define the whirlygig motion. Choose fabrics that complement each other but offer a clear distinction in value (lightness/darkness). Ensure your fabric is pre-washed and pressed flat for the most accurate cuts and seams.
- Standard quilting tools: a rotary cutter, a self-healing mat, a clear quilting ruler (at least 12.5 inches for this project), and a sewing machine equipped with a quarter-inch seam foot. Good quality thread that blends with your fabrics is also essential.
How to Make a Disappearing 4-Patch Whirlygig Two Step
Let’s dive into the step-by-step process of constructing this beautiful block. Remember, careful execution at each stage will lead to a stunning finished product.
Step 1: Construct Your Initial Four-Patch Block
Begin by taking your four 5 1/3-inch squares (two light and two dark). Arrange them into a classic four-patch layout, ensuring that the light and dark squares alternate, creating a checkerboard pattern. For instance, place a light square in the top-left, a dark square in the top-right, a dark square in the bottom-left, and a light square in the bottom-right. This alternating arrangement is key to the visual impact of the finished block.
Using a precise quarter-inch seam allowance, sew the squares together in two rows. First, sew the top-left square to the top-right square. Then, sew the bottom-left square to the bottom-right square. Press the seams in opposite directions to help them nest later (e.g., press the top row seam to the right, and the bottom row seam to the left). This will reduce bulk when you join the rows. Finally, sew the two rows together, carefully aligning your seams. Press this final seam open or to one side, whichever you prefer, to create a flat, neat block. Your completed four-patch block should now measure approximately 9 inches by 9 inches. This initial accuracy is foundational for the subsequent steps.
Step 2: The Transformative Cuts – Creating the “Disappearing” Effect
This is where the magic truly begins! With your 9″ x 9″ four-patch block laid flat and square, it’s time to make the strategic cuts that will transform it into the whirlygig design. You will cut 1 1/2 inches from the center seam in all four directions. Imagine your block has a central horizontal seam and a central vertical seam. You will make four cuts:
- Place your ruler 1 1/2 inches from the horizontal center seam, cutting parallel to it. Make this cut on both the top and bottom sides of the center seam.
- Similarly, place your ruler 1 1/2 inches from the vertical center seam, cutting parallel to it. Make this cut on both the left and right sides of the center seam.
Essentially, you are cutting a 3-inch wide cross through the center of your 9-inch block, leaving a smaller central square and several rectangular pieces. Be meticulous with your measurements and cuts to ensure all pieces are uniform. This step breaks the original four-patch into nine distinct pieces of varying sizes. This precise cutting is what creates the “disappearing” effect, as the original four-patch structure is now fragmented and ready for reassembly into an entirely new design.
Step 3: Reassembling the First Layer of the Whirlygig Units
Now that your original block is cut into nine pieces, it’s time to rearrange and sew them. The goal of this step is to create one “whirlygig unit.” You will take these nine pieces and reassemble them into a new four-patch layout. Refer to the photo provided by Brita Nelson for the exact arrangement. The key is to rotate the corner pieces and central rectangular pieces to create the distinctive swirling motion. Typically, the original corner pieces are rotated, and the long rectangular pieces are placed in the middle. Pay close attention to how the colors interact and form the new pattern.
Once you have the pieces arranged correctly on your design wall or flat surface, sew them together “like a four-patch” again. This means you will sew them into three rows of three pieces each. First, sew the three pieces in the top row together. Then, sew the three pieces in the middle row together, and finally, the three pieces in the bottom row together. Once you have your three completed rows, press the seams for each row, alternating the direction of pressing (e.g., press seams of row 1 to the right, row 2 to the left, row 3 to the right). This helps them interlock when joining the rows. Finally, sew the three rows together, carefully nesting the seams, to form one complete whirlygig unit. Press this entire unit flat and square it up if necessary. This finished unit is one of the four components you will need for your final Disappearing 4-Patch Whirlygig Two-Step block. Therefore, you will need to repeat Steps 1, 2, and 3 a total of four times to create four identical whirlygig units.
Step 4: Final Assembly of the Disappearing 4-Patch Whirlygig Two-Step Block
You should now have four identical whirlygig units created in Step 3. For the grand finale, you will arrange these four units to form the final star-shaped Disappearing 4-Patch Whirlygig Two-Step block. This is where the overall design truly emerges, showcasing the beautiful star within the swirling whirlygig elements.
Lay out your four units on your design wall or a flat surface. Arrange them just like in the photo below, rotating each unit until they align to form a cohesive star shape in the center. Experiment with the rotation until you achieve the desired star effect and the whirlygig motion flows harmoniously. This arrangement is crucial for the block’s visual appeal.
Once you are satisfied with the arrangement, sew these four larger units together just as you would a traditional four-patch. Sew the top-left unit to the top-right unit, and the bottom-left unit to the bottom-right unit. Press these seams. Then, sew the two resulting rows together, carefully matching your seams. Press the final block flat, and trim it to your desired finished size, ensuring it is perfectly square. Congratulations! You have now completed a stunning Disappearing 4-Patch Whirlygig Two-Step quilt block.
Tips for a Perfect Disappearing 4-Patch Whirlygig Block
- Accurate Seam Allowance: The infamous quarter-inch seam allowance is critical. Invest in a good quarter-inch presser foot for your sewing machine, or practice until your seams are consistently accurate. Even a slight deviation can throw off your block’s dimensions.
- Pressing is Key: Pressing after each seam is sewn is not just about flattening; it’s about setting the stitches and ensuring your block lies perfectly flat. Consider pressing seams open to reduce bulk, especially when many seams converge.
- Fabric Contrast: Don’t underestimate the power of contrast. The “disappearing” effect and the whirlygig motion rely heavily on the difference between your light and dark fabrics. High contrast will make your design pop.
- Rotary Cutter Blades: Ensure your rotary cutter blade is sharp. A dull blade can lead to frayed edges and inaccurate cuts, making precise piecing much harder.
- Design Wall: A design wall (even a simple flannel sheet tacked to a wall) allows you to visualize your block’s arrangement before sewing, helping you catch any rotational errors in Step 3 and 4.
- Chain Piecing: To save time, especially when creating your four identical units, use chain piecing. Sew multiple units sequentially without lifting your presser foot, cutting the threads between units at the end.
Creative Variations and Beyond
The Disappearing 4-Patch Whirlygig Two-Step is a versatile block that can inspire countless variations. Don’t be afraid to experiment!
- Color Play: Instead of just two colors, try using four different fabrics for your initial 4-patch. Observe how this changes the resulting whirlygig pattern and the central star.
- Scale It Up or Down: Adjust the initial size of your squares. Just remember that your cutting measurements (1 1/2 inches from the center) might need to be proportionally adjusted to maintain the integrity of the “disappearing” effect.
- Block Combinations: Once you’ve made several of these blocks, consider how they look when joined together. Do they form secondary patterns? What happens if you alternate them with solid blocks or other complementary designs?
- Project Ideas: Beyond a full-sized quilt, this block is perfect for smaller projects. Create stunning placemats, table runners, cushion covers, or even a unique tote bag.
The Disappearing 4-Patch Whirlygig Two-Step Unveiled
The Disappearing 4-Patch Whirlygig Two-Step quilt block is a testament to the endless possibilities within quilting. It masterfully combines the simplicity of a basic four-patch with the ingenuity of strategic cutting and rearrangement to produce a visually dynamic and intricate design. This pattern is not just about sewing; it’s about seeing the potential within simple shapes and transforming them into something extraordinary.
Brita Nelson’s brilliant method makes what looks like a complex design accessible to quilters of varying skill levels. The satisfaction of taking a few squares of fabric and, through a series of steps, creating a block that appears to be in motion is immensely gratifying. We hope this expanded guide empowers you to tackle this charming pattern with confidence and creativity. Happy quilting, and may your whirlygigs spin with delight!