
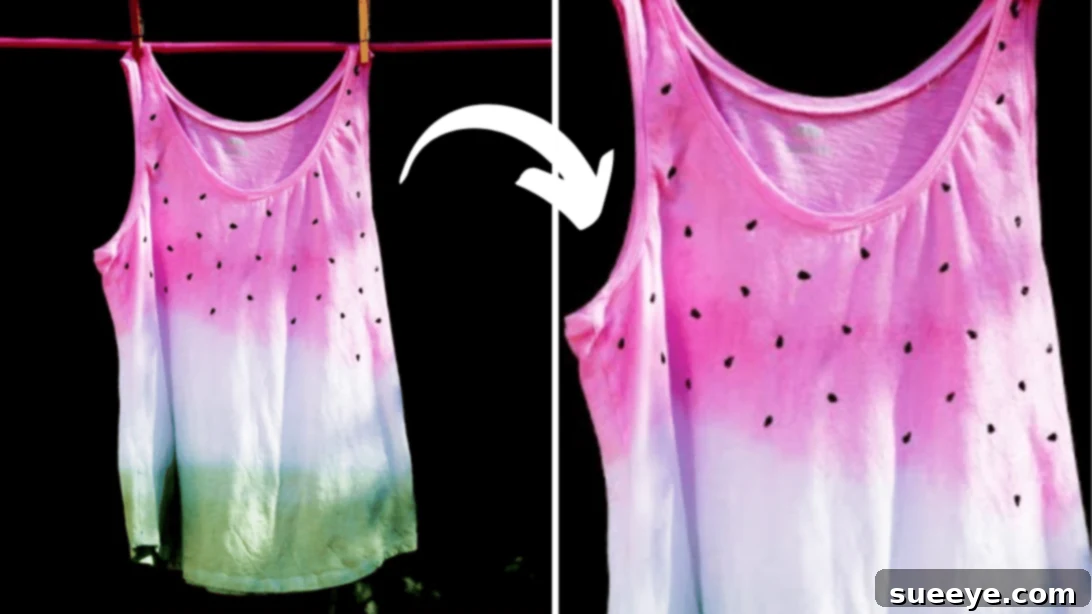
Do you have a forgotten plain white shirt lingering in the back of your closet? Perhaps a basic tee that’s lost its spark and is just begging for a creative upgrade? We’ve all been there! That’s exactly where I found myself recently, staring at a pristine white cotton shirt with no idea how to infuse it with personality. That is, until I stumbled upon an incredible video tutorial by HGTV Handmade on YouTube. Their brilliant idea offered the perfect solution for transforming a bland garment into a vibrant, eye-catching statement piece.
This tutorial isn’t just about dyeing; it’s about giving a new lease of life to something ordinary and making it truly unique. I immediately tried their dip-dyeing technique on my own shirt, and the results were absolutely adorable. What was once a forgotten item is now a cherished piece I can’t wait to wear repeatedly! The entire process of creating this custom dip-dyed watermelon shirt is surprisingly simple, making it an ideal project for beginners and seasoned crafters alike. I’m already envisioning applying this technique to other items in my wardrobe, experimenting with different colors, styles, and patterns to create an entire collection of personalized apparel.
If you’re eager to refresh your wardrobe with a splash of color and a touch of summer fun, then you’re in the right place. Dive into this comprehensive guide, inspired by the fantastic original tutorial, and learn how to craft your very own dip-dyed watermelon t-shirt. Get ready to unleash your creativity and turn that plain shirt into a wearable work of art!
RELATED: How to Dye Clothes in the Washing Machine for Vibrant Results
Why Choose a DIY Dip-Dyed Watermelon Shirt?
In a world of mass-produced fashion, creating something truly unique and personalized offers immense satisfaction. A DIY dip-dyed watermelon shirt isn’t just a craft project; it’s a fashion statement. It allows you to express your individual style, transform an old item into something new, and embrace sustainable practices by upcycling existing clothing. Beyond the aesthetic appeal, there’s a therapeutic joy in the creative process itself, from selecting your colors to watching the dye transform the fabric. This particular design, with its cheerful pink and green hues, evokes the playful spirit of summer, making it a perfect addition to your warm-weather wardrobe or a thoughtful, handmade gift.
Understanding the Magic of Dip Dyeing
Dip dyeing is a fantastic alternative to traditional tie-dyeing, offering a more controlled and often more subtle color application. Instead of tying and twisting, you simply dip sections of your fabric into dye baths, creating beautiful gradients or distinct color blocks. For our watermelon design, this technique is perfect for achieving the crisp separation between the fruit’s pink flesh and its green rind. It’s a method that yields professional-looking results with minimal effort, allowing the dye to soak into the fabric at varying depths, resulting in soft transitions or bold statements, depending on your technique.
Essential Materials for Your DIY Dip-Dyed Watermelon Shirt:
Before embarking on this colorful adventure, gather all your supplies. Having everything ready ensures a smooth and enjoyable crafting experience.
- Plastic Buckets (2 or 3): These are crucial for mixing your dye solutions and for rinsing. Using plastic ensures easy cleanup and prevents staining other containers.
- Warm Water: Essential for dissolving the dye powder and helping the fabric absorb the color effectively.
- Measuring Cups/Spoons: For precise dye measurement, ensuring consistent color strength.
- Salt or White Vinegar: Acts as a dye fixative, helping the color bond to the fabric and preventing it from washing out quickly.
- Rubber Gloves: Absolutely necessary to protect your hands from staining by the fabric dye.
- Fabric Dye (Pink and Green): Choose dyes specifically designed for natural fibers like cotton. Ensure you have enough for a vibrant color.
- White Cotton Shirt: A 100% cotton shirt will yield the best and most vibrant dyeing results. Pre-wash your shirt without fabric softener before starting.
- Black Fabric Paint: For detailing the watermelon seeds. Make sure it’s fabric-specific for durability.
- Toothpicks or Small Paintbrush: Ideal for applying the fabric paint for the seeds with precision.
- Optional: Plastic Sheeting or Newspaper: To protect your work surface from spills and stains.
- Optional: Clothesline or Drying Rack: For hanging your shirt to dry after each dyeing step.
How to Create a Stunning Dip-Dyed Watermelon Shirt: Step-by-Step Guide
Step 1: Preparing Your Dye Baths
Begin by setting up your dyeing station. Ensure you have a protected surface, whether it’s outdoors or covered with plastic sheeting. First, prepare your pink dye. In a dedicated measuring cup, use only about half a packet of your chosen pink fabric dye. The exact amount can vary based on the dye brand and desired color intensity, so always refer to the dye manufacturer’s instructions. To this, add approximately half a cup of salt or white vinegar. This critical ingredient acts as a fixative, helping the dye bond securely to the cotton fibers, ensuring a more vibrant and long-lasting color. Slowly pour in some warm water, mixing thoroughly until the dye powder is completely dissolved and no clumps remain. Once dissolved, transfer this concentrated mixture into one of your plastic buckets, then fill the bucket with additional warm water, stirring well to create an even dye bath. Repeat this entire process for the green dye in a separate bucket, ensuring you have two distinct dye baths ready for action.
Step 2: The First Dip – Pink Perfection
Don your rubber gloves to protect your hands. Before dipping into the pink dye, it’s essential to prepare your white cotton shirt. Submerge the top half of your shirt (the section intended to be pink) into a bucket of clean warm water. This pre-wetting allows the dye to absorb more evenly and prevents harsh, uneven color lines. Wring out the excess water thoroughly, ensuring the shirt is damp but not dripping. Now, carefully and slowly dip the damp shirt into the pink dye bath, immersing it to the desired “watermelon flesh” level. Swish the shirt gently in the dye for a few minutes to ensure uniform color saturation. The longer it stays submerged, the deeper the color will be. Once you’re happy with the pink hue, carefully lift the shirt, gently squeeze out any excess dye back into the bucket, and immediately rinse it under warm, running water. Continue rinsing until the water runs clear. You may need to change the rinse water once or twice to fully remove loose dye. Finally, wring out all excess water from the pink section and hang the shirt to dry completely. Patience is key here; ensure it’s bone-dry before proceeding to the next color.
Step 3: The Second Dip – Green Rind & Seed Details
With your pink section completely dry, it’s time to add the green “watermelon rind.” Prepare your green dye bath following the same method as in Step 1, if you haven’t already. Carefully dip the bottom section of your shirt (the part that will be the green rind) into the green dye bath. Ensure you align the green dip line just below the pink section, creating a distinct separation. Again, swish the shirt gently, allowing the dye to saturate the fabric. Once the desired green intensity is achieved, remove the shirt, squeeze out excess dye, and rinse it thoroughly under warm water until the water runs clear. Wring out all excess water and hang the shirt to dry completely for a second time. Once your shirt is fully dry and both colors are set, it’s time for the charming final touch: the seeds! Using your black fabric paint and a toothpick or small paintbrush, carefully paint small, irregular “watermelon seeds” onto the pink section of your shirt, as demonstrated in the original video tutorial. You can vary the size and placement for a natural look. Allow the fabric paint to dry completely according to the manufacturer’s instructions, which typically takes several hours. Once dry, your custom dip-dyed watermelon shirt is complete and ready to wear!
Pro Tips for a Perfect Dip-Dye
- Pre-Wash Your Shirt: Always wash your shirt before dyeing to remove any sizing or fabric finishes that might prevent the dye from adhering properly. Do not use fabric softener.
- Protect Your Workspace: Fabric dye can stain! Lay down plastic sheeting or several layers of newspaper to protect your surfaces. Wear old clothes you don’t mind getting stained.
- Test the Dye: If you have a scrap piece of similar fabric, it’s always a good idea to test your dye concentration and color before dipping your actual shirt.
- Even Water Absorption: Ensure your shirt is evenly damp before dipping into the dye. Dry spots will resist the dye, leading to uneven color.
- Controlling the Dip Line: For a crisp line between colors, dip slowly and steadily. For a more blended, ombre effect, you can gently feather the fabric in and out of the dye bath near the transition zone.
- Rinse, Rinse, Rinse: Thorough rinsing is crucial to prevent colors from bleeding onto each other and to remove excess dye that could rub off on other garments later.
- Caring for Your Dyed Shirt: After dyeing and drying, wash your shirt separately for the first few washes in cold water to ensure all unfixed dye is removed and to prevent it from staining other clothes.
- Ventilation: Work in a well-ventilated area, especially when mixing dyes, as some can have strong fumes.
Beyond Watermelon: Creative Variations and Customization
While the watermelon design is undeniably charming, the beauty of dip-dyeing lies in its versatility. Once you’ve mastered this technique, consider expanding your creative horizons:
- Other Fruits: Experiment with lemon (yellow and green), orange (orange and green), or even abstract fruit designs.
- Ombre Effects: Instead of distinct color blocks, create a seamless gradient by slowly dipping and lifting the fabric, allowing the dye to penetrate less as you lift.
- Rainbow Dip Dye: Use multiple colors dipped sequentially to create a stunning spectrum on your shirt.
- Geometric Patterns: Use masking tape or rubber bands to create resist areas before dipping, resulting in sharp geometric lines.
- Adding Embellishments: Once your shirt is fully dry, consider adding iron-on patches, embroidery, or fabric markers for even more personalization.
Creating your own dip-dyed watermelon shirt is a fantastically rewarding project that combines creativity, personal style, and a touch of sustainable fashion. It’s an easy way to transform an otherwise plain item into a cherished piece that truly reflects your personality. The satisfaction of wearing something you’ve made yourself is unmatched, and this vibrant shirt is sure to garner compliments and spark conversations.
We hope this detailed guide encourages you to pick up your dyes and embark on this fun DIY journey. Don’t forget to visit HGTV Handmade’s YouTube channel for the original video inspiration and to subscribe for more fantastic crafting ideas! Now go forth, get creative, and enjoy your spectacular new custom-made wardrobe addition!
Easy DIY Dip-Dyed Watermelon T-Shirt: Summary