
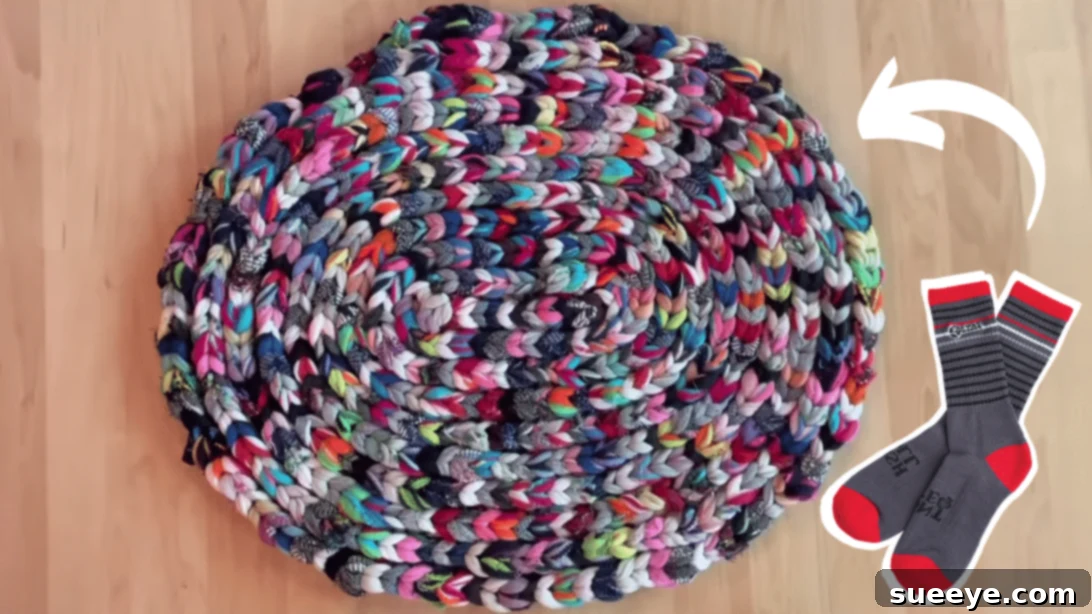
In a world increasingly focused on sustainability and personalized home decor, the art of DIY crafting offers a wonderful avenue for creativity and eco-consciousness. Many of us have embarked on various DIY projects, often repurposing discarded items into something beautiful and functional. From old shirts transformed into braided mats to scrap fabrics woven into unique tapestry, the possibilities are endless. This particular project, inspired by the innovative creators at Jody Journals on YouTube, takes the concept of upcycling to a delightful new level by utilizing an item commonly found in abundance in every household: old socks.
The idea of crafting a rag rug from socks might initially sound daunting, perhaps even a bit complicated, especially when picturing intricate braiding or complex weaving techniques. However, what makes this DIY sock rag rug project truly remarkable is its surprising simplicity and accessibility. Once you delve into the process through the clear guidance provided, you’ll discover that it’s an incredibly straightforward and enjoyable craft. This project is not only easy to master but also a fantastic way to give new life to worn-out socks, preventing them from ending up in landfills. It’s an ideal undertaking for crafters of all skill levels, promising a rewarding experience and a charming addition to your home decor.
The Allure of Upcycling: Why Choose Socks for Your Next Rug?
Beyond the simple joy of creating something with your own hands, upcycling old socks into a functional rag rug offers a multitude of benefits. Firstly, it’s an incredibly sustainable practice. Textile waste is a significant environmental concern, and repurposing items like socks directly contributes to reducing landfill burden. Instead of discarding mismatched or holey socks, you’re transforming them into a valuable household item.
Secondly, this project is remarkably cost-effective. You’re utilizing materials you already own, eliminating the need to purchase expensive fabrics or specialized tools. This makes it an excellent budget-friendly craft for anyone looking to add a personal touch to their living space without breaking the bank.
Furthermore, a handmade sock rag rug brings a unique sense of charm and personality to any room. Unlike mass-produced rugs, your creation will carry a story and reflect your individual style. You can experiment with various sock colors, patterns, and textures to design a rug that perfectly complements your home’s aesthetic, whether you prefer a vibrant, eclectic look or a more subtle, minimalist design. The tactile experience of crafting, from cutting the fabric strips to braiding them together, can also be incredibly meditative and satisfying, offering a wonderful way to unwind and engage in a productive hobby.
Essential Materials for Your DIY Sock Rag Rug
One of the beauties of this project lies in its minimal material requirements. You likely have most, if not all, of these items readily available in your home.
- Old socks (a substantial pile will be needed for a decent-sized rug)
- Sharp scissors (fabric scissors are highly recommended for clean cuts)
- Needle and strong thread (matching or contrasting, depending on your preference)
Choosing the Right Socks for Your Project
The type and quantity of socks you choose will significantly impact the final look and feel of your rag rug. Aim to gather a diverse collection of socks, considering their material, thickness, and color. Cotton socks are generally soft and easy to work with, making them ideal for a comfortable rug. Wool blends can add durability and texture, while synthetic socks might offer vibrant, lasting colors. Don’t be afraid to mix and match different patterns and hues; this can create a truly unique and visually interesting rug. Ensure the socks are clean and free from excessive wear or large holes that would compromise their integrity when cut into strips. For a medium-sized rug (e.g., 2ft x 3ft), you might need anywhere from 30 to 50 pairs of adult socks, depending on their size and thickness. It’s always better to have more than you think you’ll need.
Selecting Your Tools
A good pair of sharp fabric scissors will make the cutting process much smoother and more efficient, ensuring clean edges on your sock loops. While any strong needle and thread will work for assembling the rug, a tapestry needle or a needle with a larger eye can be helpful for pushing through thicker layers of braided sock material. Choose a thread color that either blends seamlessly with your socks or provides a subtle decorative accent, depending on your desired outcome.
Step-by-Step Guide: How to Transform Old Socks into a Beautiful Rag Rug
Prepping Your Materials: The Foundation of Your Rug
Step 1: Prepare Your Sock Loops
The first crucial step involves transforming your old socks into usable loops. Begin by laying each sock flat and cutting off the top ribbed cuff and the toe section. You’ll primarily be using the cylindrical middle part of the sock. Now, proceed to cut the remaining sock material into continuous round strips. Aim for a consistent width, typically between 1 to 2 inches (2.5 to 5 cm), depending on how thick you want your rug to be. Consistency in strip width is important for an even and aesthetically pleasing rug. Once cut, gently stretch out each loop. This action helps the fabric curl inward, creating a soft, yarn-like strip that’s easier to work with and helps hide raw edges. Continue this process until you have accumulated a substantial pile of these loop bands. Having a large supply ready before you start braiding will ensure a smooth and uninterrupted crafting session.
Once you have your pile of loops, it’s time to create the initial interlocking structure. Take one loop and wrap it around your forefinger. Twist this loop once, then wrap it around your index finger. Twist the loop again, and wrap it back onto your forefinger. Essentially, you’re creating two interlocking loops on your fingers. Now, take a second loop and place it over these two loops on your fingers, following the same twisting and wrapping motion. This forms the base for your braiding pattern.
Mastering the Braiding Technique: Weaving Your Rug
Step 2: Begin the Interlocking Process
With the initial loops set up on your fingers, you’re ready to start the unique braiding method. Carefully pull the bottom part of the original loops over both of the top loops on your fingers and push them down towards your palm. This secures the first segment of your braid. Now, take another loop band and create two “O” shapes with it, as demonstrated in the video tutorial by Jody Journals. These two “O”s will be placed over your forefinger and index finger. Once these are in place, gently pull all three pieces underneath (the loops you just secured and the two new “O”s) over the top loops, effectively securing the new band into the braid. Repeat this motion for the other side of your fingers, ensuring a balanced and symmetrical weave. This step forms the core chain of your rug, and maintaining consistent tension is key to a tidy appearance.
Step 3: Continue Braiding and Shaping Your Rug
To continue the braid, pull the bottom loop from one side over the top loops and down. Then, take a new sock loop, add it to your fingers by creating the “O” shapes as before, and repeat the pulling-over motion. Continue this rhythm of adding new loops and pulling the bottom loop over the top, alternating sides as you go. This continuous process will gradually extend your braid. As you progress, gently pull the finished braid downwards, making space for more loops and keeping the tension even. Once your braid reaches your desired length, it’s time to shape your rug. You can coil the braid into a tight spiral to create a round or oval rug, or arrange it in parallel rows for a rectangular shape. Once you have the desired shape, carefully sew the edges of the braided strips together using your needle and strong thread. Use small, tight stitches to ensure the rug holds its shape securely and can withstand daily use. Reinforce the areas where strips connect for added durability. This final sewing step is crucial for the longevity and structural integrity of your handmade rug.
Tips for a Perfect DIY Sock Rag Rug
- Color Play: Don’t underestimate the power of color. Group socks by similar shades for a monochromatic look, or embrace a vibrant mix for a bohemian, patchwork effect. You can also strategically place specific colored socks to create stripes or patterns within your rug.
- Consistency is Key: Strive for uniform width when cutting your sock strips and maintain consistent tension while braiding. This attention to detail will result in a more even and professional-looking rug.
- Practice Makes Perfect: If the initial braiding feels awkward, don’t get discouraged! Practice with a few loops until you get a feel for the rhythm and technique. It quickly becomes intuitive.
- Patience and Enjoyment: Crafting should be a relaxing and enjoyable process. Take your time, listen to music, or watch your favorite show while you braid. The satisfaction of seeing your rug come to life is part of the reward.
- Safety First: Always use sharp scissors carefully, and keep them away from children when not in use.
Caring for Your Handmade Sock Rug
Once your beautiful sock rag rug is complete, proper care will ensure its longevity. Most sock rag rugs can be machine washed on a gentle cycle with cold water, especially if made from cotton or durable synthetic blends. It’s advisable to place the rug in a large mesh laundry bag to prevent any stray loops from snagging or unraveling during the wash. After washing, air dry the rug flat or hang it to dry. Avoid putting it in a tumble dryer on high heat, as this can potentially shrink the fabric or damage the stitching. Regular vacuuming or shaking the rug outdoors will help remove dust and debris, keeping it fresh and clean.
Beyond the Basics: Creative Variations and Embellishments
While the basic instructions will guide you to a charming rug, don’t hesitate to explore creative variations to make your project truly unique. Consider making rugs in different shapes and sizes – from small coasters or placemats to large area rugs. You can also experiment with combining sock loops with other recycled fabric strips, like old t-shirts or denim, to introduce varied textures and colors. For added safety and stability, consider sewing a non-slip backing fabric to the underside of your rug, especially if it will be placed on slippery floors. You can also add decorative fringes around the perimeter or incorporate different colored stitching for a contrasting effect, further personalizing your creation.
The Sustainable Impact of Crafting with Recycled Socks
This DIY sock rag rug project is more than just a craft; it’s a small but meaningful step towards a more sustainable lifestyle. The fashion industry is a major contributor to global waste, and textiles often end up in landfills where they can take hundreds of years to decompose, releasing harmful greenhouse gases. By diverting old socks from the trash, you’re actively participating in the circular economy, giving materials a second life and reducing your environmental footprint. Each rug you create is a testament to mindful consumption and the power of repurposing. It’s a tangible way to contribute to a greener planet while simultaneously enhancing your home with handmade warmth and character.
Your Next Creative Project Awaits!
The journey from a pile of mismatched socks to a charming, unique rag rug is incredibly satisfying. This project not only helps you declutter your drawer of lonely socks but also provides an opportunity for creative expression and sustainable living. The simplicity of the technique, combined with the rewarding outcome, makes it an ideal DIY endeavor for anyone looking to add a touch of handmade warmth to their home. So, gather those forgotten socks, unleash your inner crafter, and embark on this delightful upcycling adventure. The result will be a cozy, personalized rug that you’ll be proud to display, knowing you’ve given old materials a wonderful new purpose.
*All these amazing images are thanks to Jody Journals via YouTube. Do visit her channel for more inspiring DIY videos like this!