
Are you experiencing the frustrating and often uncomfortable situation of a ring stuck on your finger? It’s a surprisingly common predicament that can cause worry, discomfort, and even pain if not addressed properly. Whether it’s due to swelling, a change in finger size, or simply having worn the ring for too long, a trapped ring can feel incredibly persistent. Before you panic or consider drastic measures, know that there are several gentle yet highly effective methods you can try right from the comfort of your home. These techniques are designed to help you safely remove the ring without causing harm to your finger or the jewelry.
This comprehensive guide will walk you through three proven strategies for dislodging a stubborn ring. We’ll explore the science behind each method, provide clear, step-by-step instructions, and offer essential tips for success. These brilliant insights, inspired by practical demonstrations like those found on channels such as Andrea Jean Cleaning on YouTube, are designed to make the process as straightforward and stress-free as possible. Let’s delve into these ingenious solutions and reclaim your comfort.
The Ultimate Guide to Safely Removing a Stuck Ring from Your Finger
#1 The Lubrication Method: Petroleum Jelly & Other Smooth Solutions
One of the most straightforward and often effective ways to remove a stuck ring is by using a lubricant. The principle is simple: by reducing the friction between your skin and the ring, you create a slippery surface that allows the ring to slide off more easily. Petroleum jelly is an excellent choice due to its consistency and widespread availability, but many other household items can serve the same purpose.
Understanding the Principle: How Lubricants Work
When a ring gets stuck, it’s often because your finger has slightly swollen, or the skin beneath the ring has become dry and resistant. Applying a lubricant creates a thin, slick layer that minimizes the direct contact and friction between the metal and your skin. This allows for smoother movement, making it possible to gently slide the ring over knuckles or swollen areas that would otherwise impede its removal.
Step-by-Step Guide: Using Petroleum Jelly
Follow these steps carefully to ensure a smooth removal process:
- Gather Your Materials: You’ll need a small amount of petroleum jelly (Vaseline is a common brand) and a cotton bud or your fingertip for application.
- Apply the Lubricant: Take a small dollop of petroleum jelly and generously apply it to your finger. Make sure to cover the entire area around the ring, including the skin directly beneath the ring, on both sides, and especially around the knuckle where the ring is most likely to get caught. A cotton bud can help you work the jelly under the ring if it’s very tight.
- Gently Twist and Wiggle: With your finger well-lubricated, begin to gently twist the ring back and forth. Avoid pulling directly, as this can cause more swelling. Instead, apply steady, firm pressure in a circular motion, trying to inch the ring forward. As you twist, you might feel the ring gradually loosening.
- Continue Moving: Keep applying gentle twisting and wiggling motions, gradually working the ring over your knuckle. If it starts to feel dry again, reapply more petroleum jelly. Patience is crucial here; do not force the ring, as this could irritate your skin or cause further swelling.
- Final Slide: Once the ring is mostly over your knuckle, it should slide off with minimal effort.
Alternative Lubricants & Tips for Success
If petroleum jelly isn’t handy, don’t worry! Many other common household products can be used as lubricants:
- Dishwashing Soap: A classic for a reason. Lather your finger with soap and water, then try to slide the ring off.
- Hand Lotion or Cream: Any moisturizing lotion can create a slick surface.
- Cooking Oil: Olive oil, vegetable oil, or coconut oil can also work effectively.
- Hair Conditioner: Similar to soap, it provides excellent slipperiness.
Key Tips:
- Be Generous: Don’t be shy with the lubricant. The more slippery your finger, the better.
- Work Slowly: Aggressive pulling or twisting can exacerbate swelling. Be gentle and persistent.
- Elevate Your Hand: Before applying the lubricant, try holding your hand above your head for a few minutes. This can help reduce swelling slightly, making the lubrication more effective.
When to Use This Method
The lubrication method is ideal for rings that are mildly stuck, especially when the main issue seems to be a slight increase in finger size or dryness of the skin. It’s a great first line of defense before trying more involved techniques.
#2 The Compression Method: Dental Floss Technique
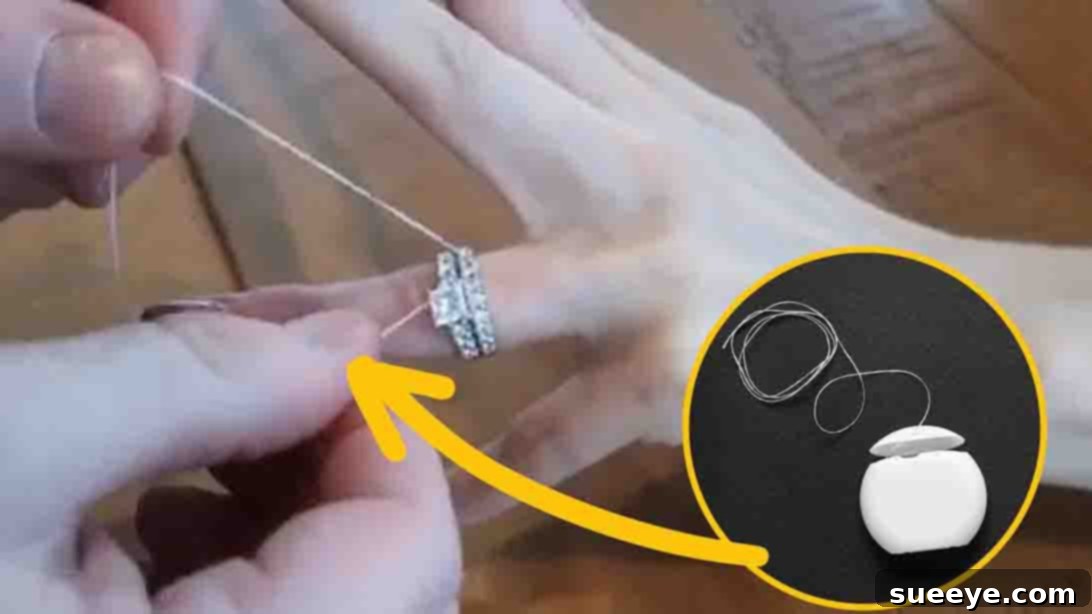
For rings that are more stubbornly stuck, particularly when swelling around the knuckle is the primary obstacle, the dental floss method can be incredibly effective. This ingenious technique works by temporarily compressing the soft tissue of your finger, allowing the ring to pass over the constricted area.
How It Works: The Magic of Compression
The dental floss method creates a controlled, temporary compression around your finger, effectively shrinking its circumference just enough to allow the ring to move past the knuckle. By wrapping floss tightly but gently from the tip of your finger down past the ring, you can reduce the volume of the swollen area. Then, by unwrapping the floss from the base of the finger, the ring is “pushed” along with the unwrapping motion.
Detailed Floss Application Steps
This method requires a bit more precision, so follow these steps carefully:
- Prepare Your Floss: Cut a piece of dental floss, about 12-18 inches long. Waxed floss is often easier to work with as it slides better and is less likely to break.
- Insert the Floss Under the Ring: Carefully thread one end of the dental floss under the stuck ring, pushing it towards your palm. You can use a needle, a toothpick, or even another piece of floss to help guide it through if the space is very tight. Leave a short tail of floss (about 2-3 inches) pointing towards your palm.
- Wrap Your Finger: Starting from the ring and moving upwards towards your fingertip, tightly (but not painfully!) wrap the longer end of the floss around your finger. Each wrap should be snug and close to the previous one, creating a continuous bandage of floss that compresses the tissue. Wrap until you’ve gone past your knuckle, or until the area where the ring is stuck is completely covered and compressed.
- Begin Unwrapping: Now, take the short tail of floss (the end that was left pointing towards your palm) and gently start to unwrap it. As you unwrap the floss from the base of your finger, the ring should slowly move outwards, gradually sliding over the compressed area.
- Continue Until Removal: Keep unwrapping the floss while simultaneously encouraging the ring to move with it. If it gets stuck again, pause, re-wrap a small section if necessary, and continue. The ring should eventually slide completely off your finger.
Important Considerations
- Floss Type: Waxed dental floss is generally preferred as it’s stronger and slides more easily than unwaxed floss.
- Tightness: Wrap the floss firmly enough to compress the finger, but never so tightly that it causes severe pain, discoloration, or numbness. If you experience these symptoms, stop immediately and loosen the floss.
- Patience and Breaks: This method can take a few minutes. If your finger starts to feel uncomfortable, unwrap the floss, let your finger rest and recover for a few minutes, and then try again.
- Lubrication Boost: You can apply a small amount of lubricant (like petroleum jelly or soap) to the wrapped floss or your finger before you start unwrapping to aid the process further.
Best Situations for Floss Removal
The dental floss method is particularly effective when the ring is stuck due to moderate swelling around the knuckle. It’s a clever way to manipulate the soft tissues of your finger to overcome the physical barrier created by the ring.
#3 Swelling Reduction with R.I.C.E. (Rest, Ice, Compression, Elevation)
When finger swelling is significant, addressing the swelling directly can be the most effective approach. The R.I.C.E. method, commonly used for minor injuries, can also be applied to reduce finger swelling, thereby making ring removal easier. R.I.C.E. stands for Rest, Ice, Compression, and Elevation.
The Science Behind R.I.C.E.: How It Reduces Swelling
Swelling is often caused by an accumulation of fluid in the tissues. The R.I.C.E. protocol works by:
- Rest: Preventing further irritation or injury.
- Ice: Causing vasoconstriction (narrowing of blood vessels), which reduces blood flow to the area and subsequently lessens fluid accumulation. It also provides a numbing effect, reducing discomfort.
- Compression: Physically reducing the space available for fluid to accumulate and encouraging fluid to drain away.
- Elevation: Using gravity to help drain fluid away from the affected area, back towards the heart.
Applying the R.I.C.E. Protocol
Here’s how to implement each component to facilitate ring removal:
- Rest Your Hand: First and foremost, avoid trying to force the ring off or repeatedly pulling at it, as this can worsen swelling. Keep your hand still and relax.
-
Apply Ice: Place an ice pack or a bag of frozen vegetables (wrapped in a thin cloth to protect your skin) directly onto your ring finger for about 10-15 minutes. The cold will help reduce inflammation and shrink the size of your finger.
- Caution: Never apply ice directly to the skin without a barrier, as it can cause frostbite. Do not leave ice on for too long.
-
Create Compression: Once you’ve iced your finger, gently wrap a bandage (like an elastic bandage or even a wide band-aid) around your finger, starting from the tip and moving downwards towards the ring. This step is similar to the dental floss method but uses a broader surface for more general compression. The aim is to gently squeeze out some of the excess fluid, reducing the finger’s overall diameter.
- Ensure the compression is firm but not so tight that it causes pain, tingling, or discoloration. You should still be able to feel a pulse in your fingertip.
- Elevate Your Hand: While resting and optionally with the compression applied, raise your hand above the level of your heart. You can do this by propping it up on pillows while lying down, or holding it up while sitting. Gravity will assist in draining fluids away from your finger, further reducing swelling. Maintain elevation for at least 5-10 minutes, or longer if needed.
After applying the full R.I.C.E. protocol for about 15-20 minutes, try to gently remove the ring using one of the lubrication methods described earlier. The combination of reduced swelling and a slick surface should significantly improve your chances of success.
When R.I.C.E. is Your Best Bet
The R.I.C.E. method is particularly useful when you notice significant swelling, perhaps after a long flight, waking up in the morning, or after some physical activity. It’s also a good preliminary step before attempting other methods if swelling is the primary concern.
General Advice and When to Seek Professional Help
While these home remedies are often highly effective, it’s crucial to approach the situation with caution and awareness. Sometimes, a stuck ring can indicate a more serious underlying issue, or the ring might simply be too tight to remove safely at home.
Prevention is Key
To avoid future incidents of stuck rings:
- Proper Sizing: Ensure your rings are properly sized. Your finger size can fluctuate with temperature, hydration, and time of day. Get sized during moderate conditions.
- Remove Before Swelling Activities: Take off rings before flying, exercising, going to bed (if you tend to swell overnight), or during pregnancy.
- Hydration and Diet: Maintaining proper hydration and a balanced diet can help reduce general body swelling.
- Regular Cleaning: Keep your rings clean to prevent grime buildup that might contribute to them sticking.
What NOT to Do
In your attempts to remove a stuck ring, avoid these actions:
- Forcing or Jerking: Aggressive pulling or twisting can damage your skin, cause further swelling, or even injure your finger.
- Using Harsh Chemicals: Do not use industrial lubricants or any chemical not intended for skin contact, as they can cause irritation or burns.
- Cutting the Ring Yourself: Unless you are a trained professional with the right tools, attempting to cut the ring can cause severe injury to your finger and damage the jewelry beyond repair.
Recognizing When to Get Medical Assistance
It’s vital to know when to stop trying home remedies and seek professional help. Consult a medical professional (emergency room or urgent care) if you experience any of the following:
- Severe Pain: If your finger is throbbing intensely or the pain is unbearable.
- Discoloration: If your finger turns blue, purple, or unusually pale, indicating a lack of blood flow.
- Numbness or Tingling: These are signs of nerve compression.
- Open Wounds or Bleeding: If your attempts have caused skin breakage.
- Persistent Swelling: If swelling doesn’t subside or worsens after trying the R.I.C.E. method and other home remedies.
- Signs of Infection: Redness, warmth, pus, or fever.
- No Success After Multiple Attempts: If you’ve tried all methods carefully and the ring remains stuck, it’s safer to get professional help.
In a medical setting, professionals have specialized ring cutters that can remove the ring quickly and safely with minimal discomfort or further injury.
Consulting a Jeweler
If the ring is not causing immediate medical distress but simply won’t budge, a professional jeweler can often help. Many jewelers have experience and tools for removing stuck rings, and they can also assess if the ring needs to be cut and subsequently repaired or resized. This is often a better option than a medical emergency room if there are no signs of injury or circulatory issues.
Dealing with a stuck ring can be a stressful experience, but with these proven methods, you’re well-equipped to handle the situation safely and effectively. Remember to remain calm, be gentle, and always prioritize the health of your finger. Whether it’s through lubrication, compression, or swelling reduction, one of these techniques should help you successfully remove your ring. If all else fails or if you notice any alarming symptoms, do not hesitate to seek professional medical or jewelry assistance. Your safety and comfort are paramount.